Disclaimer: This post has been translated to English using a machine translation model. Please, let me know if you find any mistakes.
In this post, we will explore what the RAG (Retrieval Augmented Generation) technique entails and how it can be implemented in a language model. Additionally, we will do this using the most basic RAG architecture, called naive RAG.
To make it free, instead of using an OpenAI account (as you'll see in most tutorials), we're going to use the API inference from Hugging Face, which has a free tier of 1000 requests per day, which is more than enough for this post.
Setting up the API Inference of Hugging Face
To be able to use the API Inference from HuggingFace, the first thing you need is to have an account on HuggingFace. Once you have one, you need to go to Access tokens in your profile settings and generate a new token.
We need to give it a name. In my case, I will name it rag-fundamentals and enable the permission Make calls to serverless Inference API. It will create a token that we will have to copy.
To manage the token, we are going to create a file in the same path where we are working called .env and we are going to put the token we have copied into the file in the following way:
RAG_FUNDAMENTALS_ADVANCE_TECHNIQUES_TOKEN="hf_...."Now, to obtain the token, we need to have dotenv installed, which we install through
pip install python-dotenvAnd we run the following
import osimport dotenvdotenv.load_dotenv()RAG_FUNDAMENTALS_ADVANCE_TECHNIQUES_TOKEN = os.getenv("RAG_FUNDAMENTALS_ADVANCE_TECHNIQUES_TOKEN")
Now that we have a token, we create a client. For this, we need to have the huggingface_hub library installed. We install it using conda or pip.
conda install -c conda-forge huggingface_hubo
pip install --upgrade huggingface_hubNow we have to choose which model we are going to use. You can see the available models on the Supported models page of the Hugging Face API Inference documentation.
As of the time of writing this post, the best available is Qwen2.5-72B-Instruct, so we will use that model.
MODEL = "Qwen/Qwen2.5-72B-Instruct"
Now we can create the client
from huggingface_hub import InferenceClientclient = InferenceClient(api_key=RAG_FUNDAMENTALS_ADVANCE_TECHNIQUES_TOKEN, model=MODEL)client
<InferenceClient(model='Qwen/Qwen2.5-72B-Instruct', timeout=None)>
We run a test to see if it works
message = [{ "role": "user", "content": "Hola, qué tal?" }]stream = client.chat.completions.create(messages=message,temperature=0.5,max_tokens=1024,top_p=0.7,stream=False)response = stream.choices[0].message.contentprint(response)
¡Hola! Estoy bien, gracias por preguntar. ¿Cómo estás tú? ¿En qué puedo ayudarte hoy?
What is RAG?
RAG stands for Retrieval Augmented Generation, it is a technique created to obtain information from documents. Although LLMs can be very powerful and have a lot of knowledge, they will never be able to answer about private documents, such as reports from your company, internal documentation, etc. That's why RAG was created, to be able to use these LLMs on that private documentation.
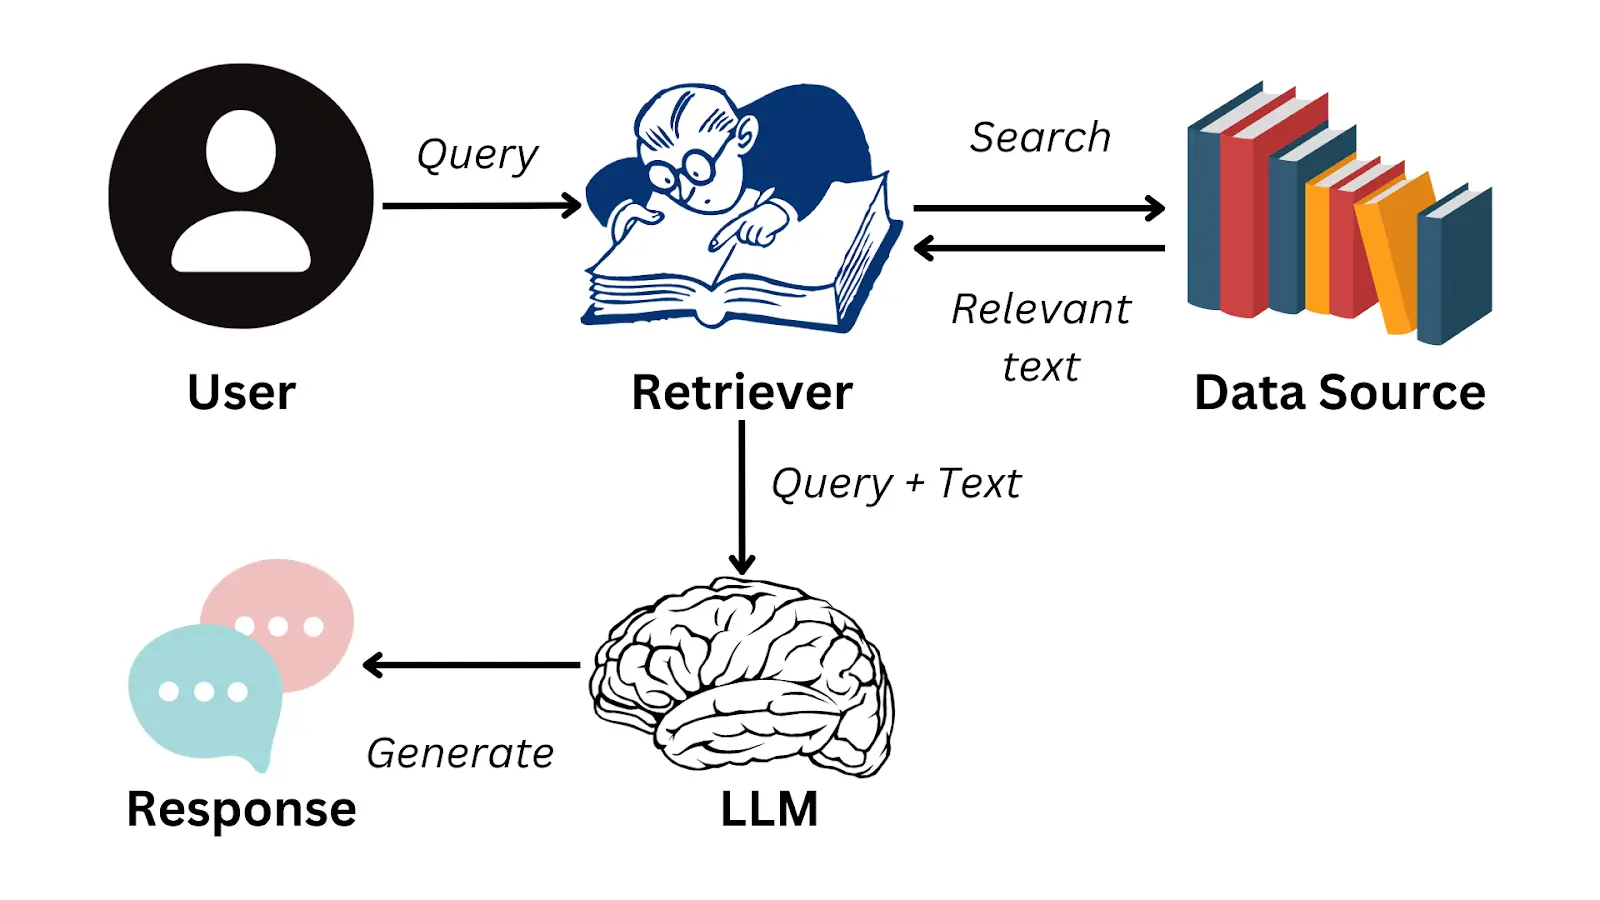
The idea is that a user asks a question about that private documentation, the system is able to retrieve the part of the documentation where the answer to that question is found, the question and the relevant part of the documentation are passed to an LLM, and the LLM generates the answer for the user.
How is information stored?
It is known, and if you didn't know, I'll tell you now, that LLMs have a limit to the amount of information that can be passed to them, which is called the context window. This is due to internal architectures of LLMs that are not relevant at the moment. But what's important is that you cannot simply pass a document and a question to an LLM, because it is likely that the LLM will not be able to process all that information.
In cases where more information is usually passed than the context window allows, what typically happens is that the LLM does not pay attention to the end of the input. Imagine asking the LLM about something in your document, and that information is at the end of the document, but the LLM doesn't read it.
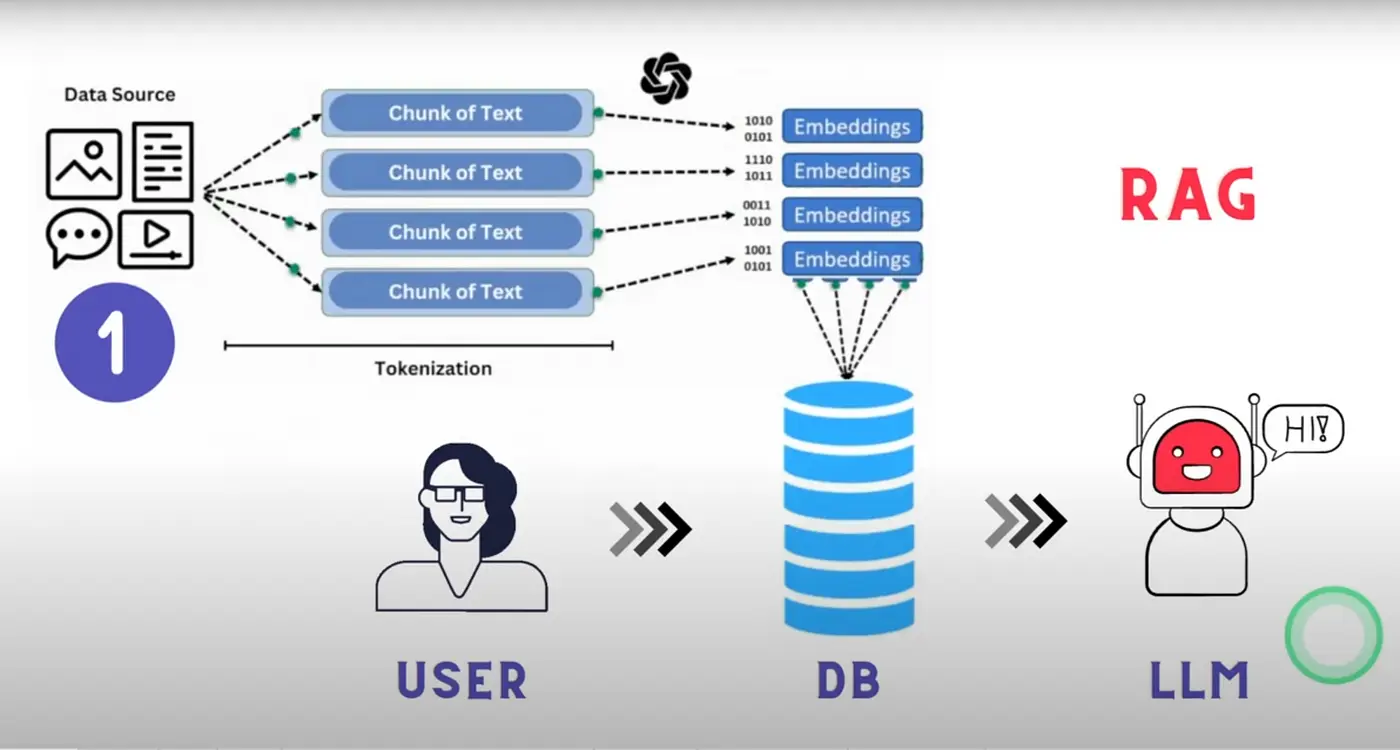
Therefore, what is done is to divide the documentation into blocks called chunks. So, the documentation is stored in a bunch of chunks, which are pieces of that documentation. This way, when the user asks a question, the chunk containing the answer to that question is passed to the LLM.
In addition to dividing the documentation into chunks, these are converted into embeddings, which are numerical representations of the chunks. This is done because LLMs actually don't understand text, but rather numbers, and the chunks are converted into numbers so that the LLM can understand them. If you want to learn more about embeddings, you can read my post on transformers where I explain how transformers work, which is the architecture underlying LLMs. You can also read my post on ChromaDB where I explain how embeddings are stored in a vector database. Additionally, it would be interesting for you to read my post about the HuggingFace Tokenizers library, which explains how text is tokenized, which is the step prior to generating embeddings.
How do you get the correct chunk?
We have said that the documentation is divided into chunks and the chunk containing the answer to the user's question is passed to the LLM. But, how do we know which chunk contains the answer? To determine this, the user's question is converted into an embedding, and the similarity between the embedding of the question and the embeddings of the chunks is calculated. The chunk with the highest similarity is the one passed to the LLM.

Let's revisit what RAG is
On one hand, we have the retrieval, which is obtaining the correct chunk from the documentation. On the other hand, we have the augmented, which involves passing the user's question and the chunk to the LLM. Finally, we have the generation, which is obtaining the response generated by the LLM.
Vector database
We have seen that the documentation is divided into chunks and stored in a vector database, so we need to use one. For this post, I will use ChromaDB, which is a widely used vector database and I also have a post where I explain how it works.
So first we need to install the ChromaDB library, for this we install it with Conda or with pip
conda install conda-forge::chromadbo
pip install chromadbEmbedding Function
As we have said, everything will be based on embeddings. So, the first thing we do is create a function to get embeddings from a text. We are going to use the model sentence-transformers/all-MiniLM-L6-v2.
import chromadb.utils.embedding_functions as embedding_functionsEMBEDDING_MODEL = "sentence-transformers/all-MiniLM-L6-v2"huggingface_ef = embedding_functions.HuggingFaceEmbeddingFunction(api_key=RAG_FUNDAMENTALS_ADVANCE_TECHNIQUES_TOKEN,model_name=EMBEDDING_MODEL)
We test the embedding function
embedding = huggingface_ef(["Hello, how are you?",])embedding[0].shape
(384,)
We obtain an embedding of dimension 384. Although the purpose of this post is not to explain embeddings, in summary, our embedding function has categorized the phrase Hello, how are you? into a 384-dimensional space.
ChromaDB client
Now that we have our embedding function, we can create a ChromaDB client.
First we create a folder where the vector database will be stored
from pathlib import Pathchroma_path = Path("chromadb_persisten_storage")chroma_path.mkdir(exist_ok=True)
Now we create the client
from chromadb import PersistentClientchroma_client = PersistentClient(path = str(chroma_path))
Collection
When we have the ChromaDB client, the next thing we need to do is create a collection. A collection is a set of vectors, in our case the chunks of the documentation.
We create it by indicating the embedding function we are going to use
collection_name = "document_qa_collection"collection = chroma_client.get_or_create_collection(name=collection_name, embedding_function=huggingface_ef)
Document loading
Now that we have created the vector database, we need to split the documentation into chunks and save them in the vector database.
Document Loading Function
First we create a function to load all the .txt documents from a directory
def load_one_document_from_directory(directory, file):with open(os.path.join(directory, file), "r") as f:return {"id": file, "text": f.read()}def load_documents_from_directory(directory):documents = []for file in os.listdir(directory):if file.endswith(".txt"):documents.append(load_one_document_from_directory(directory, file))return documents
Function to split the documentation into chunks
Once we have the documents, we divide them into chunks
def split_text(text, chunk_size=1000, chunk_overlap=20):chunks = []start = 0while start < len(text):end = start + chunk_sizechunks.append(text[start:end])start = end - chunk_overlapreturn chunks
Function to generate embeddings of a chunk
Now that we have the chunks, we generate the embeddings for each of them.
We will see why later, but to generate the embeddings we are going to do it locally and not through the Hugging Face API. For this, we need to have PyTorch and sentence-transformers installed. To do so, we run
pip install -U sentence-transformersfrom sentence_transformers import SentenceTransformerimport torchdevice = torch.device("cuda" if torch.cuda.is_available() else "cpu")embedding_model = SentenceTransformer(EMBEDDING_MODEL).to(device)def get_embeddings(text):try:embedding = embedding_model.encode(text, device=device)return embeddingexcept Exception as e:print(f"Error: {e}")exit(1)
Let's test this embedding function locally now
text = "Hello, how are you?"embedding = get_embeddings(text)embedding.shape
(384,)
We see that we obtain an embedding of the same dimension as when we did it with the Hugging Face API
The model sentence-transformers/all-MiniLM-L6-v2 has only 22M parameters, so you will be able to run it on any GPU. Even if you don't have a GPU, you will be able to run it on a CPU.
The LLM we will use to generate the responses, which is Qwen2.5-72B-Instruct, as its name suggests, is a 72B parameter model, so this model cannot be run on any GPU and running it on a CPU would be unthinkable due to how slow it would be. Therefore, we will use this LLM via the API, but when generating the embeddings we can do it locally without any issues.
Documents We Will Be Testing With
To perform all these tests, I downloaded the dataset aws-case-studies-and-blogs and placed it in the rag-txt_dataset folder. The following commands tell you how to download and extract it.
We create the folder where we are going to download the documents
!mkdir rag_txt_dataset
We download the .zip with the documents
!curl -L -o ./rag_txt_dataset/archive.zip https://www.kaggle.com/api/v1/datasets/download/harshsinghal/aws-case-studies-and-blogs
% Total % Received % Xferd Average Speed Time Time Time CurrentDload Upload Total Spent Left Speed0 0 0 0 0 0 0 0 --:--:-- --:--:-- --:--:-- 0100 1430k 100 1430k 0 0 1082k 0 0:00:01 0:00:01 --:--:-- 2440k
We decompress the .zip
!unzip rag_txt_dataset/archive.zip -d rag_txt_dataset
Archive: rag_txt_dataset/archive.zipinflating: rag_txt_dataset/23andMe Case Study _ Life Sciences _ AWS.txtinflating: rag_txt_dataset/36 new or updated datasets on the Registry of Open Data_ AI analysis-ready datasets and more _ AWS Public Sector Blog.txtinflating: rag_txt_dataset/54gene _ Case Study _ AWS.txtinflating: rag_txt_dataset/6sense Case Study.txtinflating: rag_txt_dataset/ADP Developed an Innovative and Secure Digital Wallet in a Few Months Using AWS Services _ Case Study _ AWS.txtinflating: rag_txt_dataset/AEON Case Study.txtinflating: rag_txt_dataset/ALTBalaji _ Amazon Web Services.txtinflating: rag_txt_dataset/AWS Case Study - Ineos Team UK.txtinflating: rag_txt_dataset/AWS Case Study - StreamAMG.txtinflating: rag_txt_dataset/AWS Case Study_ Creditsafe.txtinflating: rag_txt_dataset/AWS Case Study_ Immowelt.txtinflating: rag_txt_dataset/AWS Customer Case Study _ Kepler Provides Effective Monitoring of Elderly Care Home Residents Using AWS _ AWS.txtinflating: rag_txt_dataset/AWS announces 21 startups selected for the AWS generative AI accelerator _ AWS Startups Blog.txtinflating: rag_txt_dataset/AWS releases smart meter data analytics _ AWS for Industries.txtinflating: rag_txt_dataset/Accelerate Time to Business Value Using Amazon SageMaker at Scale with NatWest Group _ Case Study _ AWS.txtinflating: rag_txt_dataset/Accelerate Your Analytics Journey on AWS with DXC Analytics and AI Platform _ AWS Partner Network (APN) Blog.txt...inflating: rag_txt_dataset/Zomato Saves Big by Using AWS Graviton2 to Power Data-Driven Business Insights.txtinflating: rag_txt_dataset/Zoox Case Study _ Automotive _ AWS.txtinflating: rag_txt_dataset/e-banner Streamlines Its Contact Center Operations and Facilitates a Fully Remote Workforce with Amazon Connect _ e-banner Case Study _ AWS.txtinflating: rag_txt_dataset/iptiQ Case Study.txtinflating: rag_txt_dataset/mod.io Provides Low Latency Gamer Experience Globally on AWS _ Case Study _ AWS.txtinflating: rag_txt_dataset/myposter Case Study.txt
We delete the .zip
!rm rag_txt_dataset/archive.zip
Let's see what we have got
!ls rag_txt_dataset
'23andMe Case Study _ Life Sciences _ AWS.txt''36 new or updated datasets on the Registry of Open Data_ AI analysis-ready datasets and more _ AWS Public Sector Blog.txt''54gene _ Case Study _ AWS.txt''6sense Case Study.txt''Accelerate Time to Business Value Using Amazon SageMaker at Scale with NatWest Group _ Case Study _ AWS.txt''Accelerate Your Analytics Journey on AWS with DXC Analytics and AI Platform _ AWS Partner Network (APN) Blog.txt''Accelerating customer onboarding using Amazon Connect _ NCS Case Study _ AWS.txt''Accelerating Migration at Scale Using AWS Application Migration Service with 3M Company _ Case Study _ AWS.txt''Accelerating Time to Market Using AWS and AWS Partner AccelByte _ Omeda Studios Case Study _ AWS.txt''Achieving Burstable Scalability and Consistent Uptime Using AWS Lambda with TiVo _ Case Study _ AWS.txt''Acrobits Uses Amazon Chime SDK to Easily Create Video Conferencing Application Boosting Collaboration for Global Users _ Acrobits Case Study _ AWS.txt''Actuate AI Case study.txt''ADP Developed an Innovative and Secure Digital Wallet in a Few Months Using AWS Services _ Case Study _ AWS.txt''Adzuna doubles its email open rates using Amazon SES _ Adzuna Case Study _ AWS.txt''AEON Case Study.txt''ALTBalaji _ Amazon Web Services.txt''Amanotes Stays on Beat by Delivering Simple Music Games to Millions Worldwide on AWS.txt''Amazon OpenSearch Services vector database capabilities explained _ AWS Big Data Blog.txt''Anghami Case Study.txt''Announcing enhanced table extractions with Amazon Textract _ AWS Machine Learning Blog.txt'...'What Will Generative AI Mean for Your Business_ _ AWS Cloud Enterprise Strategy Blog.txt''Which Recurring Business Processes Can Small and Medium Businesses Automate_ _ AWS Smart Business Blog.txt'Windsor.txt'Wireless Car Case Study _ AWS IoT Core _ AWS.txt''Yamato Logistics (HK) case study.txt''Zomato Saves Big by Using AWS Graviton2 to Power Data-Driven Business Insights.txt''Zoox Case Study _ Automotive _ AWS.txt'
To create the chunks!
We list the documents with the function we had created
dataset_path = "rag_txt_dataset"documents = load_documents_from_directory(dataset_path)
We check that we have done it well
for document in documents[0:10]:print(document["id"])
Run Jobs at Scale While Optimizing for Cost Using Amazon EC2 Spot Instances with ActionIQ _ ActionIQ Case Study _ AWS.txtRecommend and dynamically filter items based on user context in Amazon Personalize _ AWS Machine Learning Blog.txtWindsor.txtBank of Montreal Case Study _ AWS.txtThe Mill Adventure Case Study.txtOptimize software development with Amazon CodeWhisperer _ AWS DevOps Blog.txtAnnouncing enhanced table extractions with Amazon Textract _ AWS Machine Learning Blog.txtTHREAD _ Life Sciences _ AWS.txtDeep Pool Optimizes Software Quality Control Using Amazon QuickSight _ Deep Pool Case Study _ AWS.txtUpstox Saves 1 Million Annually Using Amazon S3 Storage Lens _ Upstox Case Study _ AWS.txt
Now we create the chunks.
chunked_documents = []for document in documents:chunks = split_text(document["text"])for i, chunk in enumerate(chunks):chunked_documents.append({"id": f"{document['id']}_{i}", "text": chunk})
len(chunked_documents)
3611
As we can see, there are 3611 chunks. Since the daily limit of the Hugging Face API is 1000 calls on the free account, if we want to create embeddings for all the chunks, we would run out of available calls and additionally, we wouldn't be able to create embeddings for all the chunks.
We would like to remind you that this embedding model is very small, only 22M parameters, so it can be run on almost any computer, faster or slower, but it can be done.
Since we are only going to create the embeddings of the chunks once, even if we don't have a very powerful computer and it takes a long time, it will only run once. Later, when we want to ask questions about the documentation, that's when we will generate the embeddings of the prompt using the Hugging Face API and use the LLM with the API. So we will only have to go through the process of generating the embeddings of the chunks once.
We generate the embeddings of the chunks
Last library we will have to install. Since the process of generating embeddings for the chunks will be slow, we will install tqdm to show a progress bar. We can install it with Conda or pip, whichever you prefer.
conda install conda-forge::tqdmo
pip install tqdmWe generate the embeddings of the chunks
import tqdmprogress_bar = tqdm.tqdm(chunked_documents)for chunk in progress_bar:embedding = get_embeddings(chunk["text"])if embedding is not None:chunk["embedding"] = embeddingelse:print(f"Error with document {chunk['id']}")
100%|██████████| 3611/3611 [00:16<00:00, 220.75it/s]
We see an example
from random import randintidx = randint(0, len(chunked_documents))print(f"Chunk id: {chunked_documents[idx]['id']}, text: {chunked_documents[idx]['text']}, embedding shape: {chunked_documents[idx]['embedding'].shape}")
Chunk id: BNS Group Case Study _ Amazon Web Services.txt_0,text: Reducing Virtual Machines from 40 to 12The founders of BNS had been contemplating a migration from the company’s on-premises data center to the public cloud and observed a growing demand for cloud-based operations among current and potential BNS customers.FrançaisConfigures security according to cloud best practicesClive Pereira, R&D director at BNS Group, explains, “The database that records Praisal’s SMS traffic resides in Praisal’s AWS environment. Praisal can now run complete analytics across its data and gain insights into what’s happening with its SMS traffic, which is a real game-changer for the organization.”EspañolAWS ISV Accelerate ProgramReceiving Strategic, Foundational Support from ISV SpecialistsLearn MoreThe value that AWS places on the ISV stream sealed the deal in our choice of cloud provider.”日本語Contact SalesBNS is an Australian software provider focused on secure enterprise SMS and fax messaging. Its software runs on the Windows platform and is l,embedding shape: (384,)
Load the chunks into the vector database
Once we have all the chunks generated, we load them into the vector database. We use tqdm again to show a progress bar, because this is also going to be slow.
import tqdmprogress_bar = tqdm.tqdm(chunked_documents)for chunk in progress_bar:collection.upsert(ids=[chunk["id"]],documents=chunk["text"],embeddings=chunk["embedding"],)
100%|██████████| 3611/3611 [00:59<00:00, 60.77it/s]
Questions
Now that we have the vector database, we can ask questions to the documentation. For this, we need a function that returns the correct chunk.
Get the correct chunk
Now we need a function that returns the correct chunk, let's create it
def get_top_k_documents(query, k=5):results = collection.query(query_texts=query, n_results=k)return results
Lastly, we create a query.
To generate the query, I randomly selected the document Using Amazon EC2 Spot Instances and Karpenter to Simplify and Optimize Kubernetes Infrastructure _ Neeva Case Study _ AWS.txt, passed it to an LLM, and asked it to generate a question about the document. The question it generated is
How did Neeva use Karpenter and Amazon EC2 Spot Instances to improve its infrastructure management and cost optimization?So we get the most relevant chunks in response to that question.
query = "How did Neeva use Karpenter and Amazon EC2 Spot Instances to improve its infrastructure management and cost optimization?"top_chunks = get_top_k_documents(query=query, k=5)
Let's see which chunks it has returned
for i in range(len(top_chunks["ids"][0])):print(f"Rank {i+1}: {top_chunks['ids'][0][i]}, distance: {top_chunks['distances'][0][i]}")
Rank 1: Using Amazon EC2 Spot Instances and Karpenter to Simplify and Optimize Kubernetes Infrastructure _ Neeva Case Study _ AWS.txt_0, distance: 0.29233667254447937Rank 2: Using Amazon EC2 Spot Instances and Karpenter to Simplify and Optimize Kubernetes Infrastructure _ Neeva Case Study _ AWS.txt_5, distance: 0.4007825255393982Rank 3: Using Amazon EC2 Spot Instances and Karpenter to Simplify and Optimize Kubernetes Infrastructure _ Neeva Case Study _ AWS.txt_1, distance: 0.4317566752433777Rank 4: Using Amazon EC2 Spot Instances and Karpenter to Simplify and Optimize Kubernetes Infrastructure _ Neeva Case Study _ AWS.txt_6, distance: 0.43832334876060486Rank 5: Using Amazon EC2 Spot Instances and Karpenter to Simplify and Optimize Kubernetes Infrastructure _ Neeva Case Study _ AWS.txt_4, distance: 0.44625571370124817
As I had mentioned, the document I randomly selected was Using Amazon EC2 Spot Instances and Karpenter to Simplify and Optimize Kubernetes Infrastructure _ Neeva Case Study _ AWS.txt and as you can see, the chunks it returned are from that document. That is, out of more than 3000 chunks in the database, it was able to return the most relevant chunks in response to that question, it seems this works!
Generate the response
Since we already have the most relevant chunks, we pass them to the LLM, along with the question, so that it can generate an answer.
def generate_response(query, relevant_chunks, temperature=0.5, max_tokens=1024, top_p=0.7, stream=False):context = " ".join([chunk for chunk in relevant_chunks])prompt = f"You are an assistant for question-answering. You have to answer the following question: {query} Answer the question with the following information: {context}"message = [{ "role": "user", "content": prompt }]stream = client.chat.completions.create(messages=message,temperature=temperature,max_tokens=max_tokens,top_p=top_p,stream=stream,)response = stream.choices[0].message.contentreturn response
We test the function
response = generate_response(query, top_chunks["documents"][0])print(response)
Neeva, a cloud-native, ad-free search engine founded in 2019, has leveraged Karpenter and Amazon EC2 Spot Instances to significantly improve its infrastructure management and cost optimization. Here’s how:### Early Collaboration with KarpenterIn late 2021, Neeva began working closely with the Karpenter team, experimenting with and contributing fixes to an early version of Karpenter. This collaboration allowed Neeva to integrate Karpenter with its Kubernetes dashboard, enabling the company to gather valuable metrics on usage and performance.### Combining Spot Instances and On-Demand InstancesNeeva runs its jobs on a large scale, which can lead to significant costs. To manage these costs effectively, the company adopted a combination of Amazon EC2 Spot Instances and On-Demand Instances. Spot Instances allow Neeva to bid on unused EC2 capacity, often at a fraction of the On-Demand price, while On-Demand Instances provide the necessary reliability for critical pipelines.### Flexibility and Instance DiversificationAccording to Mohit Agarwal, infrastructure engineering lead at Neeva, Karpenter's adoption of best practices for Spot Instances, including flexibility and instance diversification, has been crucial. This approach ensures that Neeva can dynamically adjust its compute resources to meet varying workloads while minimizing costs.### Improved Scalability and AgilityBy using Karpenter to provision infrastructure resources for its Amazon EKS clusters, Neeva has achieved several key benefits:- **Scalability**: Neeva can scale its compute resources up or down as needed, ensuring that it always has the necessary capacity to handle its workloads.- **Agility**: The company can iterate quickly and democratize infrastructure changes, reducing the time spent on systems administration by up to 100 hours per week.### Enhanced Development CyclesThe integration of Karpenter and Spot Instances has also accelerated Neeva's development cycles. The company can now launch new features and improvements more rapidly, which is essential for maintaining a competitive edge in the search engine market.### Cost Savings and Budget ControlUsing Spot Instances, Neeva has been able to stay within its budget while meeting its performance requirements. This cost optimization is critical for a company that prioritizes user-first experiences and has no competing incentives from advertising.### Future PlansNeeva is committed to continuing its innovation and expansion. The company plans to launch in new regions and further improve its search engine, all while maintaining cost efficiency. As Mohit Agarwal notes, "The bulk of our compute is or will be managed using Karpenter going forward."### ConclusionBy leveraging Karpenter and Amazon EC2 Spot Instances, Neeva has not only optimized its infrastructure costs but also enhanced its scalability, agility, and development speed. This strategic approach has positioned Neeva to deliver high-quality, ad-free search experiences to its users while maintaining a strong focus on cost control and innovation.
When I asked the LLM to generate a question about the document, I also asked it to generate the correct answer. This is the answer that the LLM gave me.
Neeva used Karpenter and Amazon EC2 Spot Instances to improve its infrastructure management and cost optimization in several ways:

Simplified Instance Management:

Karpenter: By adopting Karpenter, Neeva simplified the process of provisioning and managing compute resources for its Amazon EKS clusters. Karpenter automatically provisions and de-provisions instances based on the workload, eliminating the need for manual configurations and reducing the complexity of understanding different compute instances.
Spot Instances: Neeva leveraged Amazon EC2 Spot Instances, which are unused EC2 capacity available at a significant discount (up to 90% cost savings). This allowed the company to control costs while meeting its performance requirements.
Enhanced Scalability:

Karpenter: Karpenter's ability to dynamically scale resources enabled Neeva to spin up new instances quickly, allowing the company to iterate at a higher velocity and run more experiments in less time.
Spot Instances: The use of Spot Instances provided flexibility and instance diversification, making it easier for Neeva to scale its compute resources efficiently.
Improved Productivity:

Karpenter: By democratizing infrastructure changes, Karpenter allowed any engineer to modify Kubernetes configurations, reducing the dependency on specialized expertise. This saved the Neeva team up to 100 hours per week of wait time on systems administration.
Spot Instances: The ability to quickly provision and de-provision Spot Instances reduced delays in the development pipeline, ensuring that jobs did not get stuck due to a lack of available resources.
Cost Efficiency:

Karpenter: Karpenter's best practices for Spot Instances, including flexibility and instance diversification, helped Neeva use these instances more effectively, staying within budget.
Spot Instances: The cost savings from using Spot Instances allowed Neeva to run large-scale jobs, such as indexing, for nearly the same cost but in a fraction of the time. For example, Neeva reduced its indexing jobs from 18 hours to just 3 hours.
Better Resource Utilization:

Karpenter: Karpenter provided better visibility into compute resource usage, allowing Neeva to track and optimize its resource consumption more closely.
Spot Instances: The combination of Karpenter and Spot Instances enabled Neeva to run large language models more efficiently, enhancing the search experience for its users.
En resumen, la adopción de Karpenter y Amazon EC2 Spot Instances por parte de Neeva mejoró significativamente su gestión de infraestructura, optimización de costos y eficiencia general en el desarrollo, lo que permitió a la compañía ofrecer mejores experiencias de búsqueda sin anuncios a sus usuarios.
And this has been the response generated by our RAG
Neeva, a cloud-native, ad-free search engine founded in 2019, has leveraged Karpenter and Amazon EC2 Spot Instances to significantly improve its infrastructure management and cost optimization. Here’s how:

### Early Collaboration with Karpenter
En 2021, Neeva comenzó a trabajar estrechamente con el equipo de Karpenter, experimentando y contribuyendo con correcciones a una versión temprana de Karpenter. Esta colaboración permitió a Neeva integrar Karpenter con su panel de Kubernetes, lo que permitió a la empresa recopilar métricas valiosas sobre el uso y el rendimiento.

### Combining Spot Instances and On-Demand Instances
Neeva runs its jobs on a large scale, which can lead to significant costs. To manage these costs effectively, the company adopted a combination of Amazon EC2 Spot Instances and On-Demand Instances. Spot Instances allow Neeva to bid on unused EC2 capacity, often at a fraction of the On-Demand price, while On-Demand Instances provide the necessary reliability for critical pipelines.

### Flexibilidad y Diversificación de Instancias
Según Mohit Agarwal, ingeniero de infraestructura principal en Neeva, la adopción por parte de Karpenter de las mejores prácticas para Spot Instances, incluyendo flexibilidad y diversificación de instancias, ha sido crucial. Este enfoque garantiza que Neeva pueda ajustar dinámicamente sus recursos de cómputo para satisfacer cargas de trabajo variables mientras minimiza los costos.

### Mejorada Escalabilidad y Agilidad
By using Karpenter to provision infrastructure resources for its Amazon EKS clusters, Neeva has achieved several key benefits:
- **Scalability**: Neeva can scale its compute resources up or down as needed, ensuring that it always has the necessary capacity to handle its workloads.
- **Agility**: The company can iterate quickly and democratize infrastructure changes, reducing the time spent on systems administration by up to 100 hours per week.

### Enhanced Development CyclesLa integración de Karpenter y Spot Instances también ha acelerado los ciclos de desarrollo de Neeva. La compañía ahora puede lanzar nuevas funciones y mejoras más rápidamente, lo cual es esencial para mantener una ventaja competitiva en el mercado de motores de búsqueda.

### Cost Savings and Budget Control
Using Spot Instances, Neeva has been able to stay within its budget while meeting its performance requirements. This cost optimization is critical for a company that prioritizes user-first experiences and has no competing incentives from advertising.

### Future Plans
Neeva is committed to continuing its innovation and expansion. The company plans to launch in new regions and further improve its search engine, all while maintaining cost efficiency. As Mohit Agarwal notes, "The bulk of our compute is or will be managed using Karpenter going forward."

### Conclusion
By leveraging Karpenter and Amazon EC2 Spot Instances, Neeva has not only optimized its infrastructure costs but also enhanced its scalability, agility, and development speed. This strategic approach has positioned Neeva to deliver high-quality, ad-free search experiences to its users while maintaining a strong focus on cost control and innovation.
So we can conclude that the RAG has worked correctly!!!
Limits of Naive RAG
As we have said, today we have explained naive RAG, which is the simplest RAG architecture, but it has its limitations.
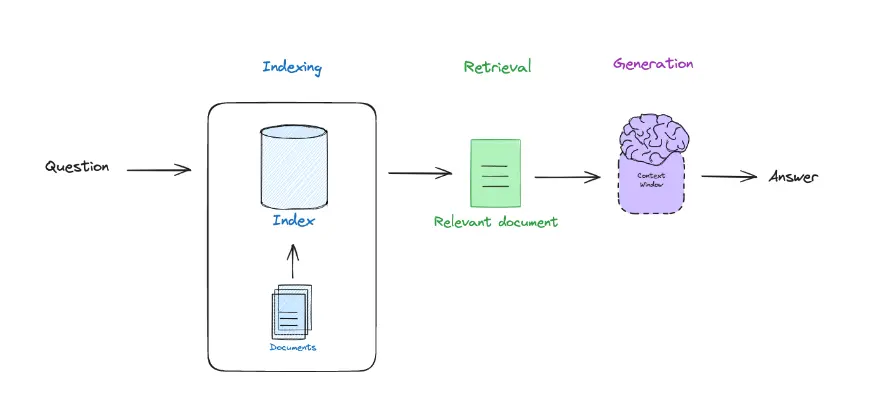
The limitations of this architecture are:
Limits in Information Retrieval
- Limited knowledge of context and documentation: When the naive RAG system searches for chunks, it looks for those that have a semantically similar meaning to the prompt, but it is not capable of knowing which ones are the most relevant to the user's question, or which ones have the most up-to-date information, or whose information is more accurate than others. For example, if a user asks about the problems of sweeteners in the digestive system, the naive RAG may return documents about sweeteners or about the digestive system, but it is not capable of knowing that the documents about the digestive system are the most relevant to the user's question. Another example is if the user asks about the latest advances in AI, but the naive RAG is not able to determine which are the most recent papers in the database.
- There is no synchronization between the retrieval and the generator. As we have seen, they are two independent systems; on one hand, the retrieval searches for the documents most similar to the user's question, and these documents are passed to the generator, which generates a response.
- Inefficient scaling with large databases. Since retrieval searches for documents with the highest semantic similarity across the entire database, when it becomes very large, search times can become very long.
- Limited adaptation to the user's question. If the user asks a question that involves several documents, meaning there is no single document containing all the information needed for the user's question, the system will retrieve all those documents and pass them to the generator, which may or may not use them. In a worst-case scenario, it might overlook some relevant documents when generating the response.
Limits in Response Generation (Generator)
- The model could hallucinate responses even when provided with relevant information.
- The model could be limited by issues related to hate, discrimination, etc.
To overcome these limitations, techniques such as the
- Pre-retrieval: This includes techniques to improve indexing, so that information retrieval is more efficient. Or techniques such as improving the user's question so that retrieval can find the most relevant documents.
- Post-retrieval: Here techniques such as document re-ranking are used, which is a technique used to improve the retrieval of relevant information

