Disclaimer: This post has been translated to English using a machine translation model. Please, let me know if you find any mistakes.
In this post, we will see how to deploy a backend on HuggingFace. We will cover two methods: the common way by creating an application with Gradio, and a different option using FastAPI, Langchain, and Docker.
For both cases, it will be necessary to have an account on HuggingFace, as we are going to deploy the backend in a HuggingFace space.
Deploy backend with Gradio
Create space
First of all, we create a new space on Hugging Face.
- We put a name, a description, and choose the license.
- We chose Gradio as the type of SDK. When choosing Gradio, templates will appear, so we selected the chatbot template.
- We select the HW on which we are going to deploy the backend, I will choose the free CPU, but you choose what you consider best.
- And finally, we need to choose whether we want to create the space as public or private.
Code
When creating the space, we can clone it or we can view the files on the Hugging Face page itself. We can see that 3 files have been created: app.py, requirements.txt, and README.md. So let's take a look at what to put in each one.
app.py
Here we have the code for the application. Since we chose the chatbot template, we already have a lot done, but we will need to change 2 things: first, the language model and the system prompt.
As a language model, I see HuggingFaceH4/zephyr-7b-beta, but we are going to use Qwen/Qwen2.5-72B-Instruct, which is a very capable model.
So, look for the text client = InferenceClient("HuggingFaceH4/zephyr-7b-beta") and replace it with client = InferenceClient("Qwen/Qwen2.5-72B-Instruct"), or wait until I put all the code later.
We will also change the system prompt, which by default is You are a friendly Chatbot., but since the model is trained mostly in English, it is likely that if you speak to it in another language it will respond in English, so we will change it to You are a friendly Chatbot. Always reply in the language in which the user is writing to you..
So, look for the text gr.Textbox(value="You are a friendly Chatbot.", label="System message"), and replace it with gr.Textbox(value="You are a friendly Chatbot. Always reply in the language in which the user is writing to you.", label="System message"),, or wait as I am going to put all the code now.
import gradio as gr
from huggingface_hub import InferenceClient

"""
For more information on `huggingface_hub` Inference API support, please check the docs: https://huggingface.co/docs/huggingface_hub/v0.22.2/en/guides/inference
"""
client = InferenceClient("Qwen/Qwen2.5-72B-Instruct")


def respond(
  message,
  history: list[tuple[str, str]],
  system_message,
  max_tokens,
  temperature,
  top_p,
):
  messages = [{"role": "system", "content": system_message}]

  for val in history:
    if val[0]:
      messages.append({"role": "user", "content": val[0]})
    if val[1]:
      messages.append({"role": "assistant", "content": val[1]})

  messages.append({"role": "user", "content": message})

  response = ""

  for message in client.chat_completion(
    messages,
    max_tokens=max_tokens,
    stream=True,
    temperature=temperature,
    top_p=top_p,
  ):
    token = message.choices[0].delta.content

    response += token
    yield response


"""
For information on how to customize the ChatInterface, peruse the gradio docs: https://www.gradio.app/docs/gradio/chatinterface
"""
demo = gr.ChatInterface(
  respond,
  additional_inputs=[
    gr.Textbox(value="You are a friendly Chatbot. Always reply in the language in which the user is writing to you.", label="System message"),
    gr.Slider(minimum=1, maximum=2048, value=512, step=1, label="Max new tokens"),
    gr.Slider(minimum=0.1, maximum=4.0, value=0.7, step=0.1, label="Temperature"),
    gr.Slider(
      minimum=0.1,
      maximum=1.0,
      value=0.95,
      step=0.05,
      label="Top-p (nucleus sampling)",
    ),
  ],
)


if __name__ == "__main__":
  demo.launch()
requirements.txt
This is the file where the dependencies will be written, but for this case it's going to be very simple:
huggingface_hub==0.25.2README.md
This is the file where we will put the information about the space. In HuggingFace spaces, at the beginning of the readmes, a code is placed so that HuggingFace knows how to display the thumbnail of the space, which file to use to run the code, SDK version, etc.
---
title: SmolLM2
emoji: 💬
colorFrom: yellow
colorTo: purple
sdk: gradio
sdk_version: 5.0.1
app_file: app.py
pinned: false
license: apache-2.0
short_description: Gradio SmolLM2 chat
---

An example chatbot using [Gradio](https://gradio.app), [`huggingface_hub`](https://huggingface.co/docs/huggingface_hub/v0.22.2/en/index), and the [Hugging Face Inference API](https://huggingface.co/docs/api-inference/index).
Deployment
If we have cloned the space, we need to make a commit and a push. If we have modified the files in HuggingFace, saving them is enough.
So when the changes are in HuggingFace, we will have to wait a few seconds for the space to build and then we can use it.
Backend
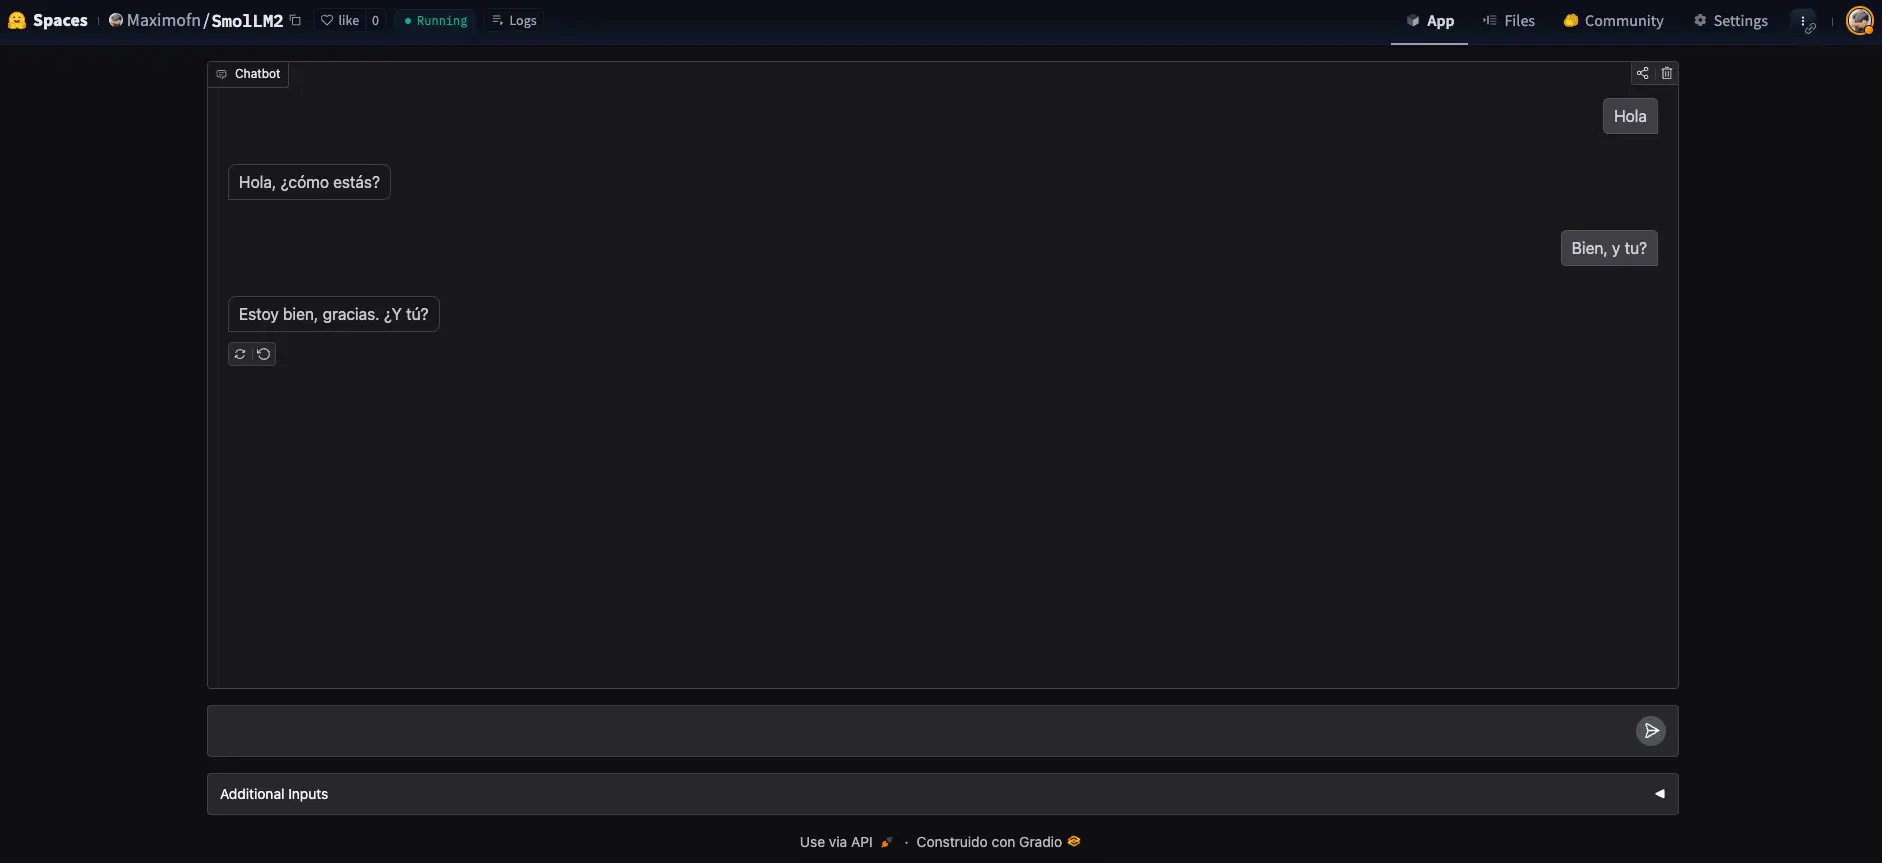
Alright, we've created a chatbot, but that wasn't the intention; we came here to build a backend! Stop, stop, look at what it says below the chatbot
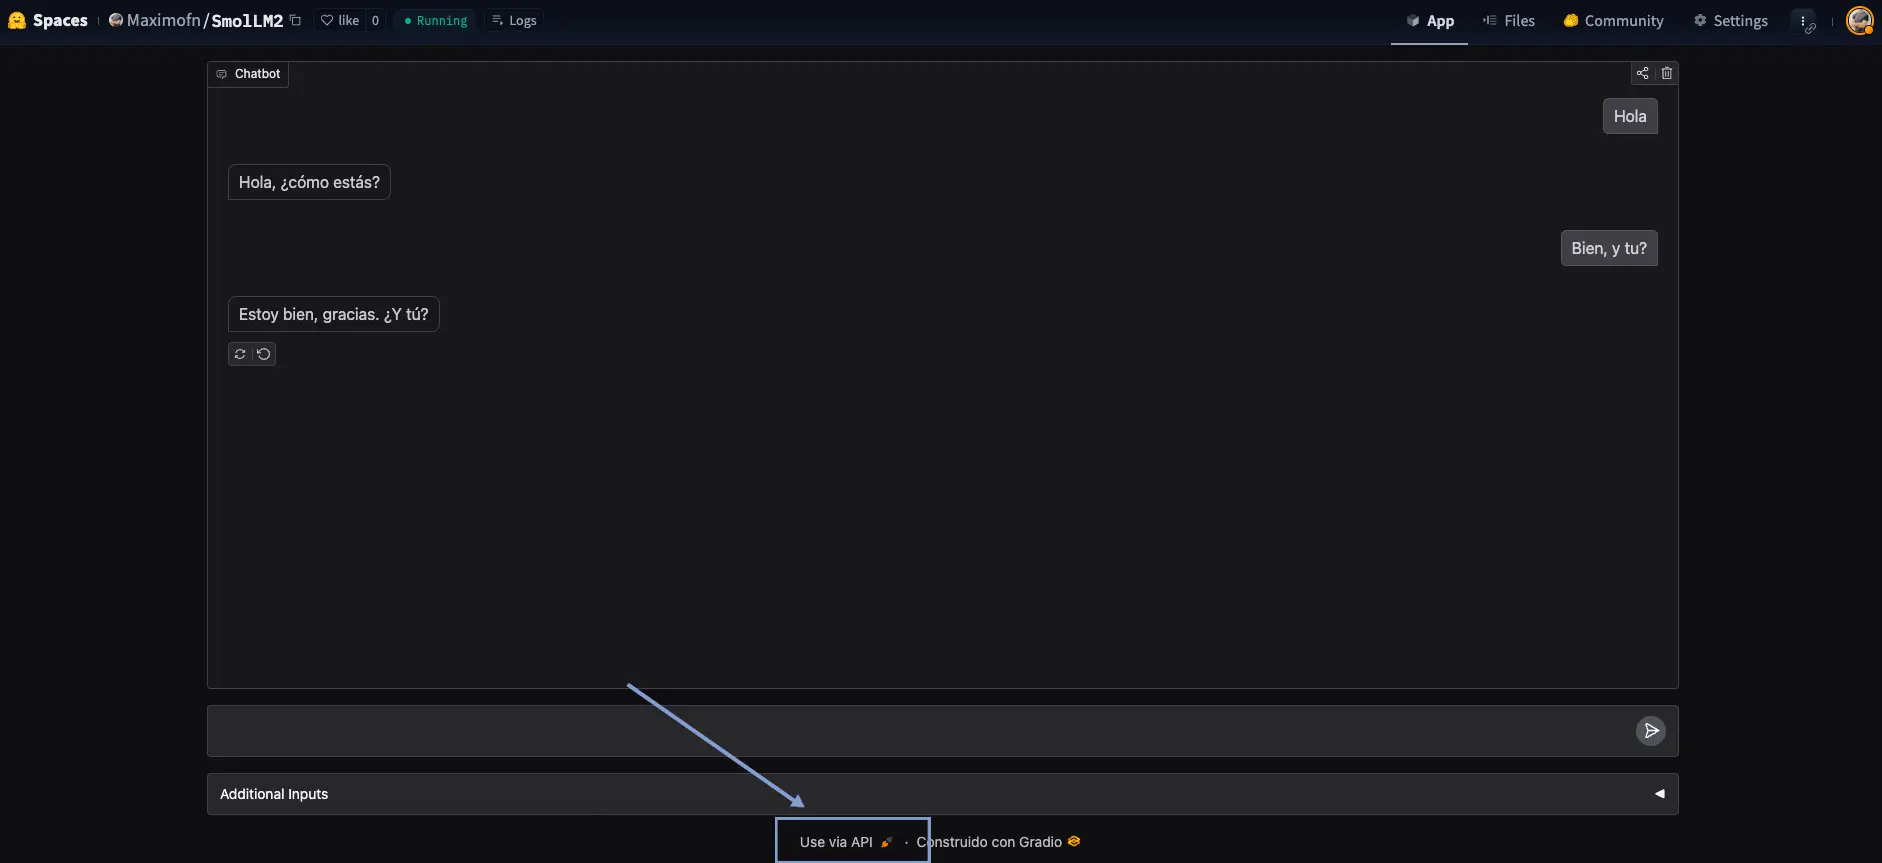
We can see a text Use via API, where if we click it, a menu with an API opens for us to use the chatbot.
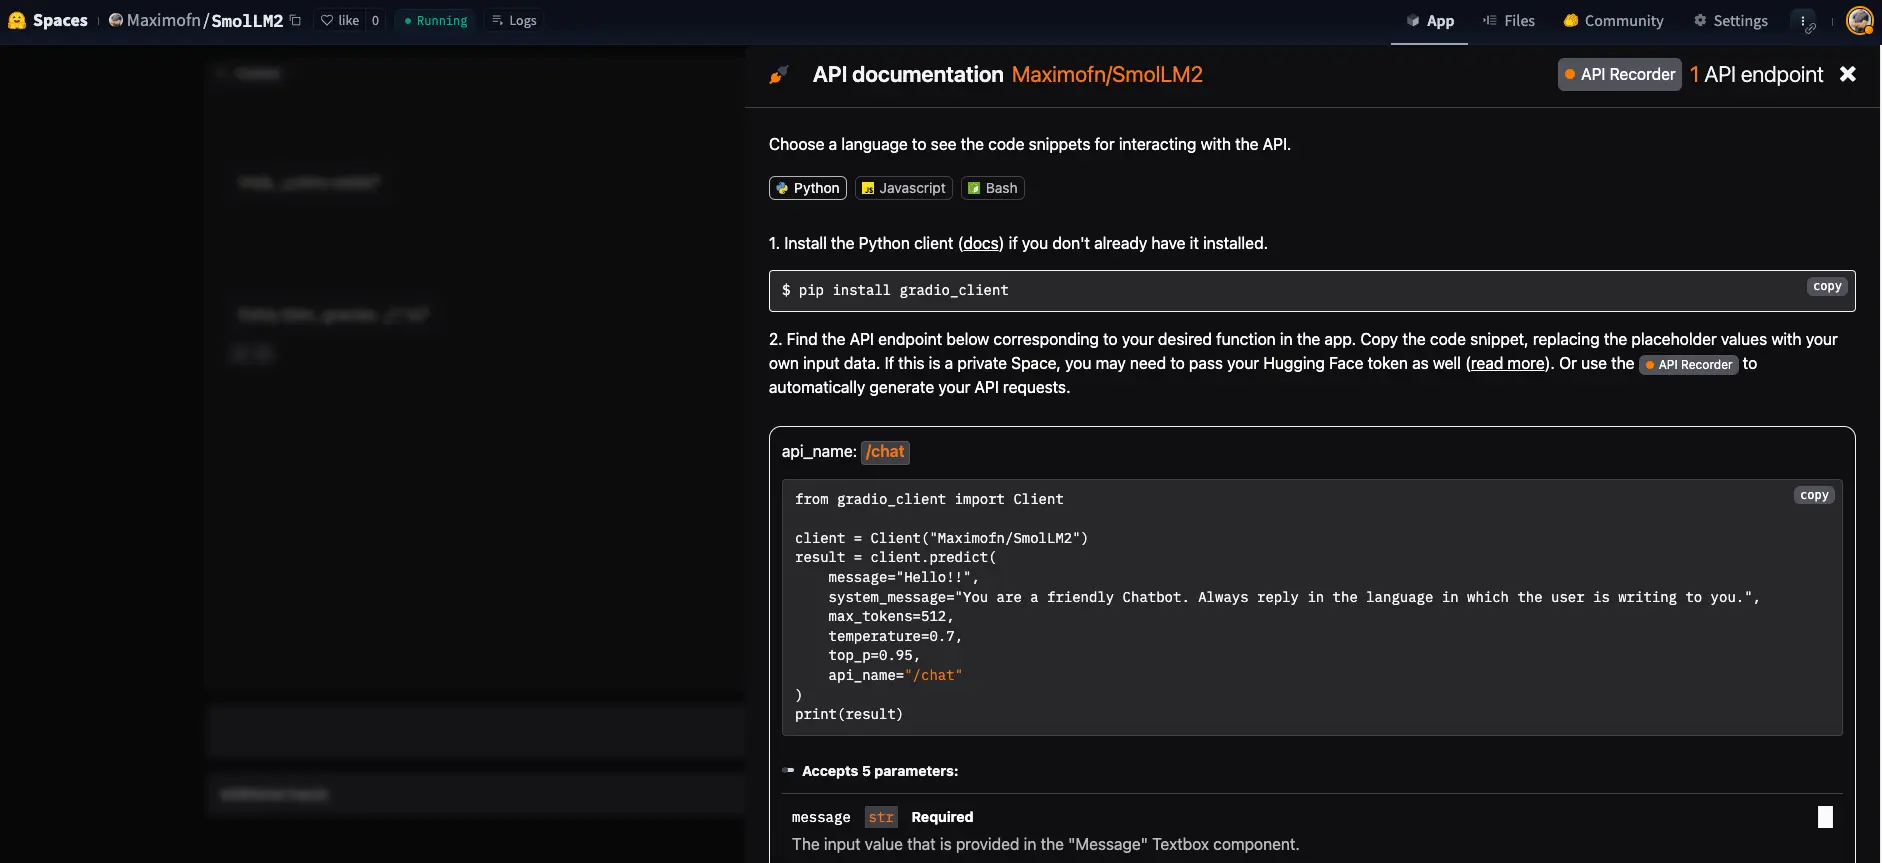
We see that it provides documentation on how to use the API, both with Python, JavaScript, and bash.
API Test
We use the example Python code.
from gradio_client import Clientclient = Client("Maximofn/SmolLM2")result = client.predict(message="Hola, ¿cómo estás? Me llamo Máximo",system_message="You are a friendly Chatbot. Always reply in the language in which the user is writing to you.",max_tokens=512,temperature=0.7,top_p=0.95,api_name="/chat")print(result)Copied
Loaded as API: https://maximofn-smollm2.hf.space ✔¡Hola Máximo! Mucho gusto, estoy bien, gracias por preguntar. ¿Cómo estás tú? ¿En qué puedo ayudarte hoy?
We are making calls to the InferenceClient API from HuggingFace, so we might wonder, why did we create a backend if we can call the HuggingFace API directly? You will see this in the following section.
result = client.predict(message="¿Cómo me llamo?",system_message="You are a friendly Chatbot. Always reply in the language in which the user is writing to you.",max_tokens=512,temperature=0.7,top_p=0.95,api_name="/chat")print(result)Copied
Tu nombre es Máximo. ¿Es correcto?
The Gradio chat template handles the history for us, so that each time we create a new client, a new conversation thread is created.
Let's try to create a new client and see if a new conversation thread is created.
from gradio_client import Clientnew_client = Client("Maximofn/SmolLM2")result = new_client.predict(message="Hola, ¿cómo estás? Me llamo Luis",system_message="You are a friendly Chatbot. Always reply in the language in which the user is writing to you.",max_tokens=512,temperature=0.7,top_p=0.95,api_name="/chat")print(result)Copied
Loaded as API: https://maximofn-smollm2.hf.space ✔Hola Luis, estoy muy bien, gracias por preguntar. ¿Cómo estás tú? Es un gusto conocerte. ¿En qué puedo ayudarte hoy?
Now we ask him again what my name is
result = new_client.predict(message="¿Cómo me llamo?",system_message="You are a friendly Chatbot. Always reply in the language in which the user is writing to you.",max_tokens=512,temperature=0.7,top_p=0.95,api_name="/chat")print(result)Copied
Te llamas Luis. ¿Hay algo más en lo que pueda ayudarte?
As we can see, we have two clients, each with their own conversation thread.
Deploy backend with FastAPI, Langchain and Docker
Now we are going to do the same, create a chatbot backend, with the same model, but in this case using FastAPI, Langchain and Docker.
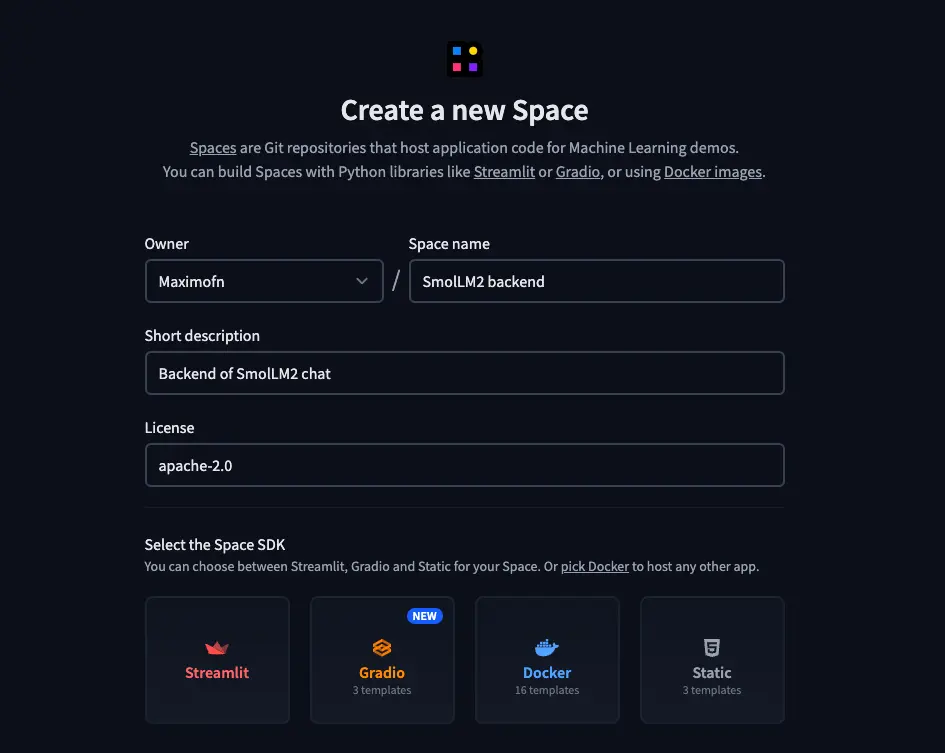
Create space
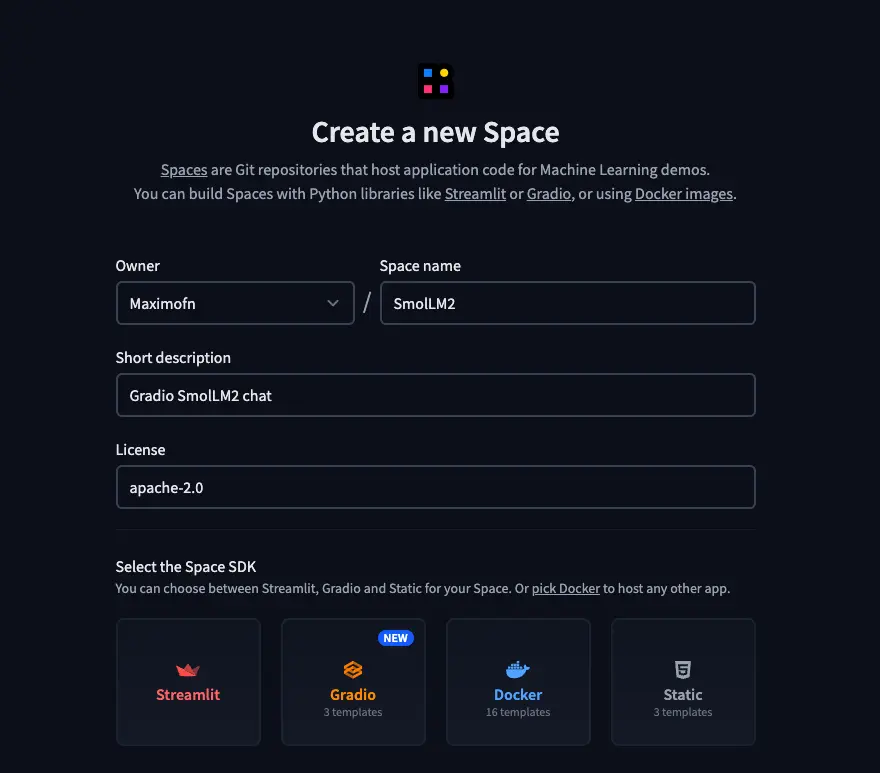
We need to create a new space, but in this case we will do it differently
- We put a name, a description, and choose the license.
- We chose Docker as the type of SDK. When choosing Docker, templates will appear, so we selected a blank template.
- We select the HW on which we will deploy the backend, I will choose the free CPU, but you choose what you consider best.
- And lastly, we need to choose whether we want to create the space as public or private.
Code
Now, when creating the space, we see that we only have one file, the README.md. So we are going to have to create all the code ourselves.
app.py
Let's create the application code
Let's start with the necessary libraries
from fastapi import FastAPI, HTTPException
from pydantic import BaseModel
from huggingface_hub import InferenceClient

from langchain_core.messages import HumanMessage, AIMessage
from langgraph.checkpoint.memory import MemorySaver
from langgraph.graph import START, MessagesState, StateGraph

import os
from dotenv import load_dotenv
load_dotenv()
We load fastapi to create the API routes, pydantic to create the query templates, huggingface_hub to create a language model, langchain to indicate whether messages are from the chatbot or the user, and langgraph to create the chatbot.
We also load os and dotenv to be able to load the environment variables.
We load the HuggingFace token
# HuggingFace token
HUGGINGFACE_TOKEN = os.environ.get("HUGGINGFACE_TOKEN", os.getenv("HUGGINGFACE_TOKEN"))
We create the language model
# Initialize the HuggingFace model
model = InferenceClient(
model="Qwen/Qwen2.5-72B-Instruct",
api_key=os.getenv("HUGGINGFACE_TOKEN")
)
We now create a function to call the model
# Define the function that calls the model
def call_model(state: MessagesState):
  """
  Call the model with the given messages

  Args:
    state: MessagesState

  Returns:
    dict: A dictionary containing the generated text and the thread ID
  """
  # Convert LangChain messages to HuggingFace format
  hf_messages = []
  for msg in state["messages"]:
    if isinstance(msg, HumanMessage):
      hf_messages.append({"role": "user", "content": msg.content})
    elif isinstance(msg, AIMessage):
      hf_messages.append({"role": "assistant", "content": msg.content})

  # Call the API
  response = model.chat_completion(
    messages=hf_messages,
    temperature=0.5,
    max_tokens=64,
    top_p=0.7
  )

  # Convert the response to LangChain format
  ai_message = AIMessage(content=response.choices[0].message.content)
  return {"messages": state["messages"] + [ai_message]}
We convert the messages from LangChain format to HuggingFace format, so we can use the language model.
We define a template for the queries
class QueryRequest(BaseModel):
query: str
thread_id: str = "default"
The queries will have a query, the user's message, and a thread_id, which is the identifier of the conversation thread and we will explain later what we use it for.
We create a LangGraph graph
# Define the graph
workflow = StateGraph(state_schema=MessagesState)

# Define the node in the graph
workflow.add_edge(START, "model")
workflow.add_node("model", call_model)

# Add memory
memory = MemorySaver()
graph_app = workflow.compile(checkpointer=memory)
With this, we create a LangGraph graph, which is a data structure that allows us to create a chatbot and manages the chatbot's state for us, including, among other things, the message history. This way, we don't have to do it ourselves.
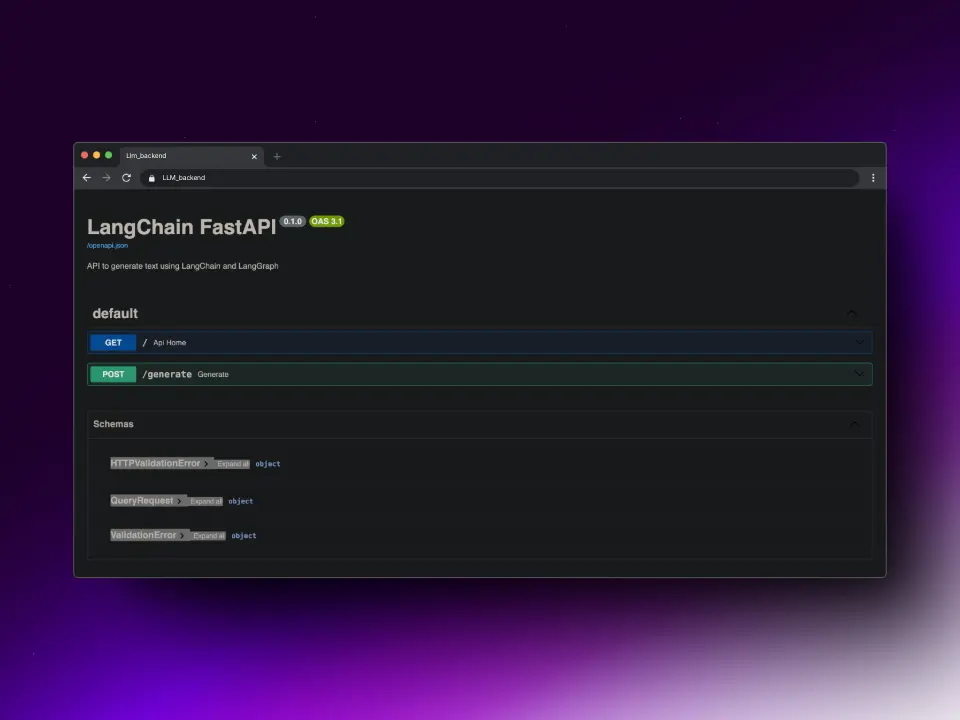
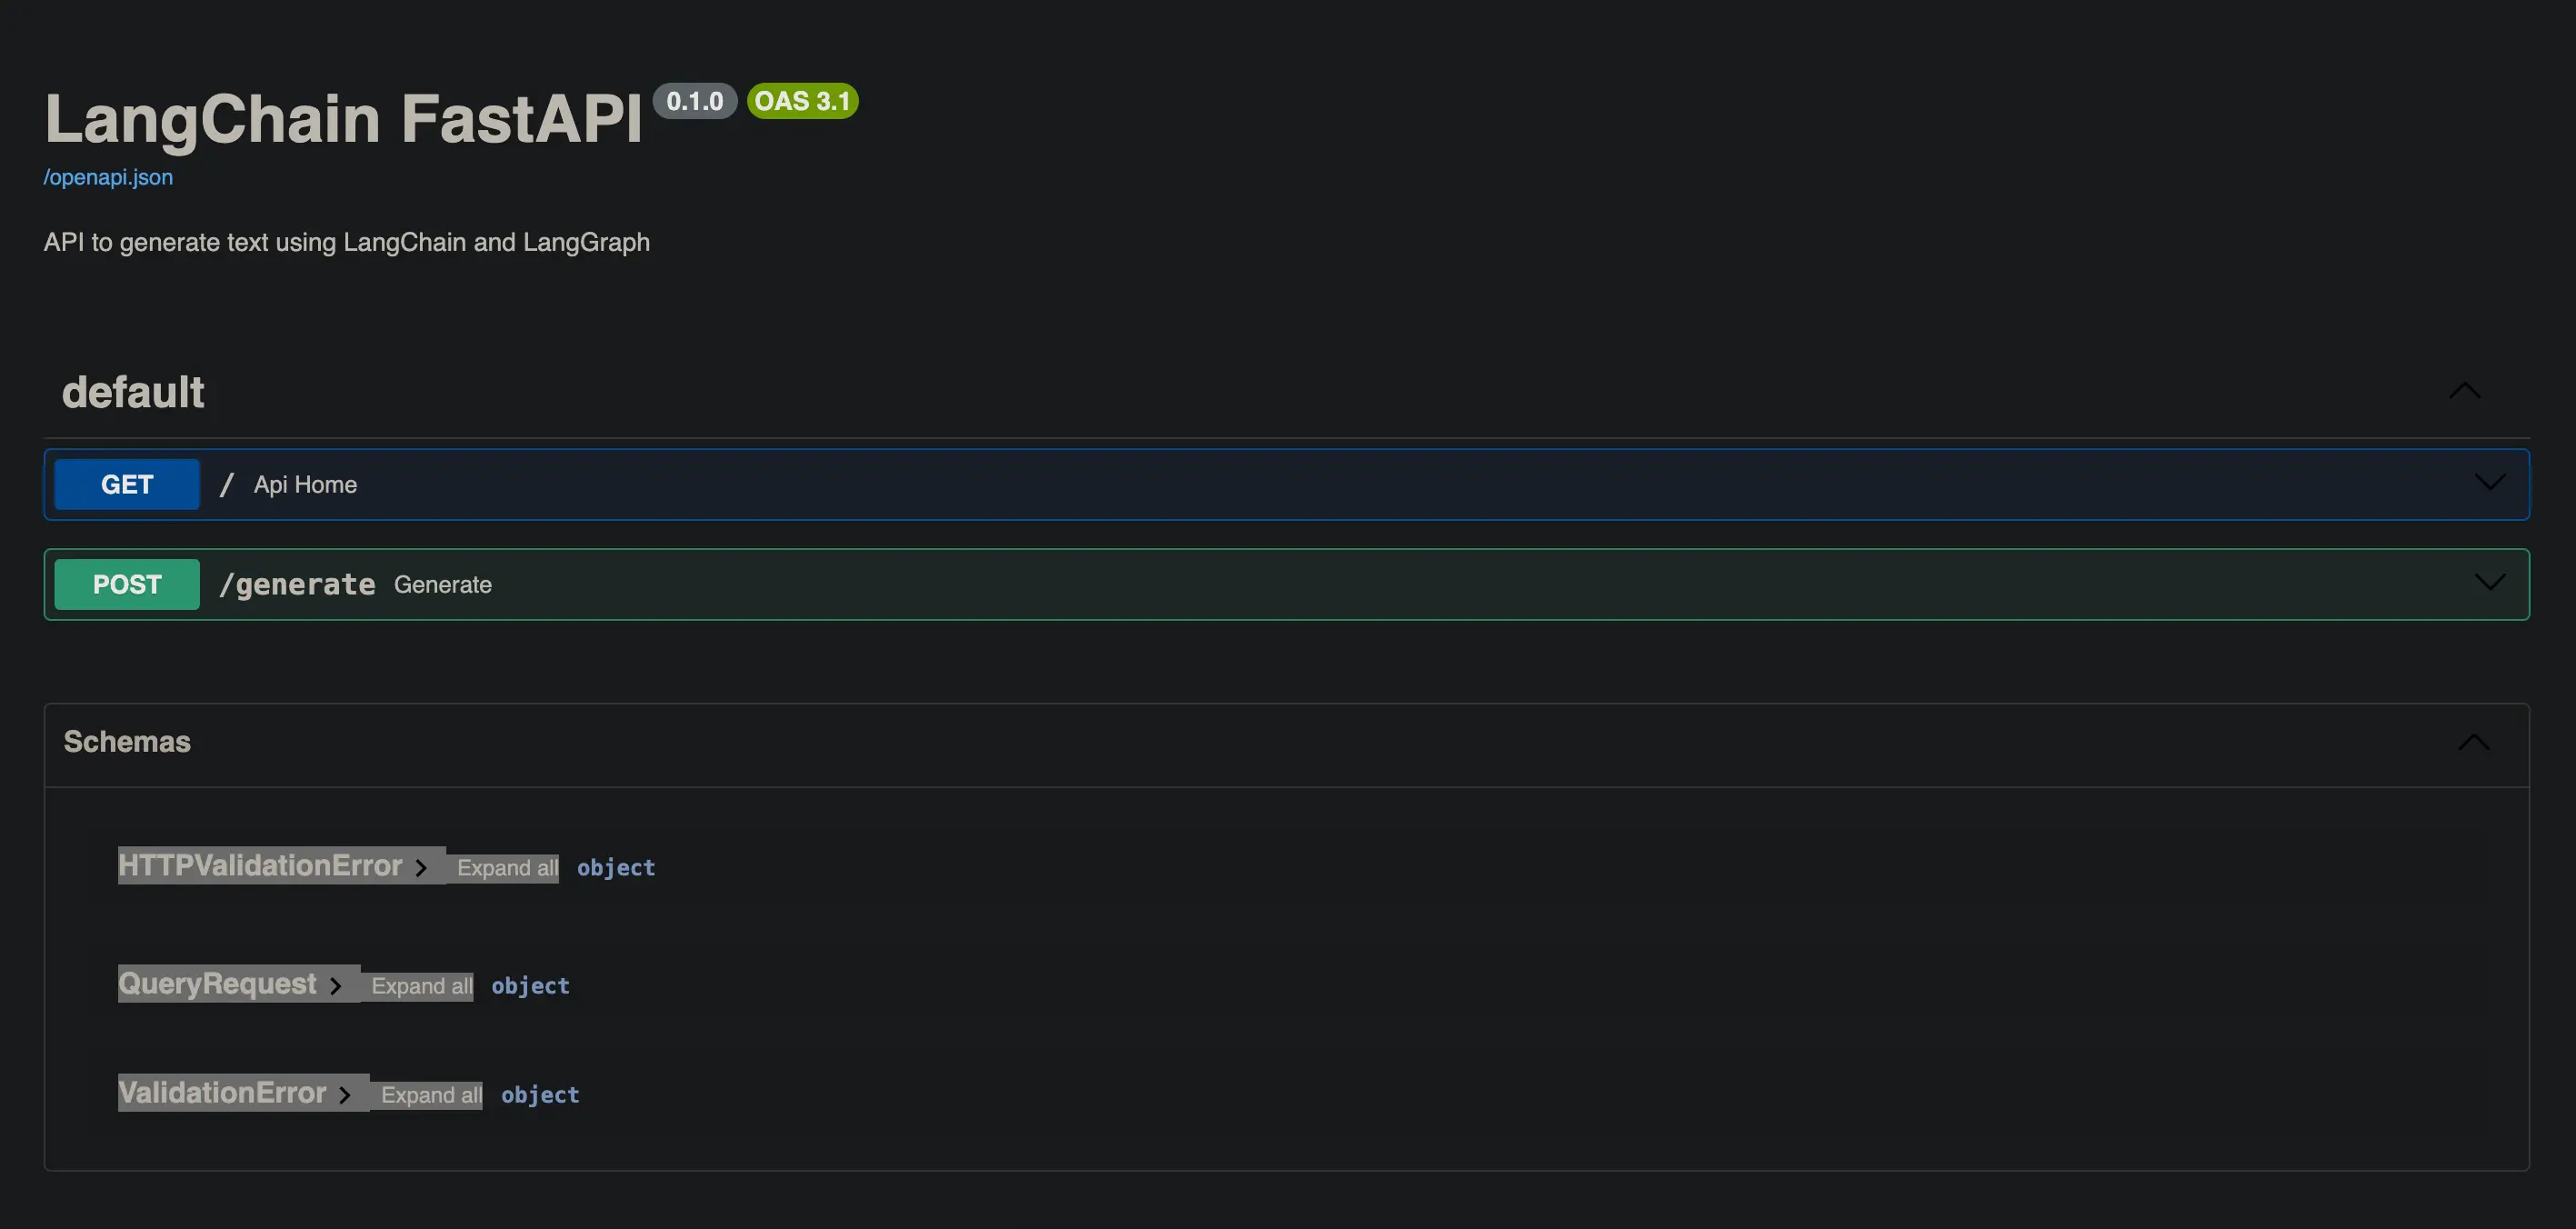
We create the FastAPI application
app = FastAPI(title="LangChain FastAPI", description="API to generate text using LangChain and LangGraph")We create the API endpoints
# Welcome endpoint
@app.get("/")
async def api_home():
"Welcome endpoint"
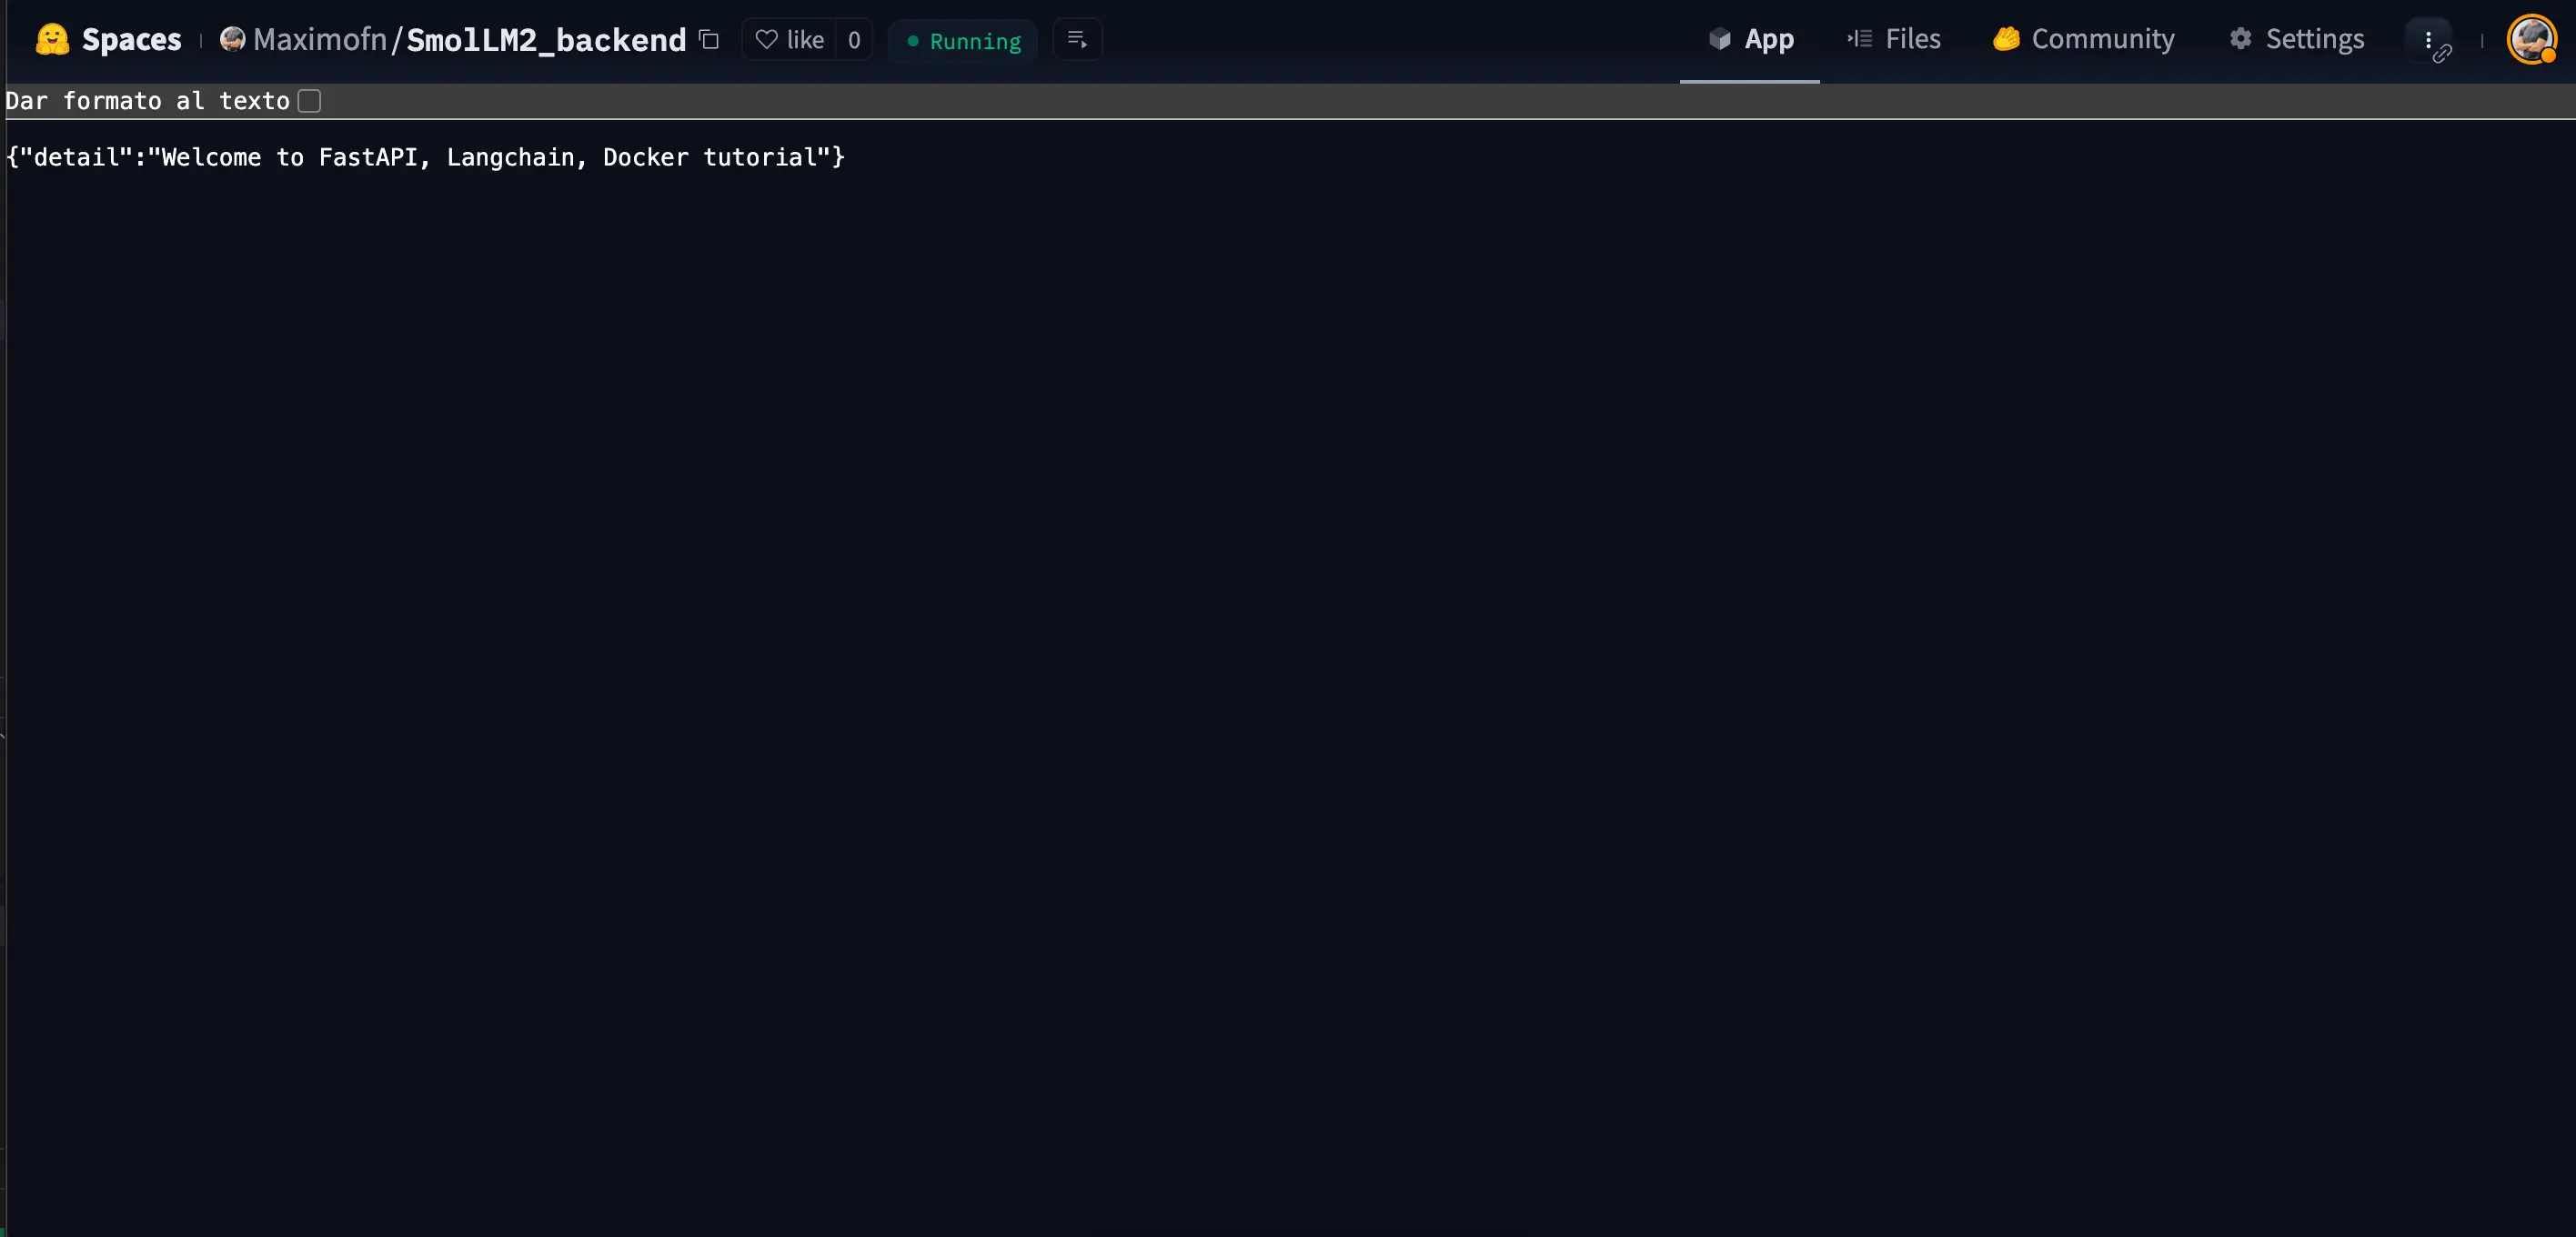
return {"detail": "Welcome to FastAPI, Langchain, Docker tutorial"}
# Generate endpoint
@app.post("/generate")
async def generate(request: QueryRequest):
"""
Endpoint to generate text using the language model
Args:
request: QueryRequest
query: str
thread_id: str = "default"
Devuelve:
dict: A dictionary containing the generated text and the thread ID
"""
try:
# Configure the thread ID
config = {"configurable": {"thread_id": request.thread_id}}
# Create the input message
input_messages = [HumanMessage(content=request.query)]
# Invoke the graph
output = graph_app.invoke({"messages": input_messages}, config)
# Get the model response
response = output["messages"][-1].content
return {
"generated_text": "response",
"thread_id": request.thread_id
It seems like you've provided an incomplete or incorrect Markdown text to translate. Could you please provide the correct Markdown text that needs translation?
except Exception as e:
raise HTTPException(status_code=500, detail=f"Error generating text: {str(e)}")We have created the endpoint / that will return a text when we access the API, and the endpoint /generate which we will use to generate the text.
If we look at the generate function, we have the variable config, which is a dictionary that contains the thread_id. This thread_id allows us to maintain a message history for each user, so different users can use the same endpoint and have their own message history.
Finally, we have the code for the application to run.
if __name__ == "__main__":
import uvicorn
uvicorn.run(app, host="0.0.0.0", port=7860)
Let's write all the code together
from fastapi import FastAPI, HTTPException
from pydantic import BaseModel
from huggingface_hub import InferenceClient

from langchain_core.messages import HumanMessage, AIMessage
from langgraph.checkpoint.memory import MemorySaver
from langgraph.graph import START, MessagesState, StateGraph

import os
from dotenv import load_dotenv
load_dotenv()

# HuggingFace token
HUGGINGFACE_TOKEN = os.environ.get("HUGGINGFACE_TOKEN", os.getenv("HUGGINGFACE_TOKEN"))

# Initialize the HuggingFace model
model = InferenceClient(
model="Qwen/Qwen2.5-72B-Instruct",
api_key=os.getenv("HUGGINGFACE_TOKEN")
)

# Define the function that calls the model
def call_model(state: MessagesState):
"""
Llamar al modelo con los mensajes dados

Args:
state: MessagesState

Devuelve:
dict: A dictionary containing the generated text and the thread ID
"""
# Convert LangChain messages to HuggingFace format
hf_messages = []
for msg in state["messages"]:
if isinstance(msg, HumanMessage):
hf_messages.append({"role": "user", "content": msg.content})
elif isinstance(msg, AIMessage):
hf_messages.append({"role": "assistant", "content": msg.content})

# Call the API
response = model.chat_completion(
messages=hf_messages,
temperature=0.5,
max_tokens=64,
top_p=0.7
)

# Convert the response to LangChain format
ai_message = AIMessage(content=response.choices[0].message.content)
return {"messages": state["messages"] + [ai_message]}

# Define the graph
workflow = StateGraph(state_schema=MessagesState)

# Define the node in the graph
workflow.add_edge(START, "model")
workflow.add_node("model", call_model)

# Add memory
memory = MemorySaver()
graph_app = workflow.compile(checkpointer=memory)

# Define the data model for the request
class QueryRequest(BaseModel):
query: str
thread_id: str = "default"

# Create the FastAPI application
app = FastAPI(title="LangChain FastAPI", description="API to generate text using LangChain and LangGraph")

# Welcome endpoint
@app.get("/")
async def api_home():
"Welcome endpoint"
return {"detail": "Welcome to FastAPI, Langchain, Docker tutorial"}

# Generate endpoint
@app.post("/generate")
async def generate(request: QueryRequest):
"""
Endpoint to generate text using the language model

Args:
request: QueryRequest
query: str
thread_id: str = "default"

Returns:
dict: A dictionary containing the generated text and the thread ID
"""
try:
# Configure the thread ID
config = {"configurable": {"thread_id": request.thread_id}}

# Create the input message
input_messages = [HumanMessage(content=request.query)]

# Invoke the graph
output = graph_app.invoke({"messages": input_messages}, config)

# Get the model response
response = output["messages"][-1].content

return {
"generated_text": "response,"
"thread_id": request.thread_id
}
except Exception as e:
raise HTTPException(status_code=500, detail=f"Error generating text: {str(e)}")

if __name__ == "__main__":
import uvicorn
uvicorn.run(app, host="0.0.0.0", port=7860)
Dockerfile
Now we see how to create the Dockerfile
First we indicate which image we are going to start from
FROM python:3.13-slimNow we create the working directory
RUN useradd -m -u 1000 user
WORKDIR /app
We copy the file with the dependencies and install
COPY --chown=user ./requirements.txt requirements.txt
RUN pip install --no-cache-dir --upgrade -r requirements.txt
We copy the rest of the code
COPY --chown=user . /appWe expose port 7860
EXPOSE 7860We create the environment variables
RUN --mount=type=secret,id=HUGGINGFACE_TOKEN,mode=0444,required=true \
test -f /run/secrets/HUGGINGFACE_TOKEN && echo "Secret exists!"
Lastly, we indicate the command to run the application
CMD ["uvicorn", "app:app", "--host", "0.0.0.0", "--port", "7860"]Now we put it all together
FROM python:3.13-slim

RUN useradd -m -u 1000 user
WORKDIR /app

COPY --chown=user ./requirements.txt requirements.txt
RUN pip install --no-cache-dir --upgrade -r requirements.txt

COPY --chown=user . /app

EXPOSE 7860

RUN --mount=type=secret,id=HUGGINGFACE_TOKEN,mode=0444,required=true \
test -f /run/secrets/HUGGINGFACE_TOKEN && echo "Secret exists!"

CMD ["uvicorn", "app:app", "--host", "0.0.0.0", "--port", "7860"]
requirements.txt
We create the file with the dependencies
fastapi
uvicorn
requests
pydantic>=2.0.0
langchain
langchain-huggingface
langchain-core
langgraph > 0.2.27
python-dotenv.2.11
README.md
Finally, we create the README.md file with information about the space and instructions for HuggingFace.
      ---
      title: SmolLM2 Backend
      emoji: 📊
      colorFrom: yellow
      colorTo: red
      sdk: docker
      pinned: false
      license: apache-2.0
      short_description: Backend of SmolLM2 chat
      app_port: 7860
      ---

      # SmolLM2 Backend

      This project implements a FastAPI API that uses LangChain and LangGraph to generate text with the Qwen2.5-72B-Instruct model from HuggingFace.

      ## Configuration

      ### In HuggingFace Spaces

      This project is designed to run in HuggingFace Spaces. To configure it:

      1. Create a new Space in HuggingFace with SDK Docker
      2. Configure the `HUGGINGFACE_TOKEN` or `HF_TOKEN` environment variable in the Space configuration:
         - Go to the "Settings" tab of your Space
         - Scroll down to the "Repository secrets" section
         - Add a new variable with the name `HUGGINGFACE_TOKEN` and your token as the value
         - Save the changes

      ### Local development

      For local development:

      1. Clone this repository
      2. Create a `.env` file in the project root with your HuggingFace token:
         ```
         HUGGINGFACE_TOKEN=your_token_here
         ```
      3. Install the dependencies:
         ```
         pip install -r requirements.txt
         ```

      ## Local execution

      ```bash
      uvicorn app:app --reload
      ```

      The API will be available at `http://localhost:8000`.

      ## Endpoints

      ### GET `/`

      Welcome endpoint that returns a greeting message.

      ### POST `/generate`

      Endpoint to generate text using the language model.

      **Request parameters:**
      ```json
      {
        "query": "Your question here",
        "thread_id": "optional_thread_identifier"
      }
      ```

      **Response:**
      ```json
      {
        "generated_text": "Generated text by the model",
        "thread_id": "thread identifier"
      }
      ```

      ## Docker

      To run the application in a Docker container:

      ```bash
      # Build the image
      docker build -t smollm2-backend .

      # Run the container
      docker run -p 8000:8000 --env-file .env smollm2-backend
      ```

      ## API documentation

      The interactive API documentation is available at:
      - Swagger UI: `http://localhost:8000/docs`
      - ReDoc: `http://localhost:8000/redoc`
HuggingFace Token
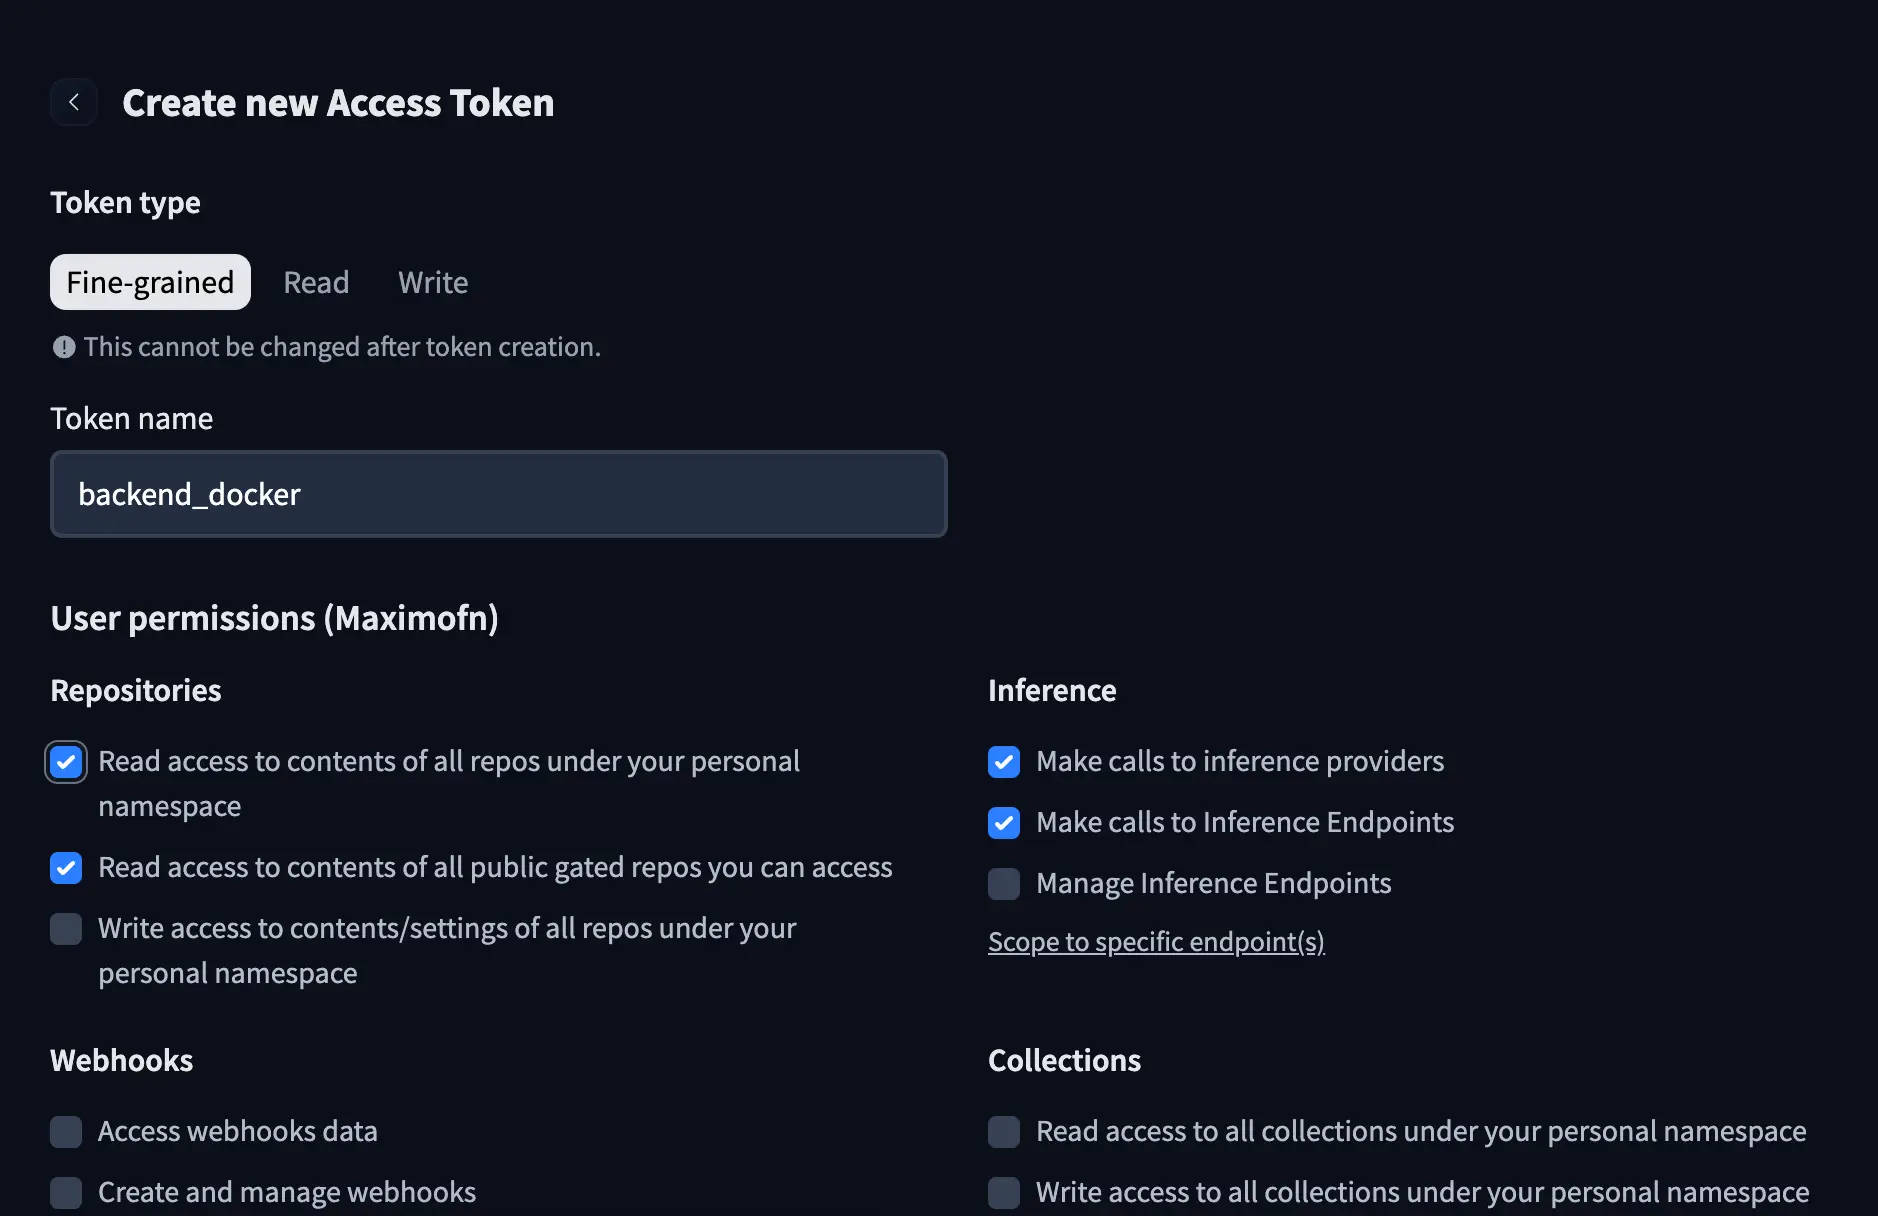
If you've noticed in the code and the Dockerfile, we used a HuggingFace token, so we will have to create one. In our HuggingFace account, we create a new token, give it a name, and grant it the following permissions:
- Read access to contents of all repos under your personal namespace
- Read access to contents of all repos under your personal namespace
- Make calls to inference providers
- Make calls to Inference Endpoints
Add the token to the space secrets
Now that we have the token, we need to add it to the space. At the top of the app, we will see a button called Settings, we press it and we will be able to see the space configuration section.
If we scroll down, we can see a section where we can add Variables and Secrets. In this case, since we are adding a token, we will add it to the Secrets.
We set the name to HUGGINGFACE_TOKEN and the value of the token.
Deployment
If we have cloned the space, we need to make a commit and a push. If we have modified the files in HuggingFace, saving them is enough.
So when the changes are in HuggingFace, we will have to wait a few seconds for the space to be built and then we can use it.
In this case, we have only built a backend, so what we will see when entering the space is what we defined in the endpoint /
Backend URL
We need to know the URL of the backend to be able to make API calls. To do this, we have to click on the three dots in the top right corner to see the options.
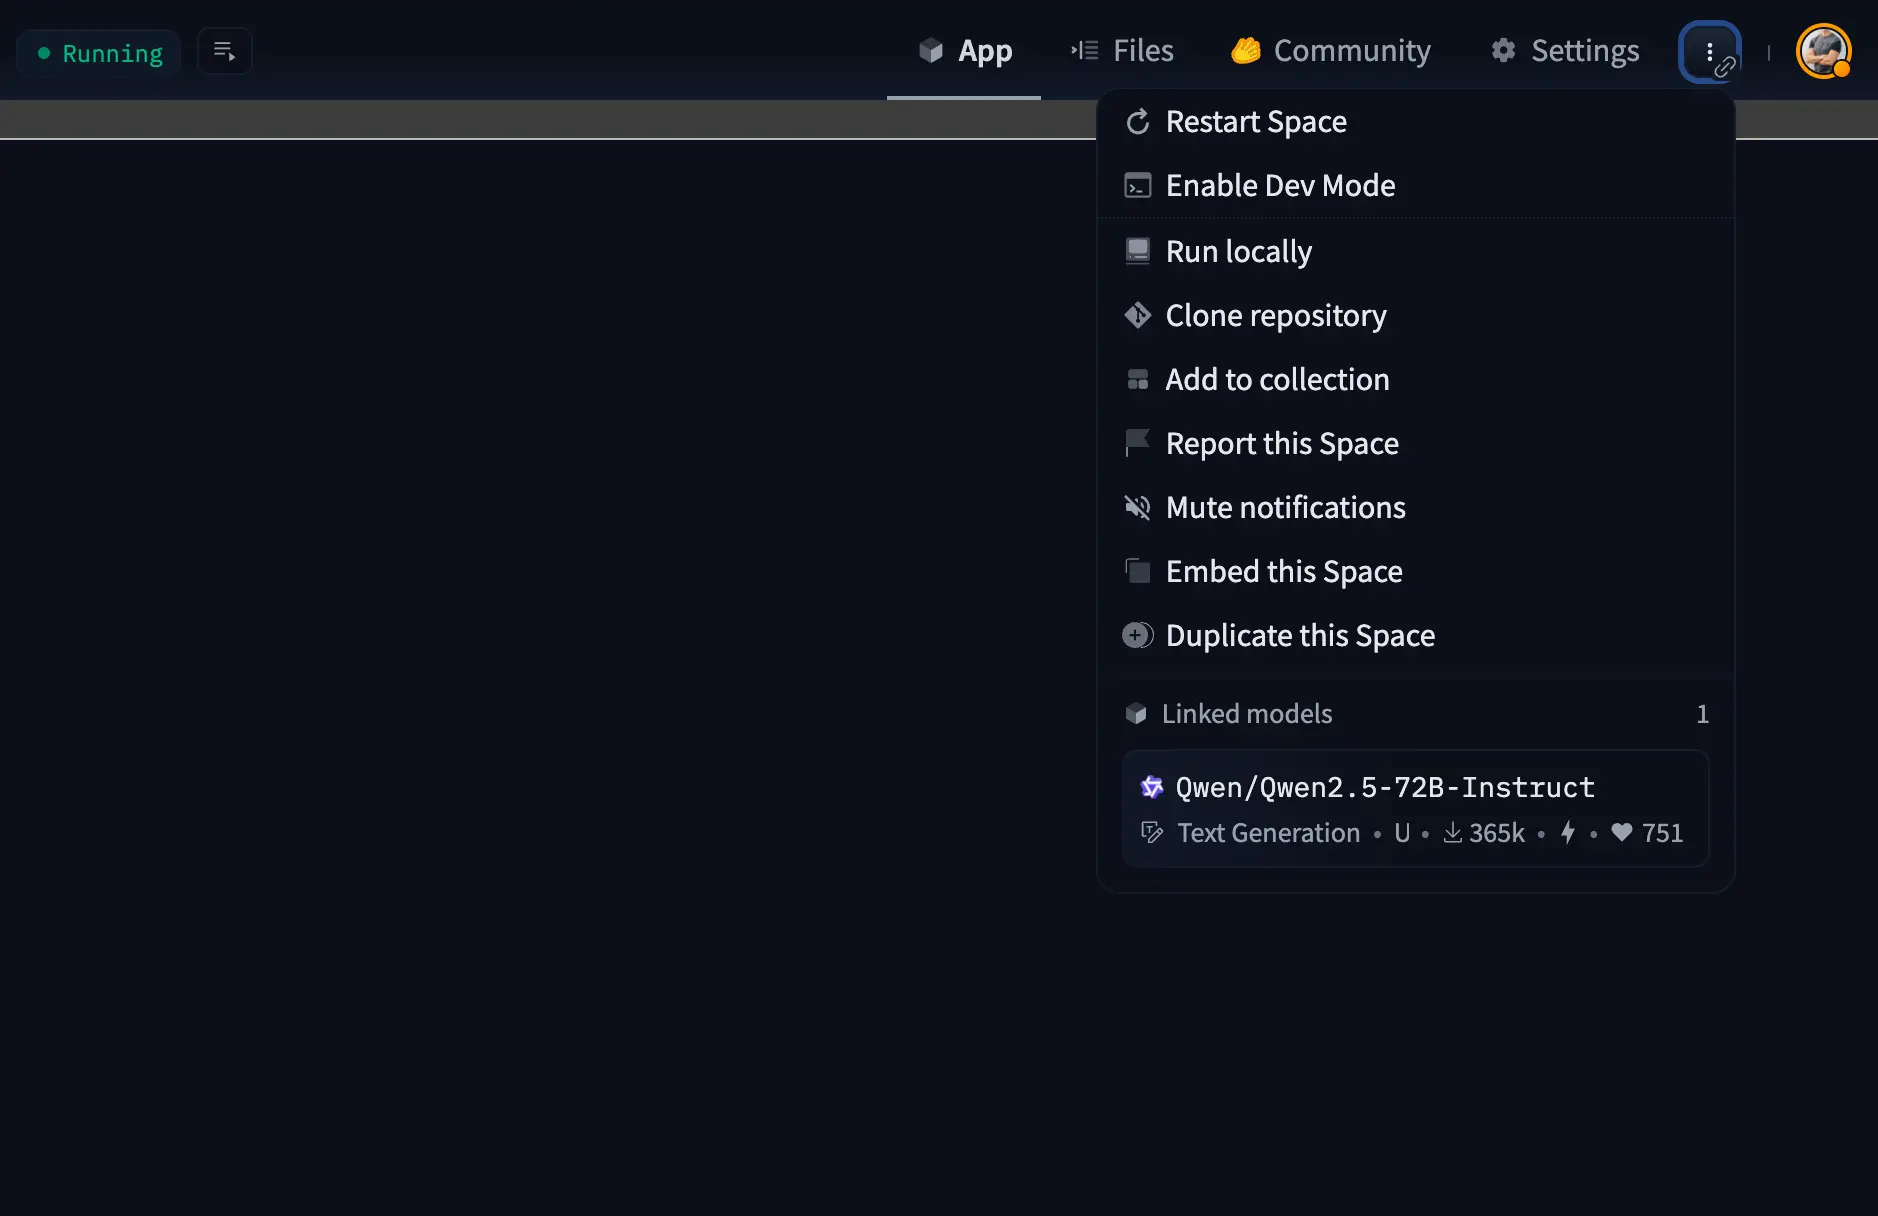
In the drop-down menu, we click on Embed this Space, which will open a window indicating how to embed the space with an iframe and also providing the URL of the space.
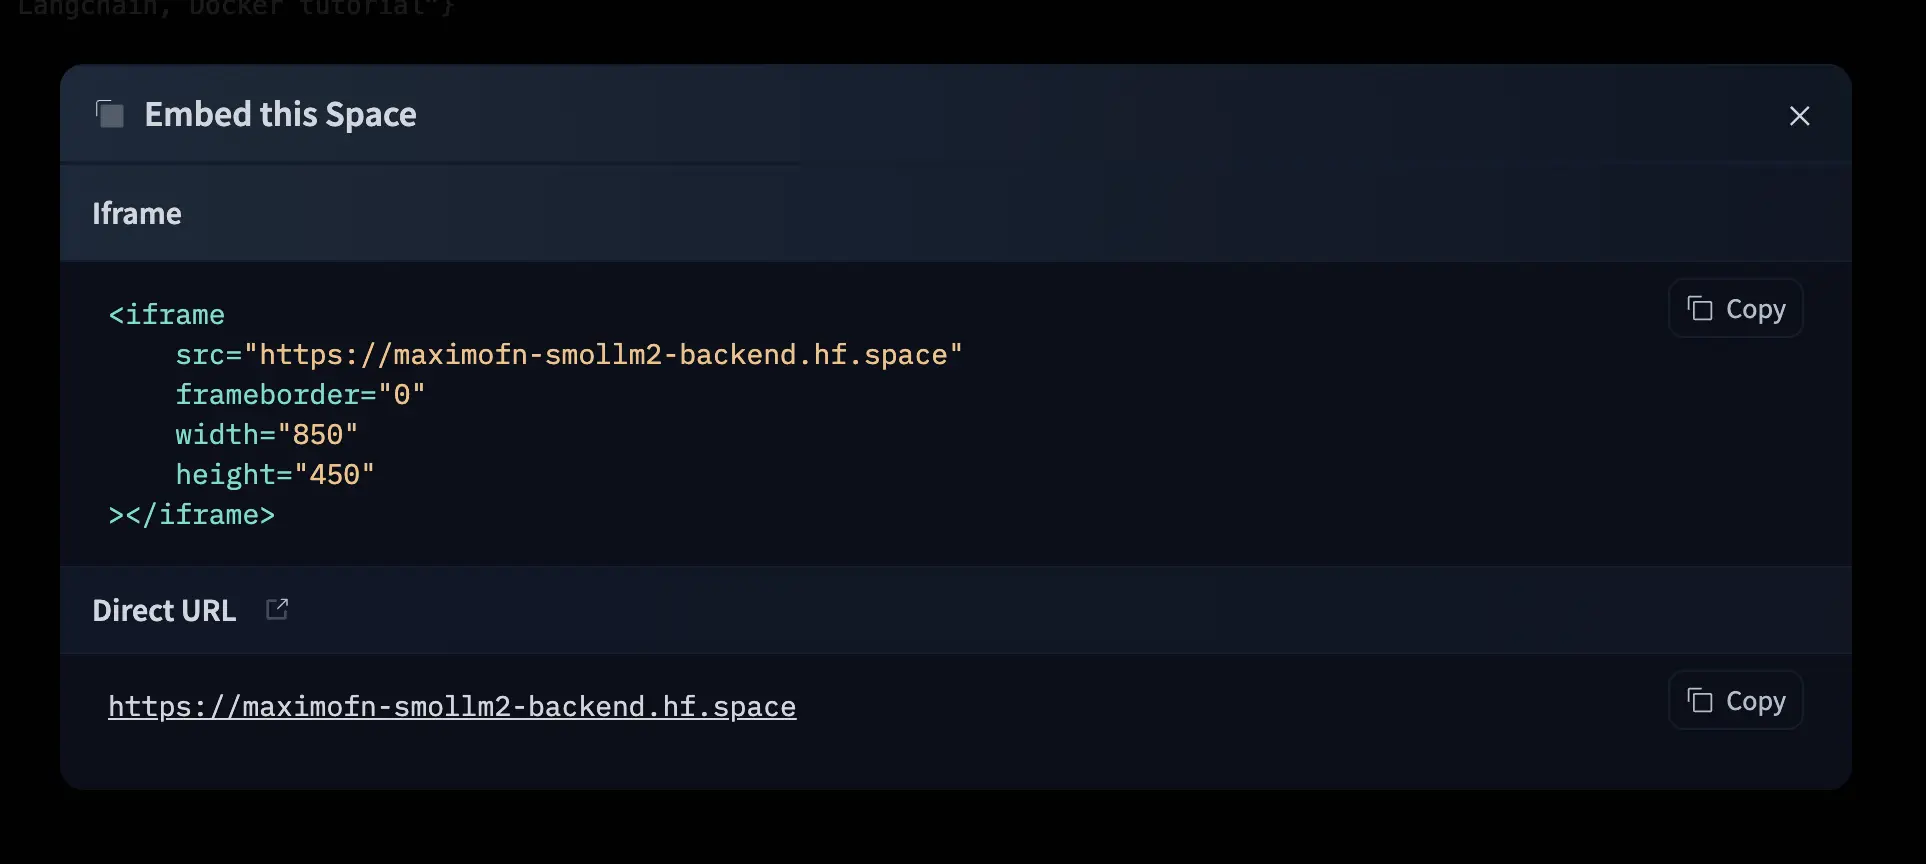
If we now go to that URL, we will see the same as in space.
Documentation
FastAPI, besides being an extremely fast API, has another great advantage: it generates documentation automatically.
If we add /docs to the URL we saw earlier, we will be able to see the API documentation with Swagger UI.
We can also add /redoc to the URL to view the documentation with ReDoc.
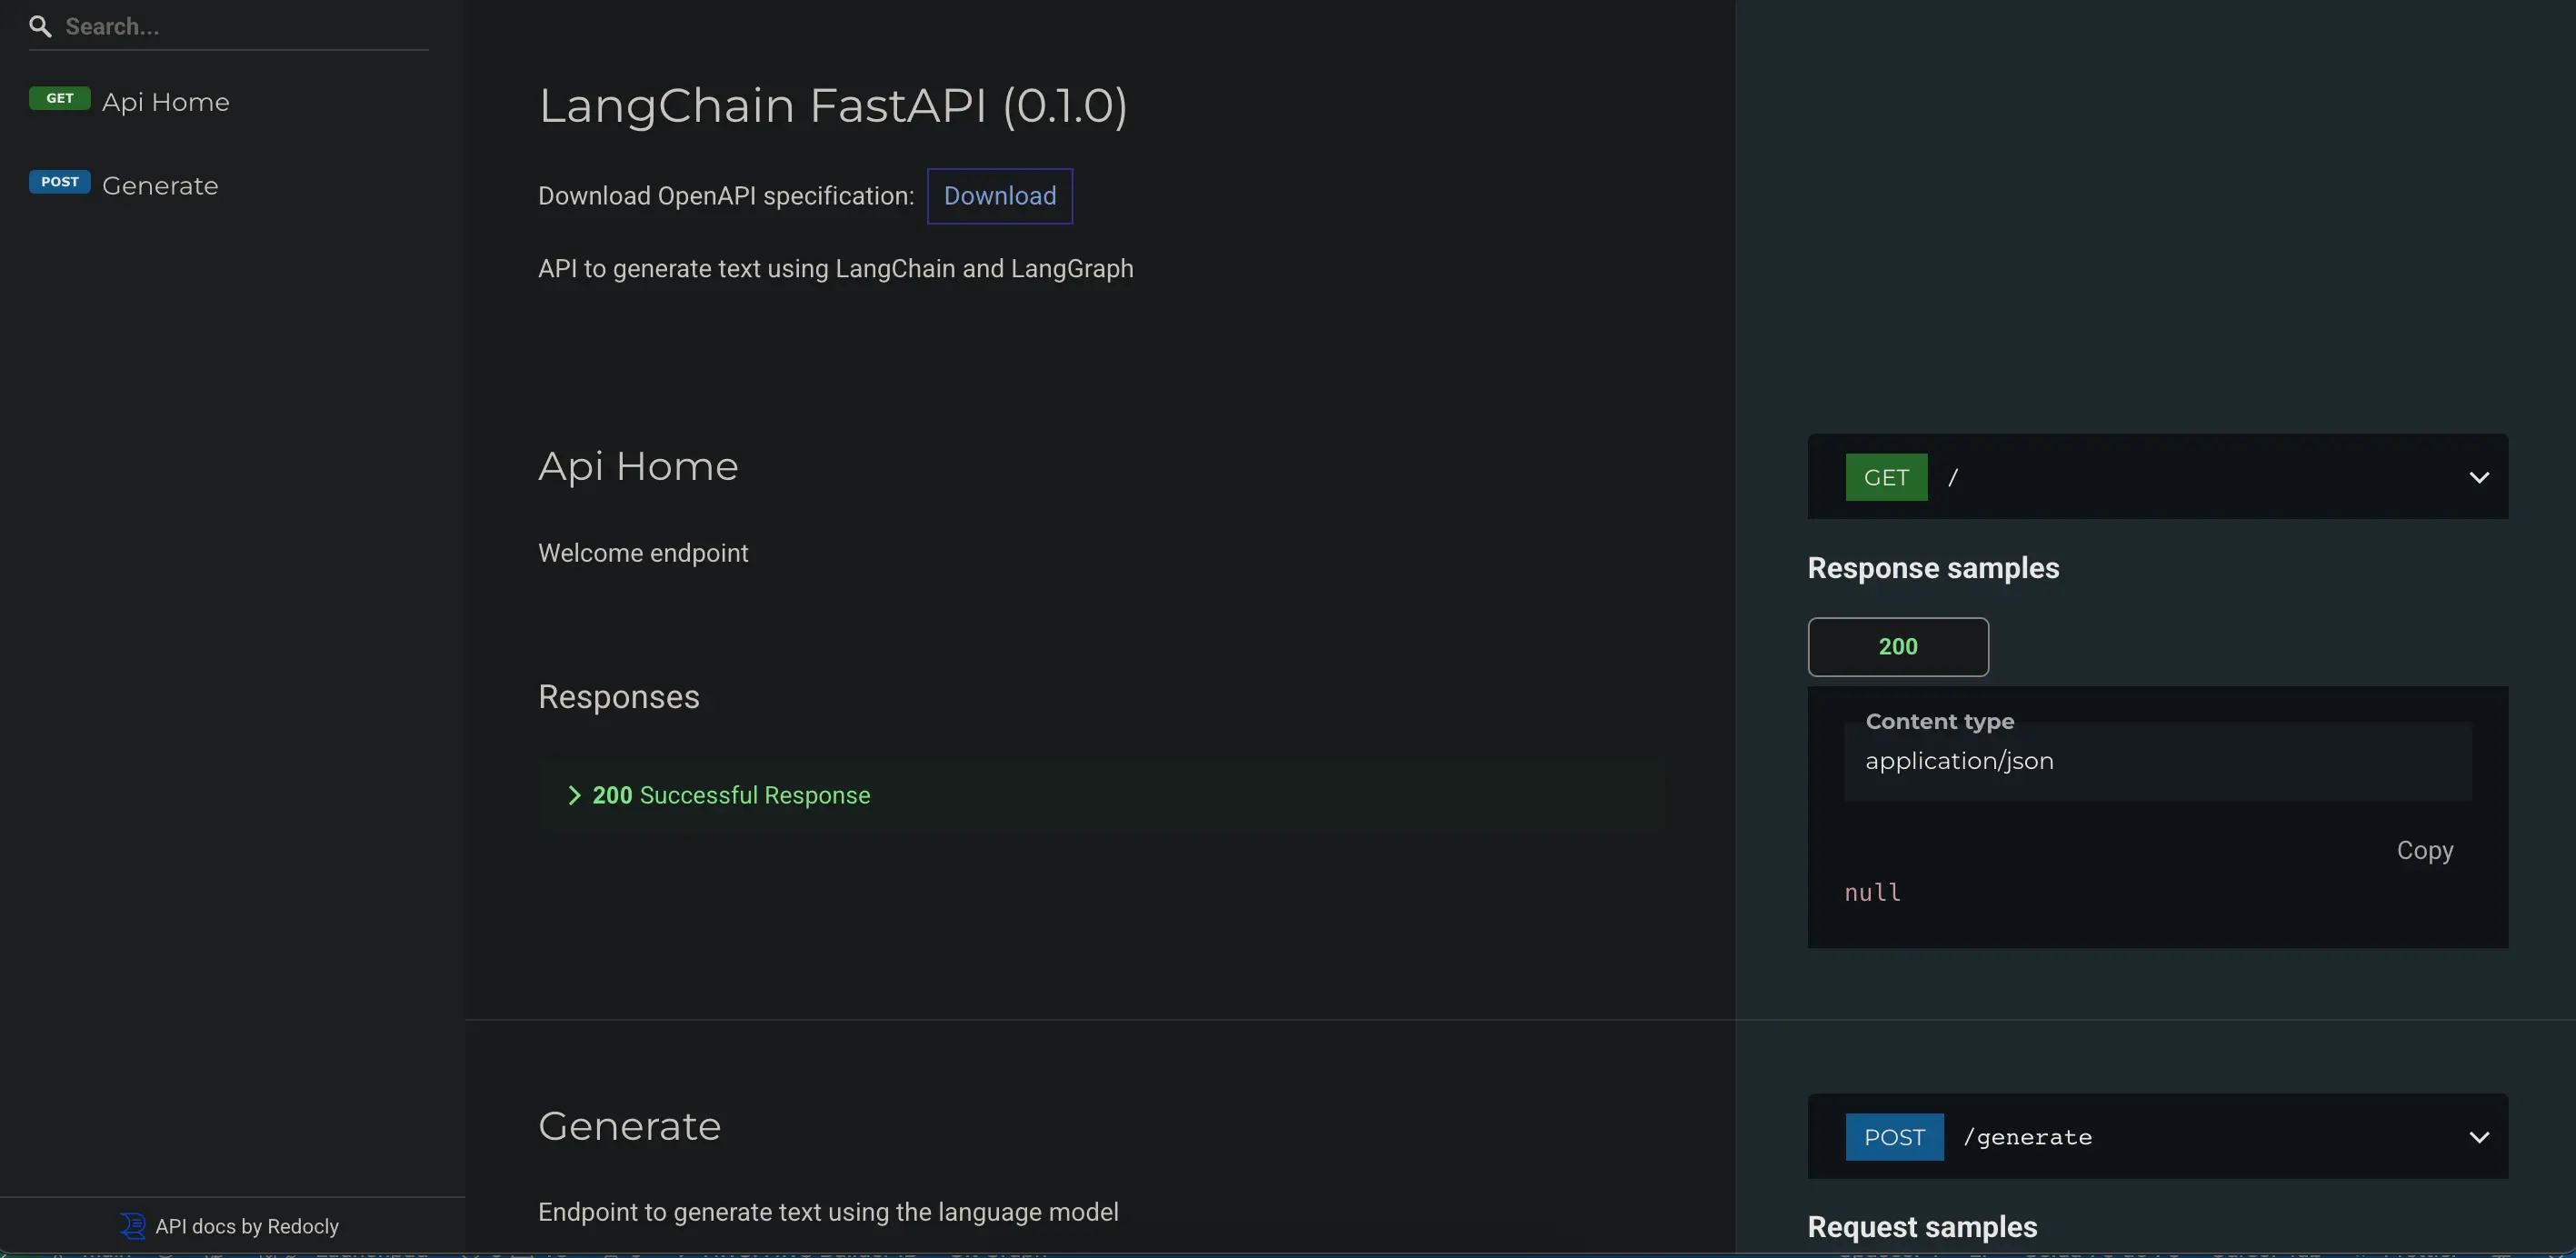
API Test
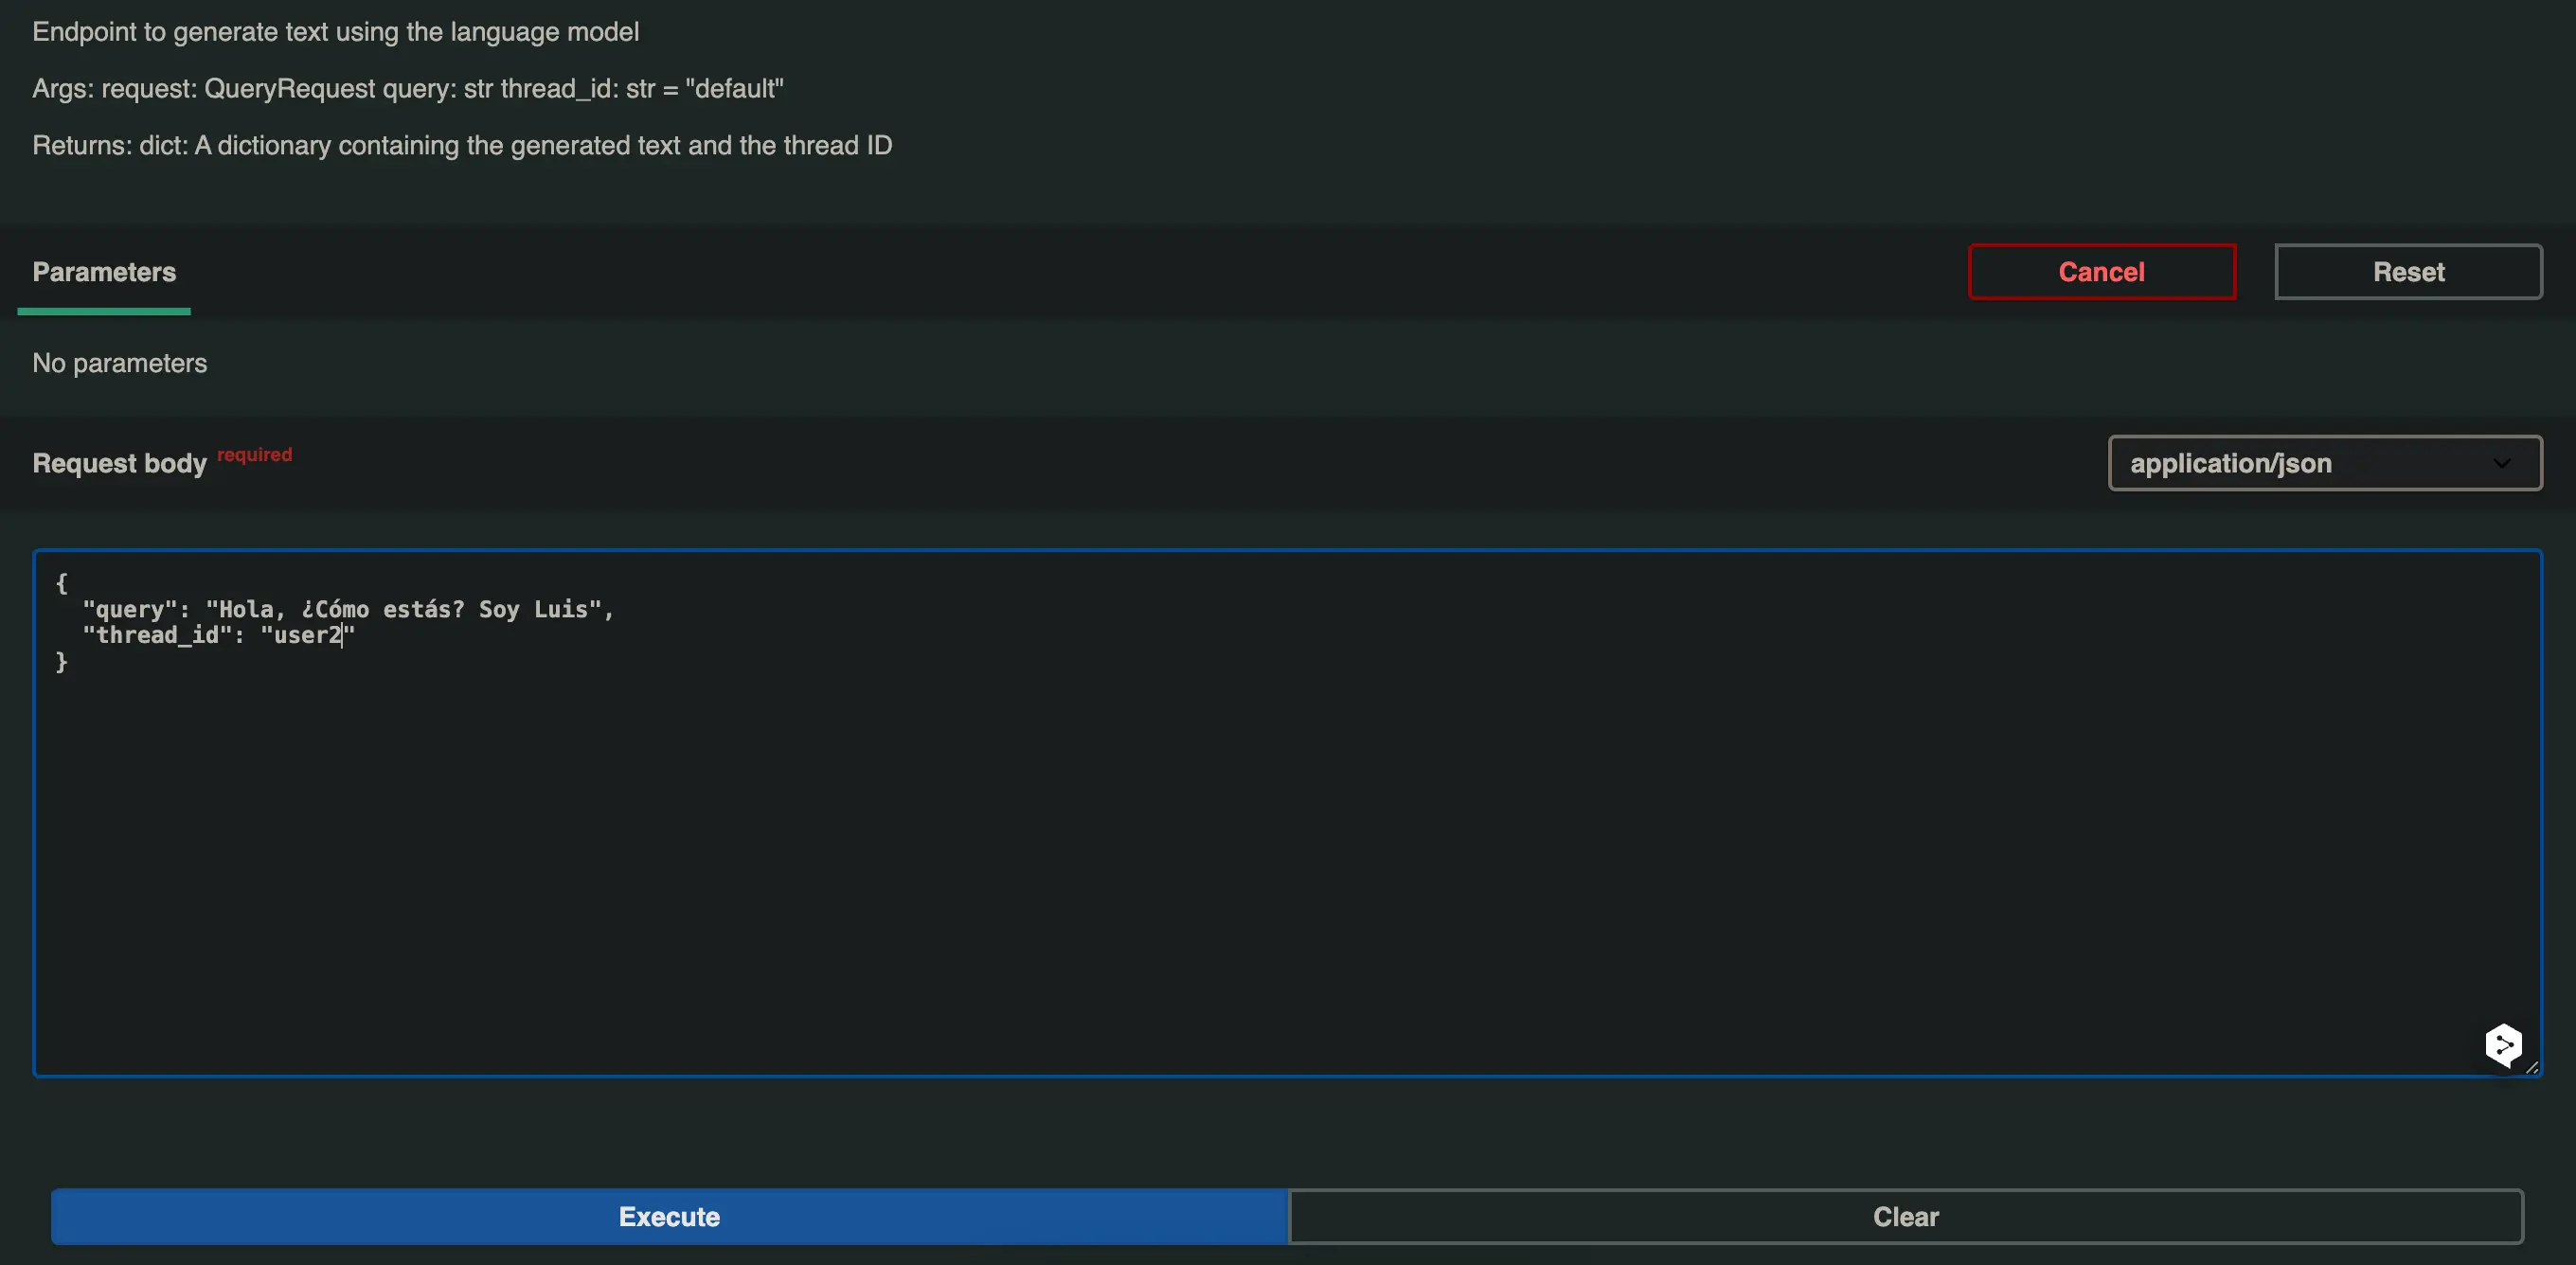
The good thing about Swagger UI documentation is that it allows us to test the API directly from the browser.
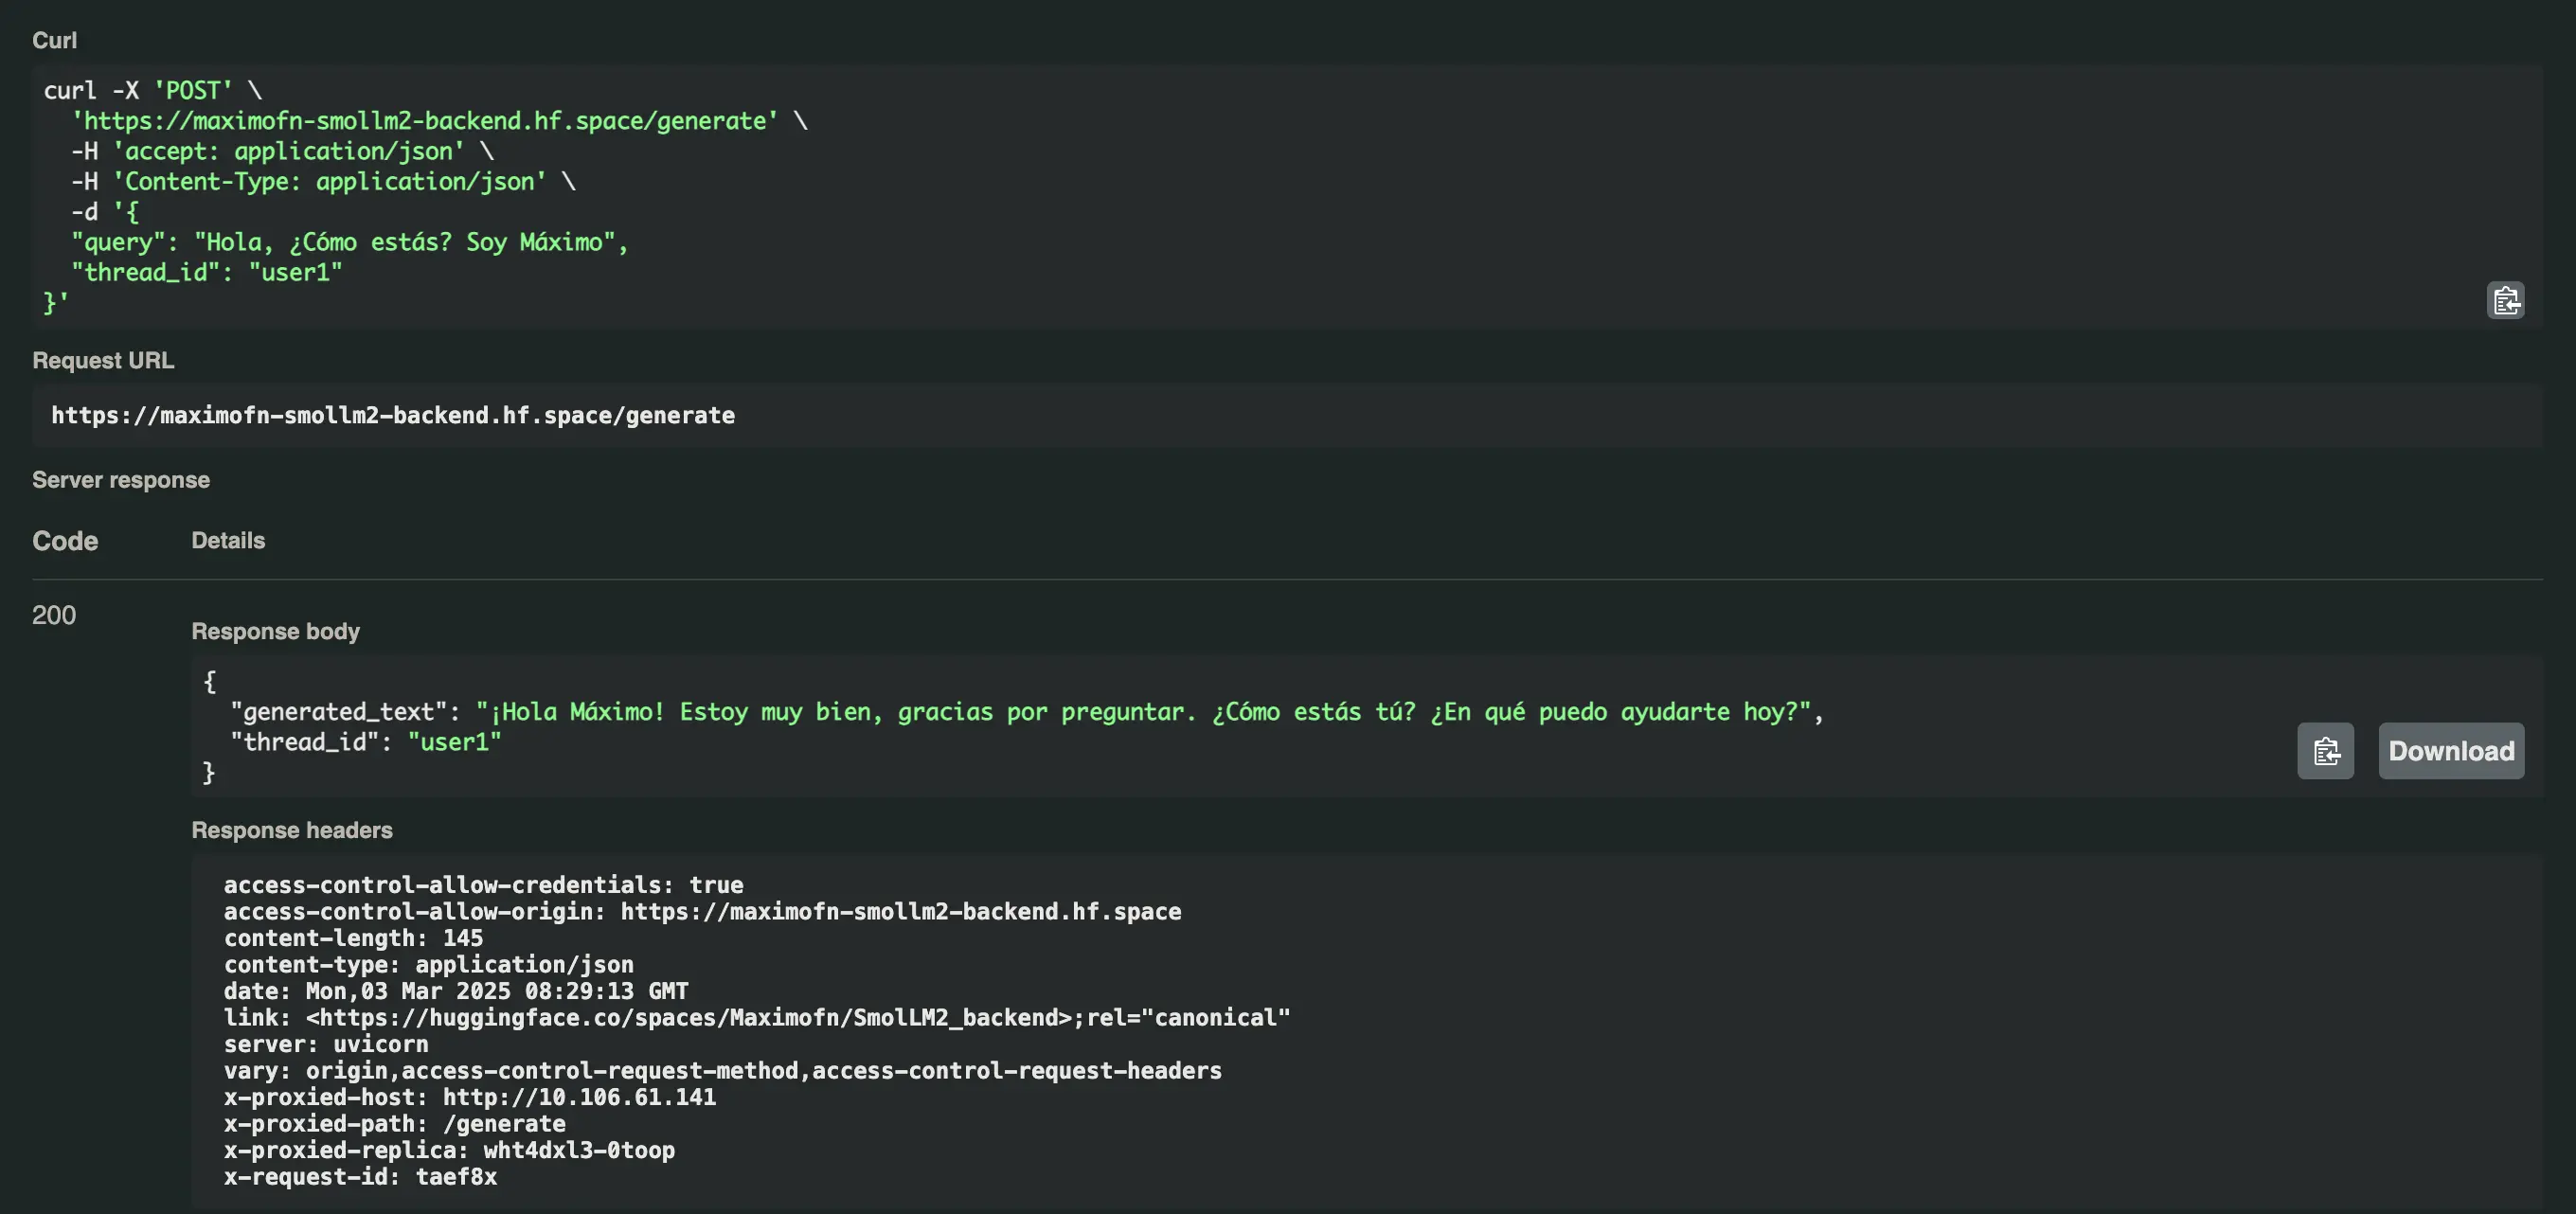
We add /docs to the URL we obtained, open the dropdown for the /generate endpoint, and click on Try it out. We modify the value of the query and the thread_id, and then press Execute.
In the first case I will put
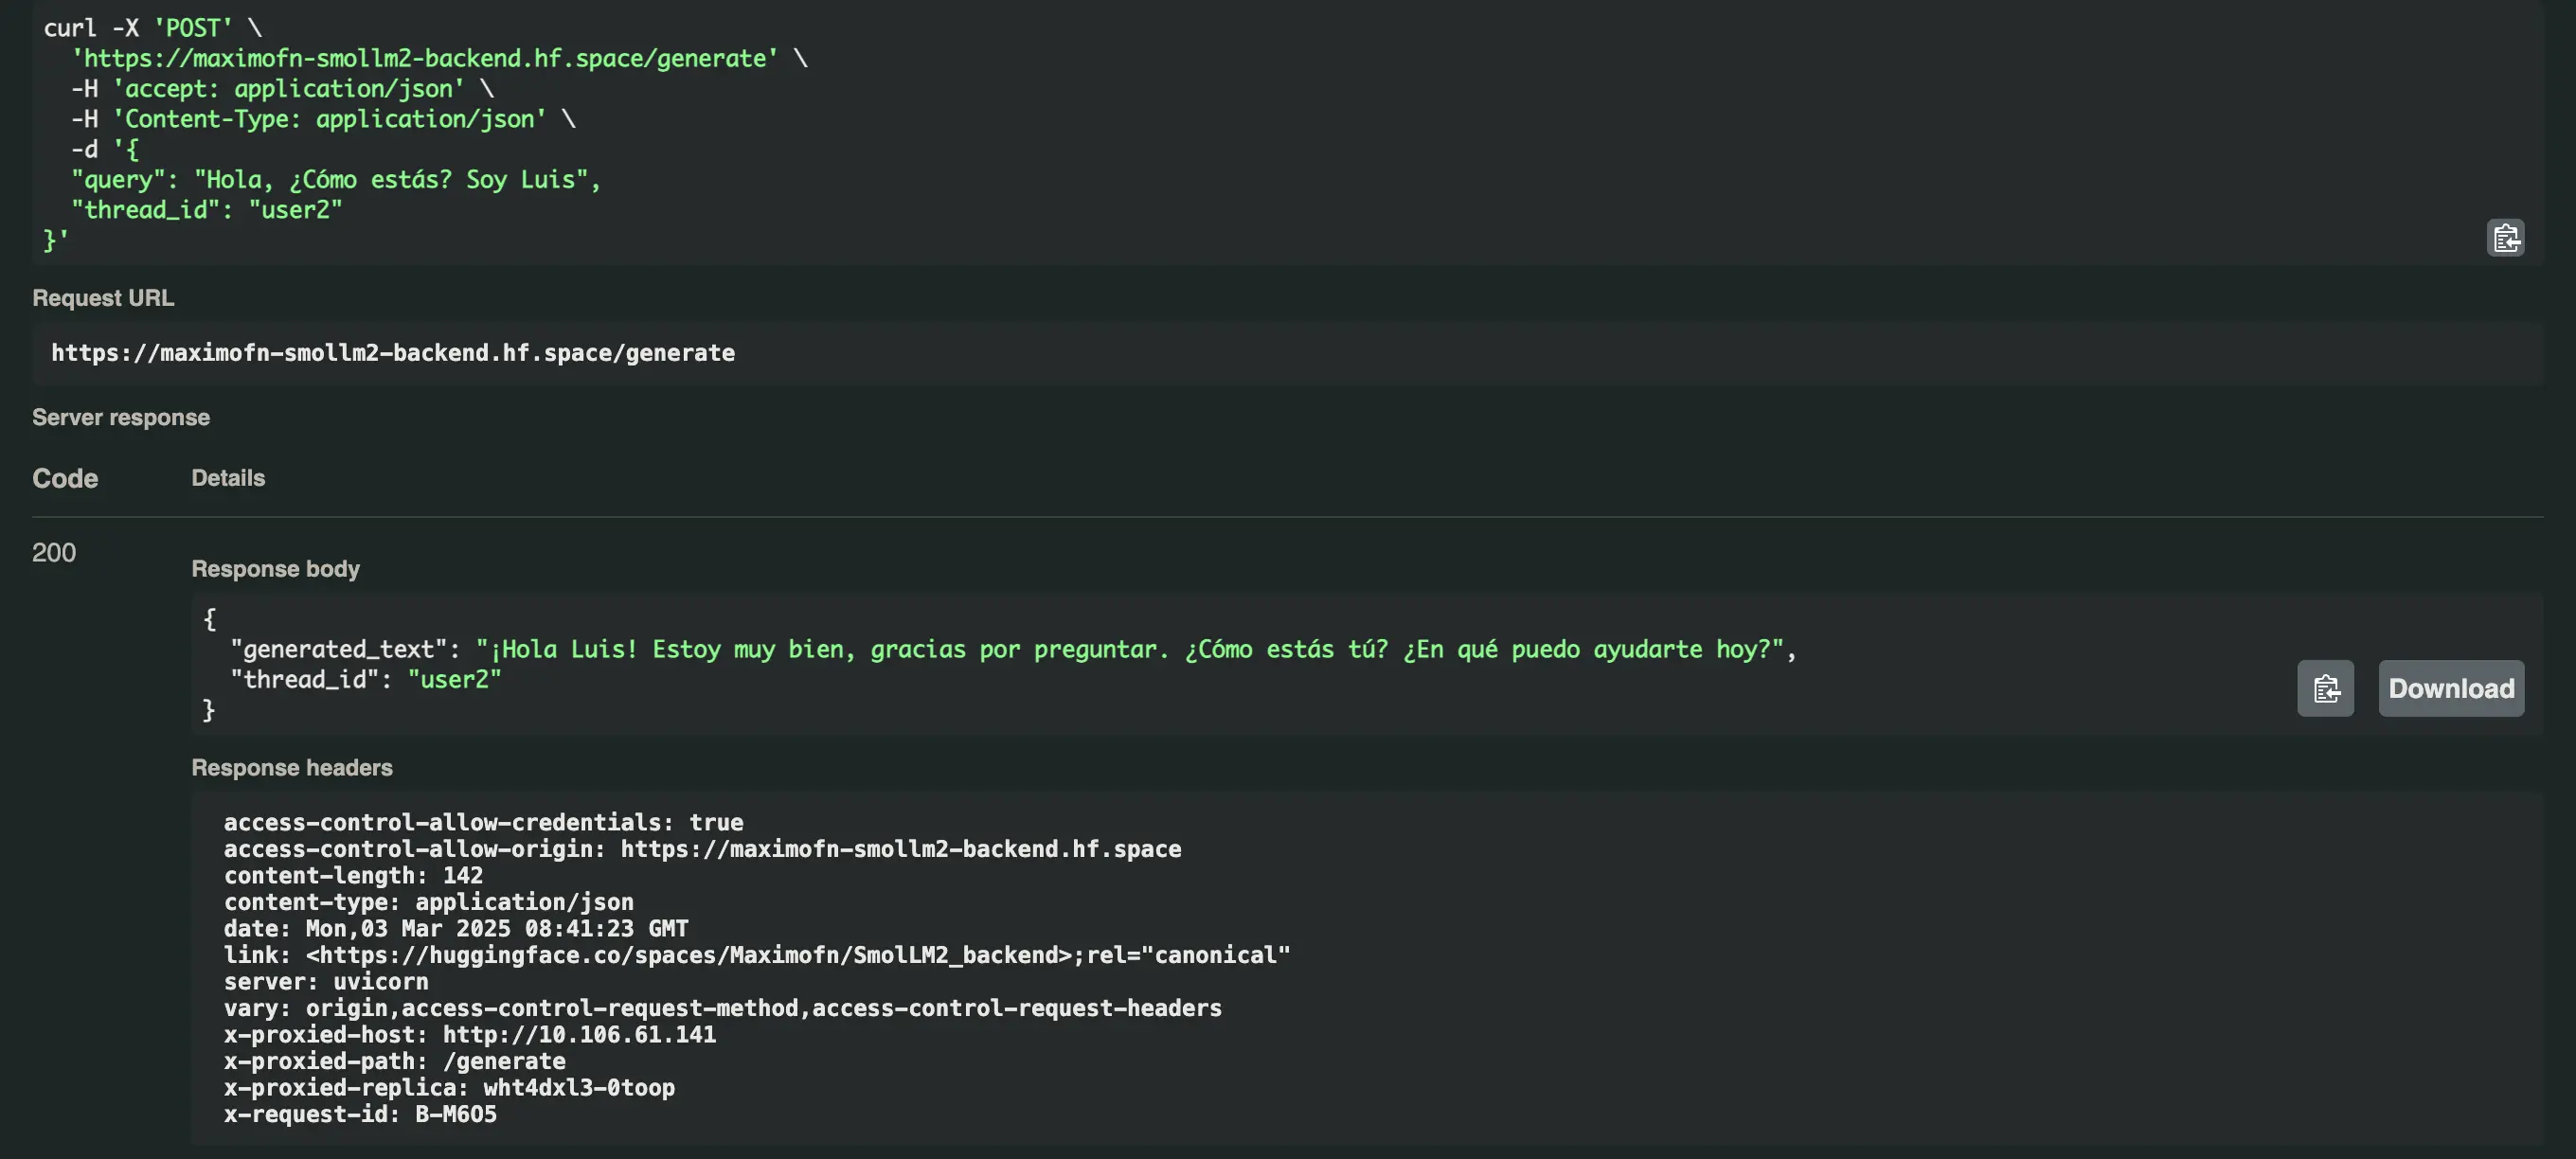
- query: Hello, how are you? I'm Maximo
- thread_id: user1
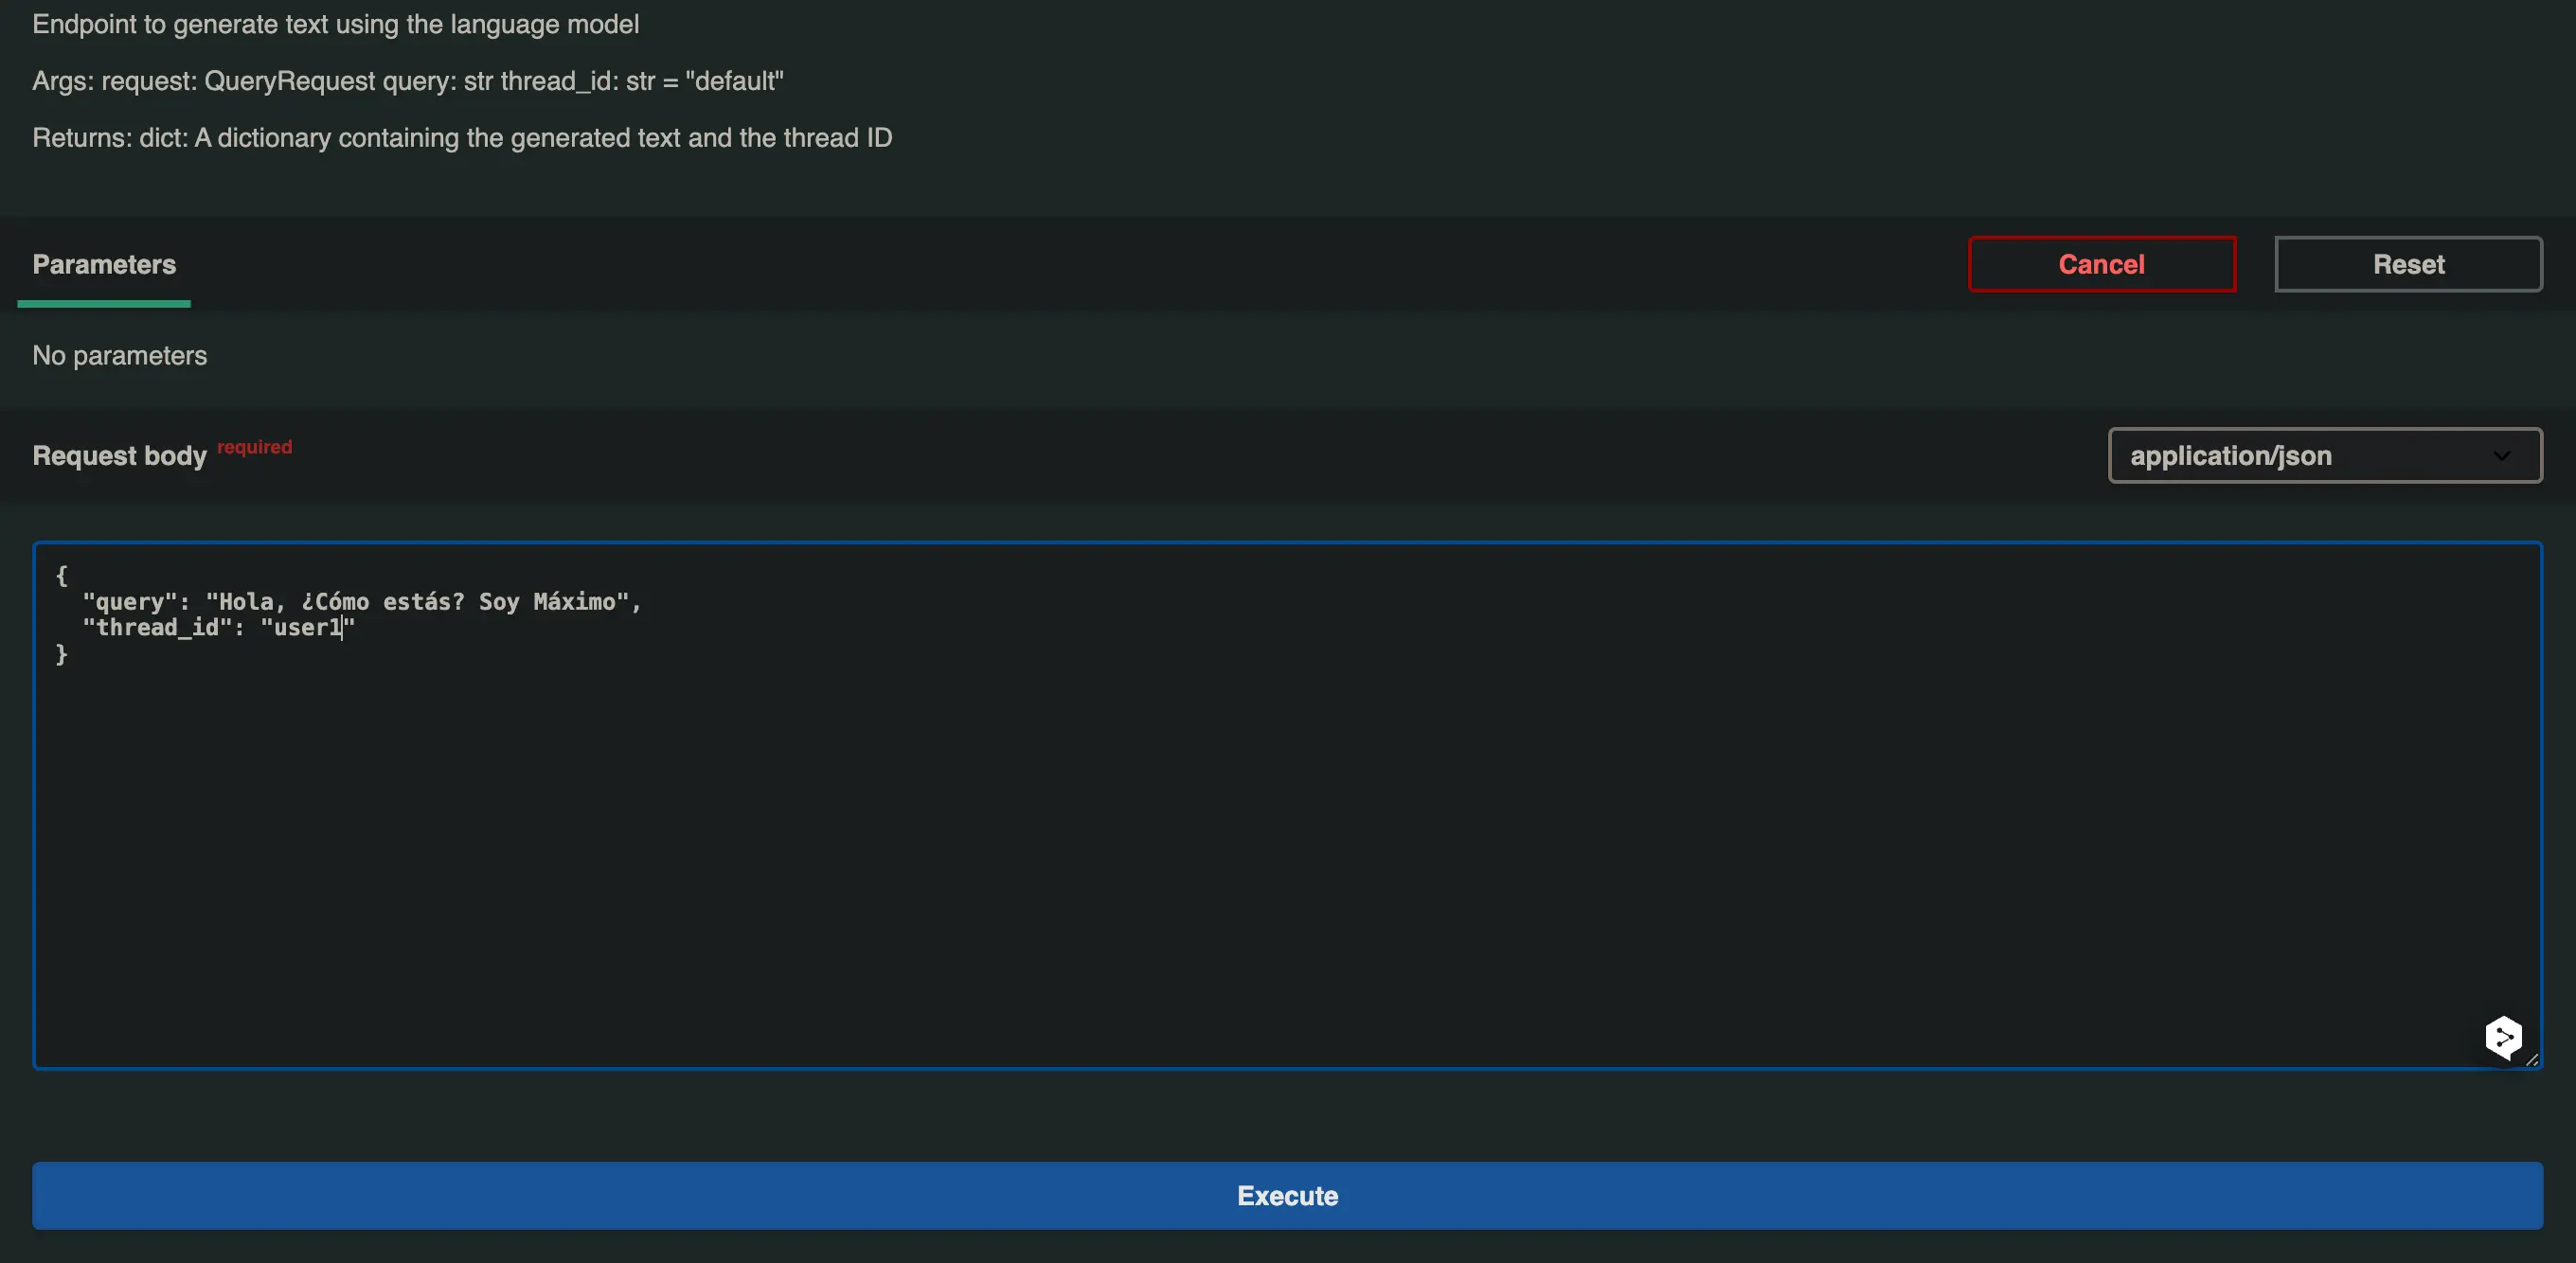
We received the following response: Hello Maximo! I'm doing very well, thank you for asking. How are you? What can I help you with today?
Let's now try the same question but with a different thread_id, in this case user2.
And it responds like this Hello Luis! I'm doing very well, thank you for asking. How are you? What can I help you with today?
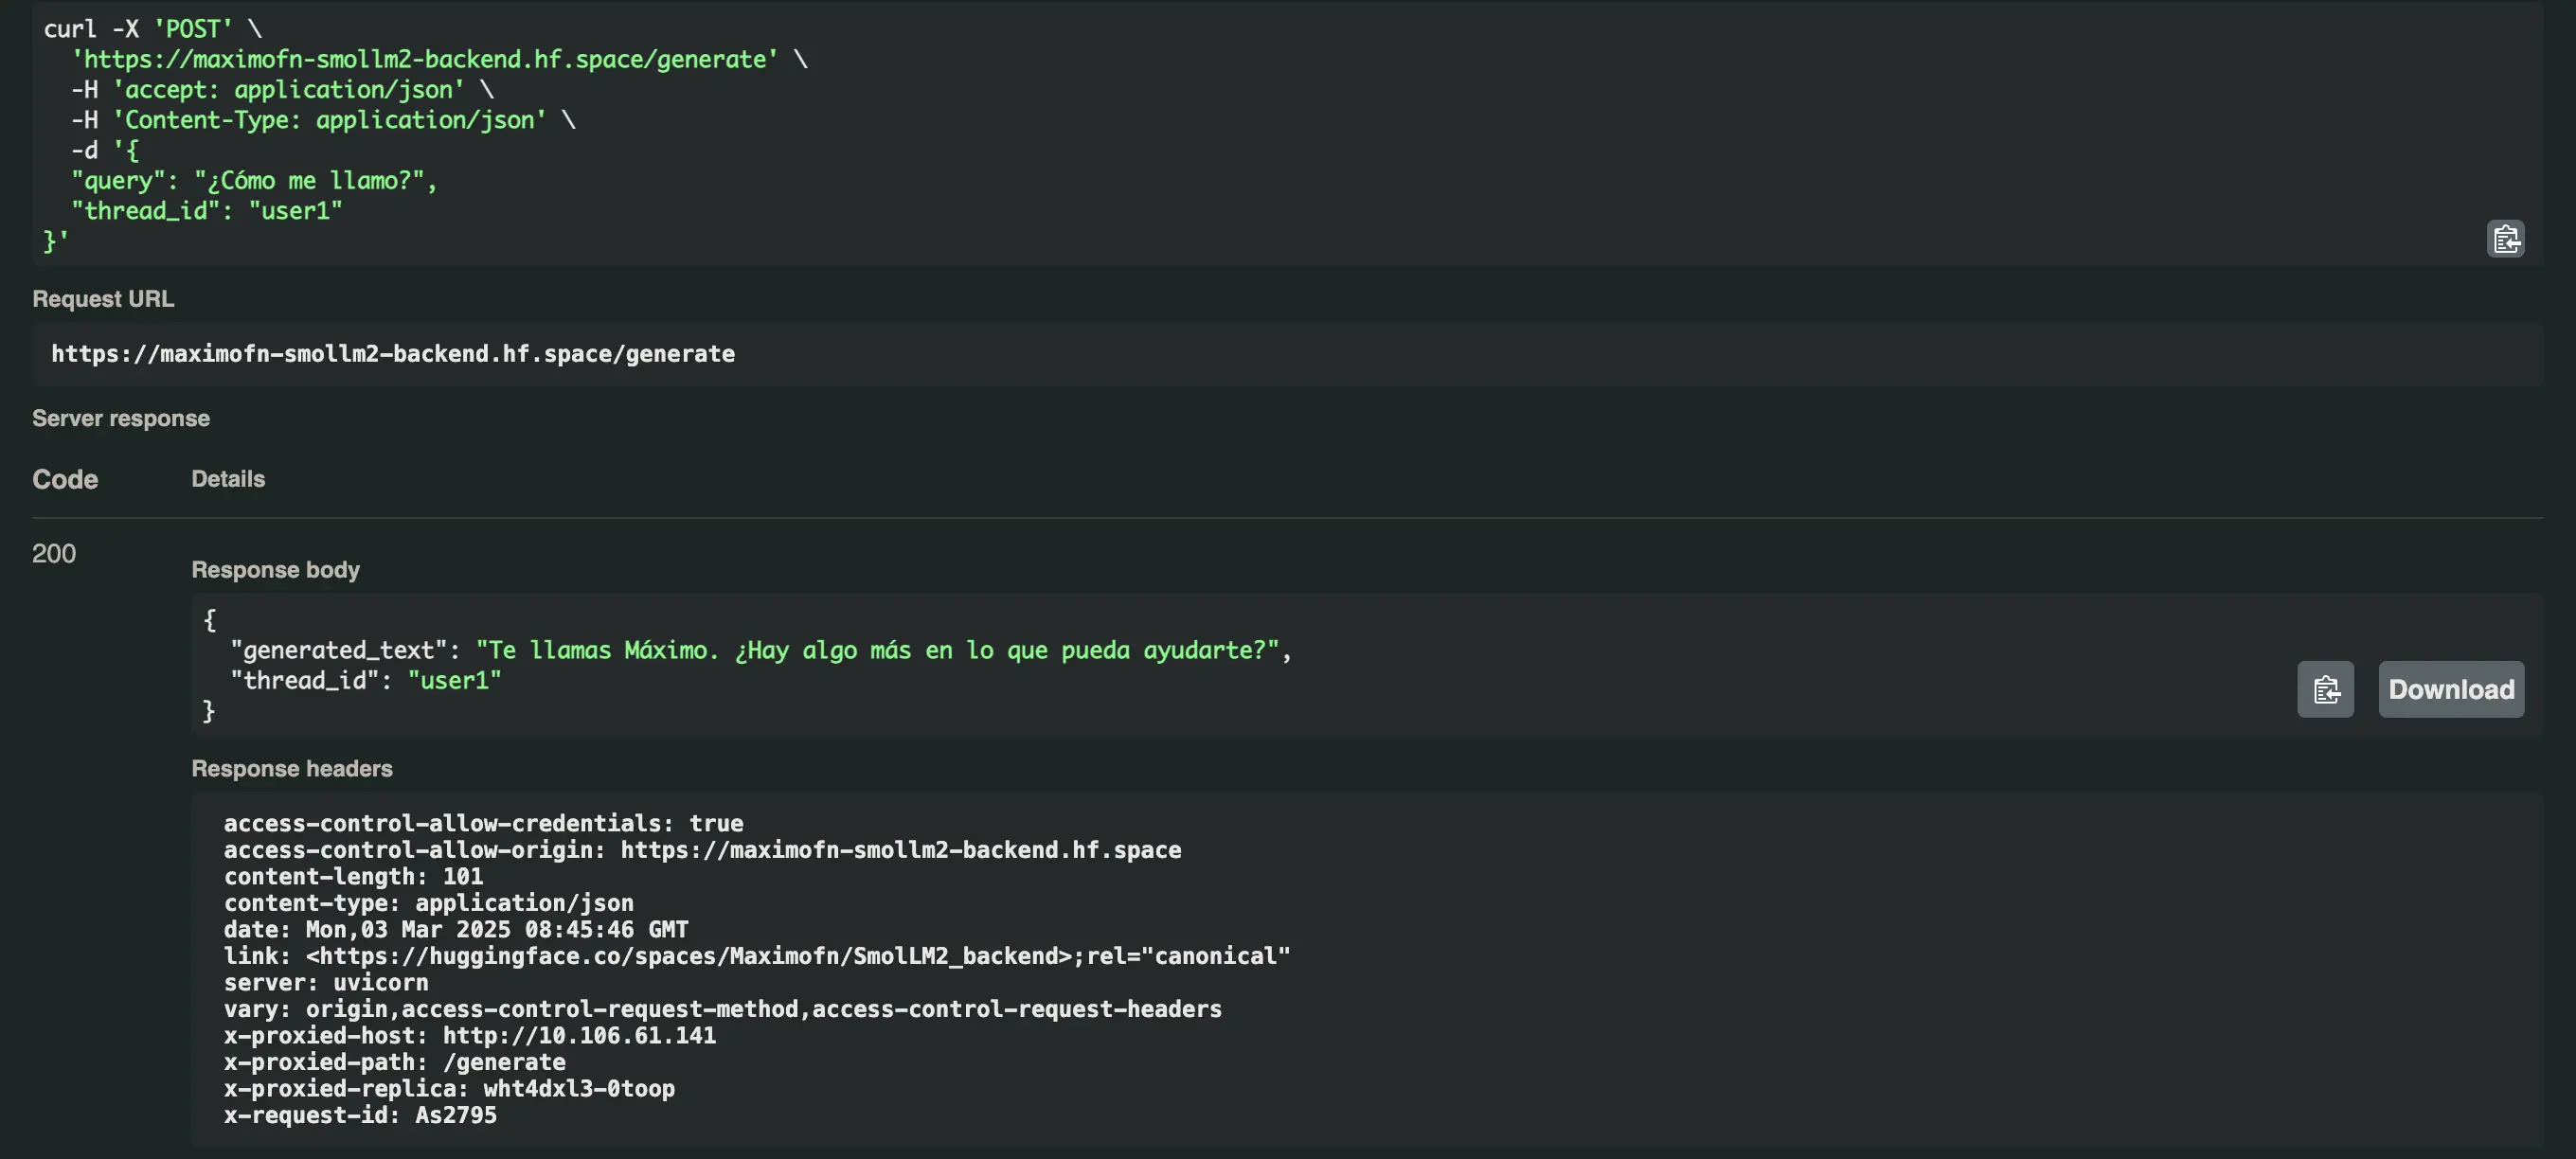
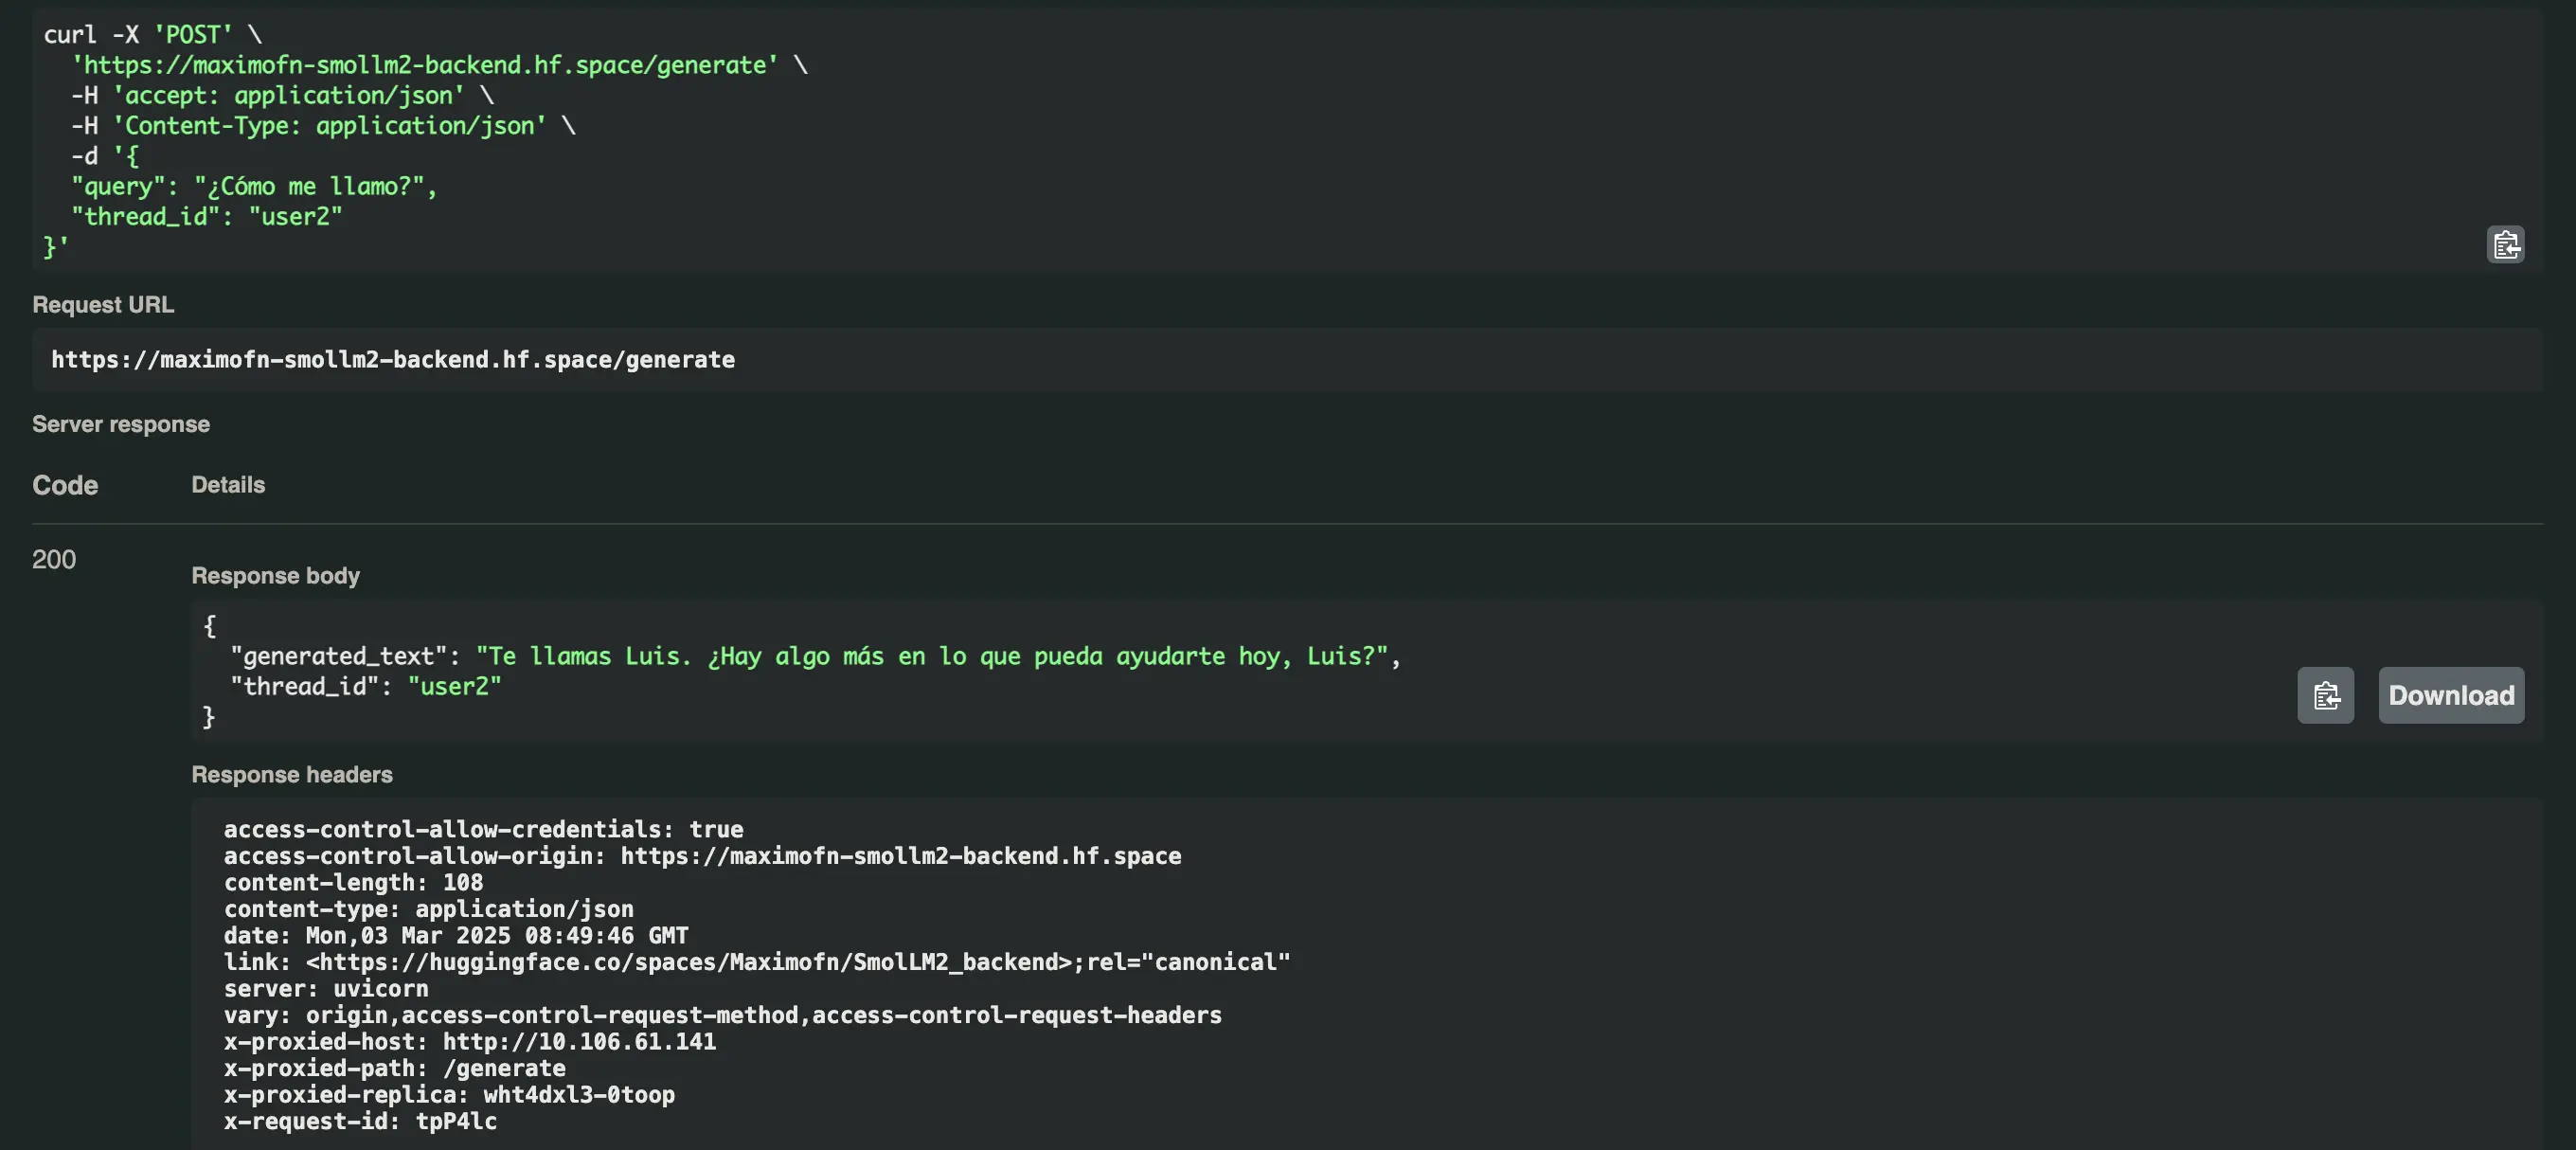
Now we ask for our name with both users and get this
- For the user user1:
Your name is Maximus. Is there anything else I can help you with? - For the user user2:
You are called Luis. Is there anything else I can help you with today, Luis?
Deploy backend with Gradio and model running on the server
The two backends we have created are actually not running a model, but rather making calls to HuggingFace Inference Endpoints. However, you might want everything to run on the server, including the model. It could be that you have fine-tuned an LLM for your use case, so you can no longer make calls to Inference Endpoints.
So let's see how to modify the code of the two backends to run a model on the server and not make calls to Inference Endpoints.
Create Space
When creating the space on HuggingFace, we do the same as before: create a new space, give it a name and a description, select Gradio as the SDK, choose the hardware on which we will deploy it—I select the most basic and free hardware—and choose whether to make it private or public.
Code
We need to make changes in app.py and requirements.txt so that instead of making calls to Inference Endpoints, the model runs locally.
app.py
The changes we have to make are
Import AutoModelForCausalLM and AutoTokenizer from the transformers library and import torch
from transformers import AutoModelForCausalLM, AutoTokenizer
import torch
Instead of creating a model using InferenceClient, we create it with AutoModelForCausalLM and AutoTokenizer.
# Load the model and the tokenizer
model_name = "HuggingFaceTB/SmolLM2-1.7B-Instruct"
tokenizer = AutoTokenizer.from_pretrained(model_name)
model = AutoModelForCausalLM.from_pretrained(
model_name,
torch_dtype=torch.float16,
device_map="auto"
)
I use HuggingFaceTB/SmolLM2-1.7B-Instruct because it is a fairly capable model with only 1.7B parameters. Since I chose the most basic hardware, I can't use very large models. If you want to use a larger model, you have two options: use the free hardware and accept that inference will be slower, or use more powerful hardware, but at a cost.
Modify the respond function to build the prompt with the necessary structure for the transformers library, tokenize the prompt, perform inference, and detokenize the response.
def respond(
message,
history: list[tuple[str, str]],
It seems like you've mentioned a "system_message," but there's no specific content to translate. If you have a markdown text that needs translation, please provide it and I'll translate it for you.
max_tokens,
temperature,
top_p,
):
# Build the prompt with the correct format
prompt = f"<|system|>\n{system_message}</s>\n"

for val in history:
if val[0]:
prompt += f"<|user|>\n{val[0]}</s>\n"
if val[1]:
prompt += f"<|assistant|>\n{val[1]}</s>\n"

prompt += f"<|user|>\n{message}</s>\n<|assistant|>\n"

# Tokenize the prompt
inputs = tokenizer(prompt, return_tensors="pt").to(model.device)

# Generate the response
outputs = model.generate(
**inputs,**
max_new_tokens=max_tokens,
temperature=temperature,
top_p=top_p,
do_sample=True,
pad_token_id=tokenizer.eos_token_id
)

# Decode the response
response = tokenizer.decode(outputs[0], skip_special_tokens=True)

# Extract only the assistant's response part
response = response.split("<|assistant|>\n")[-1].strip()

yield response
Here I leave all the code
import gradio as gr
from transformers import AutoModelForCausalLM, AutoTokenizer
import torch

"""
For more information on `huggingface_hub` Inference API support, please check the docs: https://huggingface.co/docs/huggingface_hub/v0.22.2/en/guides/inference
"""

# Cargar el modelo y el tokenizer
model_name = "HuggingFaceTB/SmolLM2-1.7B-Instruct"
tokenizer = AutoTokenizer.from_pretrained(model_name)
model = AutoModelForCausalLM.from_pretrained(
  model_name,
  torch_dtype=torch.float16,
  device_map="auto"
)

def respond(
  message,
  history: list[tuple[str, str]],
  system_message,
  max_tokens,
  temperature,
  top_p,
):
  # Construir el prompt con el formato correcto
  prompt = f"<|system|>\n{system_message}</s>\n"

  for val in history:
    if val[0]:
      prompt += f"<|user|>\n{val[0]}</s>\n"
    if val[1]:
      prompt += f"<|assistant|>\n{val[1]}</s>\n"

  prompt += f"<|user|>\n{message}</s>\n<|assistant|>\n"

  # Tokenizar el prompt
  inputs = tokenizer(prompt, return_tensors="pt").to(model.device)

  # Generar la respuesta
  outputs = model.generate(
    **inputs,
    max_new_tokens=max_tokens,
    temperature=temperature,
    top_p=top_p,
    do_sample=True,
    pad_token_id=tokenizer.eos_token_id
  )

  # Decodificar la respuesta
  response = tokenizer.decode(outputs[0], skip_special_tokens=True)

  # Extraer solo la parte de la respuesta del asistente
  response = response.split("<|assistant|>\n")[-1].strip()

  yield response


"""
For information on how to customize the ChatInterface, peruse the gradio docs: https://www.gradio.app/docs/gradio/chatinterface
"""
demo = gr.ChatInterface(
  respond,
  additional_inputs=[
    gr.Textbox(
      value="You are a friendly Chatbot. Always reply in the language in which the user is writing to you.",
      label="System message"
    ),
    gr.Slider(minimum=1, maximum=2048, value=512, step=1, label="Max new tokens"),
    gr.Slider(minimum=0.1, maximum=4.0, value=0.7, step=0.1, label="Temperature"),
    gr.Slider(
      minimum=0.1,
      maximum=1.0,
      value=0.95,
      step=0.05,
      label="Top-p (nucleus sampling)",
    ),
  ],
)


if __name__ == "__main__":
  demo.launch()
requirements.txt
In this file, we need to add the new libraries we are going to use, in this case transformers, accelerate and torch. The entire file would be:
huggingface_hub==0.25.2
gradio>=4.0.0
transformers>=4.36.0
torch>=2.0.0
accelerate>=0.25.0
API Test
We deploy the space and test the API directly.
from gradio_client import Clientclient = Client("Maximofn/SmolLM2_localModel")result = client.predict(message="Hola, ¿cómo estás? Me llamo Máximo",system_message="You are a friendly Chatbot. Always reply in the language in which the user is writing to you.",max_tokens=512,temperature=0.7,top_p=0.95,api_name="/chat")print(result)Copied
Loaded as API: https://maximofn-smollm2-localmodel.hf.space ✔Hola Máximo, soy su Chatbot amable y estoy funcionando bien. Gracias por tu mensaje, me complace ayudarte hoy en día. ¿Cómo puedo servirte?
I'm surprised how quickly the model responds even on a server without a GPU.
Deploy backend with FastAPI, Langchain and Docker and model running on the server
Now we do the same as before, but with FastAPI, LangChain and Docker.
Create Space
When creating the space on HuggingFace, we do the same as before: create a new space, give it a name and a description, select Docker as the SDK, choose the hardware on which we are going to deploy it—I select the most basic and free hardware—and decide whether to make it private or public.
Code
app.py
We no longer import InferenceClient and now import AutoModelForCausalLM and AutoTokenizer from the transformers library and import torch.
from transformers import AutoModelForCausalLM, AutoTokenizer
import torch
We instantiate the model and the tokenizer with AutoModelForCausalLM and AutoTokenizer.
# Initialize the model and tokenizer
print("Loading model and tokenizer...")
device = "cuda" if torch.cuda.is_available() else "cpu"
model_name = "HuggingFaceTB/SmolLM2-1.7B-Instruct"

try:
# Load the model in BF16 format for better performance and lower memory usage
tokenizer = AutoTokenizer.from_pretrained(model_name)

if device == "cuda":
print("Using GPU for the model...")
model = AutoModelForCausalLM.from_pretrained(
model_name,
torch_dtype=torch.bfloat16,
device_map="auto",
low_cpu_mem_usage=True
)
else:
print("Using CPU for the model...")
model = AutoModelForCausalLM.from_pretrained(
model_name,
device_map={"": device},
torch_dtype=torch.float32
)

print(f"Model successfully loaded on: {device}")
except Exception as e:
print(f"Error loading the model: {str(e)}")
raise
We redefine the call_model function to perform inference with the local model.
# Define the function that calls the model
def call_model(state: MessagesState):
  """
  Call the model with the given messages

  Args:
    state: MessagesState

  Returns:
    dict: A dictionary containing the generated text and the thread ID
  """
  # Convert LangChain messages to chat format
  messages = []
  for msg in state["messages"]:
    if isinstance(msg, HumanMessage):
      messages.append({"role": "user", "content": msg.content})
    elif isinstance(msg, AIMessage):
      messages.append({"role": "assistant", "content": msg.content})

  # Prepare the input using the chat template
  input_text = tokenizer.apply_chat_template(messages, tokenize=False)
  inputs = tokenizer.encode(input_text, return_tensors="pt").to(device)

  # Generate response
  outputs = model.generate(
    inputs,
    max_new_tokens=512,  # Increase the number of tokens for longer responses
    temperature=0.7,
    top_p=0.9,
    do_sample=True,
    pad_token_id=tokenizer.eos_token_id
  )

  # Decode and clean the response
  response = tokenizer.decode(outputs[0], skip_special_tokens=True)
  # Extract only the assistant's response (after the last user message)
  response = response.split("Assistant:")[-1].strip()

  # Convert the response to LangChain format
  ai_message = AIMessage(content=response)
  return {"messages": state["messages"] + [ai_message]}
requirements.txt
We need to remove langchain-huggingface and add transformers, accelerate and torch in the requirements.txt file. The file would look like:
fastapi
uvicorn
requests
pydantic>=2.0.0
langchain>=0.1.0
langchain-core>=0.1.10
langgraph>=0.2.27
python-dotenv>=1.0.0
transformers>=4.36.0
torch>=2.0.0
accelerate>=0.26.0
Dockerfile
We no longer need to have RUN --mount=type=secret,id=HUGGINGFACE_TOKEN,mode=0444,required=true because since the model will be on the server and we won't be making calls to Inference Endpoints, we don't need the token. The file would look like:
FROM python:3.13-slim

RUN useradd -m -u 1000 user
WORKDIR /app

COPY --chown=user ./requirements.txt requirements.txt
RUN pip install --no-cache-dir --upgrade -r requirements.txt

COPY --chown=user . /app

EXPOSE 7860

CMD ["uvicorn", "app:app", "--host", "0.0.0.0", "--port", "7860"]
API Test
We deploy the space and test the API. In this case, I will test it directly from Python.
import requestsurl = "https://maximofn-smollm2-backend-localmodel.hf.space/generate"data = {"query": "Hola, ¿cómo estás?","thread_id": "user1"}response = requests.post(url, json=data)if response.status_code == 200:result = response.json()print("Respuesta:", result["generated_text"])print("Thread ID:", result["thread_id"])else:print("Error:", response.status_code, response.text)Copied
Respuesta: systemYou are a friendly Chatbot. Always reply in the language in which the user is writing to you.userHola, ¿cómo estás?assistantEstoy bien, gracias por preguntar. Estoy muy emocionado de la semana que viene.Thread ID: user1
This takes a bit longer than the previous one. In reality, it takes the normal time for a model running on a server without a GPU. The odd thing is when we deploy it on Gradio. I don't know what HuggingFace does behind the scenes, or maybe it's just a coincidence.
Conclusions
We have seen how to create a backend with an LLM, both by making calls to the HuggingFace Inference Endpoint and by making calls to a model running locally. We have seen how to do this with Gradio or with FastAPI, Langchain, and Docker.
From here you have the knowledge to deploy your own models, even if they are not LLMs, they could be multimodal models. From here you can do whatever you want.