Aviso: Este post foi traduzido para o português usando um modelo de tradução automática. Por favor, me avise se encontrar algum erro.
Neste post, vamos ver em que consiste a técnica de RAG (Retrieval Augmented Generation) e como ela pode ser implementada em um modelo de linguagem. Além disso, faremos isso com a arquitetura de RAG mais básica, chamada naive RAG.
Para que saia免费, em vez de usar uma conta da OpenAI (como você verá na maioria dos tutoriais), vamos usar o API inference do Hugging Face, que tem um free tier de 1000 requisições por dia, o que é mais do que suficiente para fazer este post.
(Note: There was a mistake in the translation. "免费" is Chinese for "free". The correct Portuguese word should be used instead.)
Here's the corrected version:
Para que saia grátis, em vez de usar uma conta da OpenAI (como você verá na maioria dos tutoriais), vamos usar o API inference do Hugging Face, que tem um free tier de 1000 requisições por dia, o que é mais do que suficiente para fazer este post.
Configuração da API Inference do Hugging Face
Para poder usar a API Inference da HuggingFace, o primeiro que você precisa é ter uma conta na HuggingFace. Uma vez que você tenha, é necessário ir para Access tokens nas configurações do seu perfil e gerar um novo token.
Temos que dar um nome. No meu caso, vou chamá-lo de rag-fundamentos e ativar a permissão Make calls to serverless Inference API. Isso criará um token que teremos que copiar.
Para gerenciar o token, vamos a criar um arquivo no mesmo caminho em que estamos trabalhando chamado ".env" e vamos colocar o token que copiamos no arquivo da seguinte maneira:
RAG_FUNDAMENTOS_TÉCNICAS_AVANÇADAS_TOKEN="hf_...."Agora, para poder obter o token, precisamos ter instalado dotenv, que instalamos através de
pip install python-dotenvE executamos o seguinte
import osimport dotenvdotenv.load_dotenv()RAG_FUNDAMENTALS_ADVANCE_TECHNIQUES_TOKEN = os.getenv("RAG_FUNDAMENTALS_ADVANCE_TECHNIQUES_TOKEN")Copied
Agora que temos um token, criamos um cliente. Para isso, precisamos ter a biblioteca huggingface_hub instalada. A instalamos através do conda ou pip.
conda install -c conda-forge huggingface_hubo
pip install --upgrade huggingface_hubAgora temos que escolher qual modelo vamos usar. Você pode ver os modelos disponíveis na página de Supported models da documentação da API Inference do Hugging Face.
Como na hora de escrever o post, o melhor disponível é Qwen2.5-72B-Instruct, vamos usar esse modelo.
MODEL = "Qwen/Qwen2.5-72B-Instruct"Copied
Agora podemos criar o cliente
from huggingface_hub import InferenceClientclient = InferenceClient(api_key=RAG_FUNDAMENTALS_ADVANCE_TECHNIQUES_TOKEN, model=MODEL)clientCopied
<InferenceClient(model='Qwen/Qwen2.5-72B-Instruct', timeout=None)>
Fazemos um teste para ver se funciona
message = [{ "role": "user", "content": "Hola, qué tal?" }]stream = client.chat.completions.create(messages=message,temperature=0.5,max_tokens=1024,top_p=0.7,stream=False)response = stream.choices[0].message.contentprint(response)Copied
¡Hola! Estoy bien, gracias por preguntar. ¿Cómo estás tú? ¿En qué puedo ayudarte hoy?
O que é RAG?
RAG são as siglas de Retrieval Augmented Generation, é uma técnica criada para obter informações de documentos. Embora os LLMs possam ser muito poderosos e ter muito conhecimento, nunca serão capazes de responder sobre documentos privados, como relatórios da sua empresa, documentação interna, etc. Por isso foi criado o RAG, para poder usar esses LLMs nessa documentação privada.
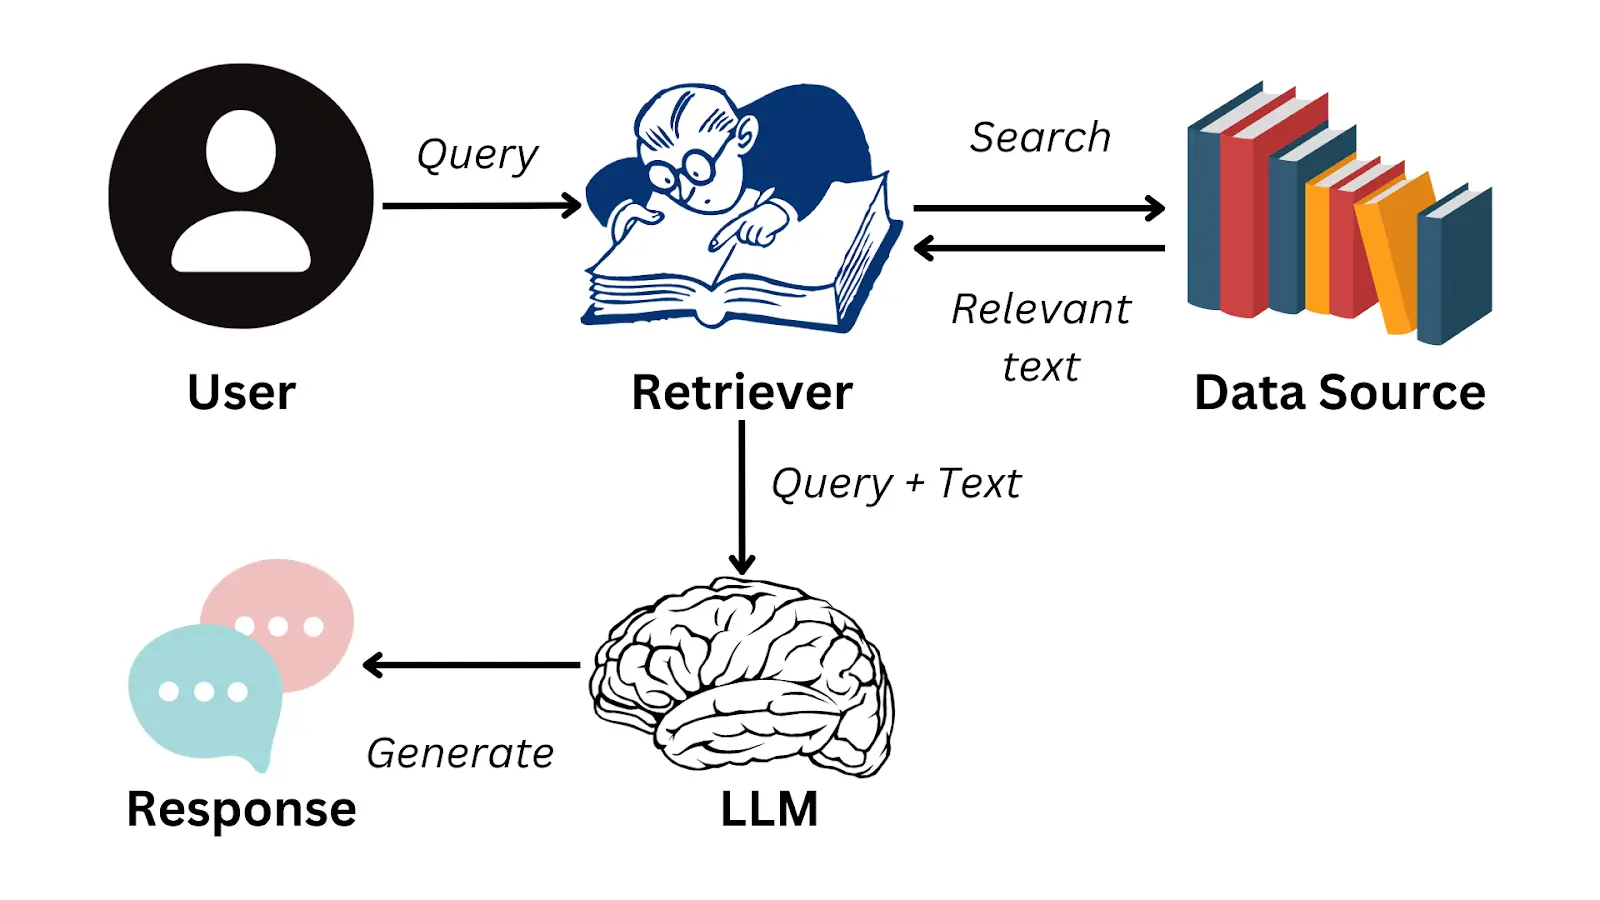
A ideia consiste em um usuário fazer uma pergunta sobre essa documentação privada, o sistema é capaz de obter a parte da documentação onde está a resposta para essa pergunta, passa-se ao LLM a pergunta e a parte da documentação e o LLM gera a resposta para o usuário.
Como a informação é armazenada?
É sabido, e se você não sabia, vou te contar agora, que os LLMs têm um limite de informação que podem receber, a isso se chama janela de contexto. Isso é devido às arquiteturas internas dos LLMs que, no momento, não vêm ao caso. Mas o importante é que não se pode passar um documento e uma pergunta assim, porque é provável que o LLM não seja capaz de processar toda essa informação.
Nos casos em que se passa mais informação do que o contexto da sua janela permite, geralmente acontece que o LLM não presta atenção ao final da entrada. Imagine que você pergunte ao LLM algo sobre seu documento, e essa informação esteja no final do documento e o LLM não a leia.
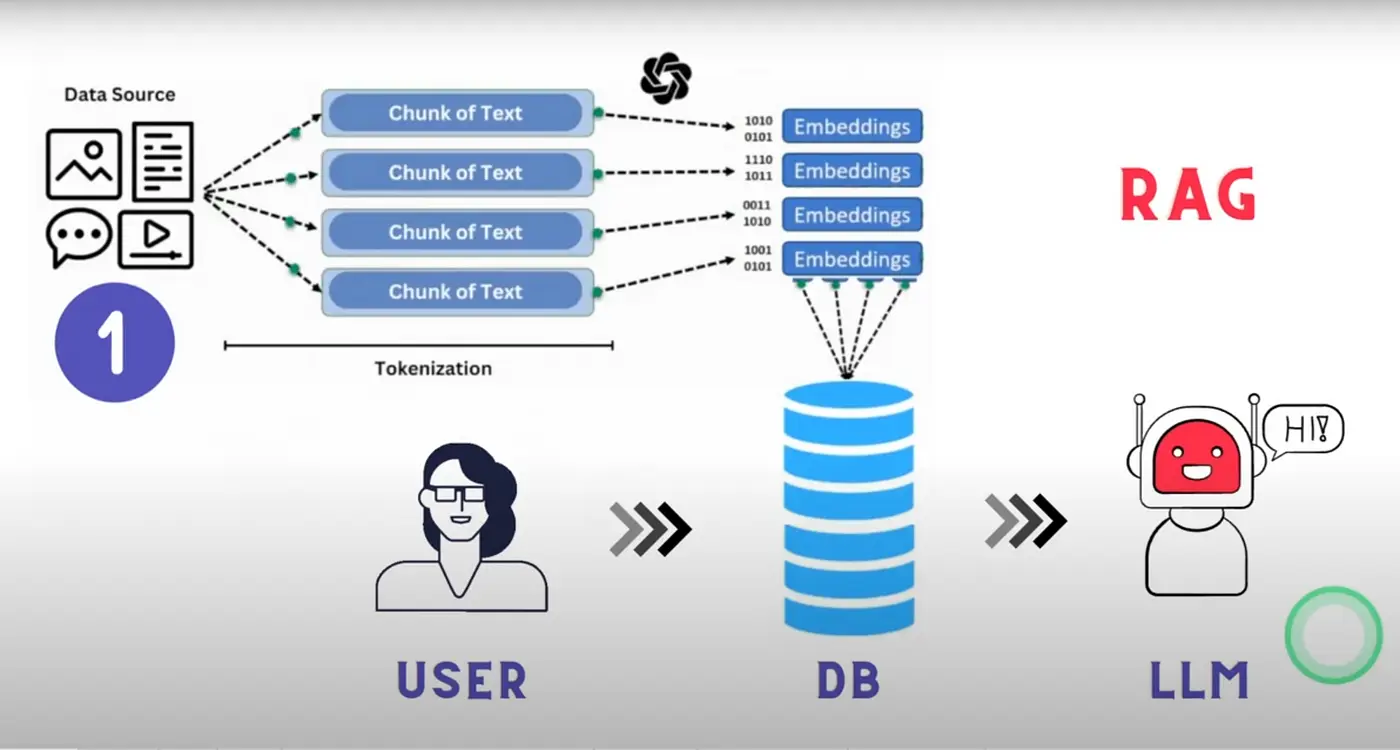
Por isso, o que se faz é dividir a documentação em blocos chamados chunks. Dessa forma, a documentação é armazenada em um monte de chunks, que são pedaços dessa documentação. Assim, quando o usuário faz uma pergunta, o chunk no qual está a resposta para essa pergunta é passado ao LLM.
Além de dividir a documentação em chunks, esses são convertidos em embeddings, que são representações numéricas dos chunks. Isso é feito porque os LLMs na verdade não entendem texto, mas sim números, e os chunks são convertidos em números para que o LLM possa entendê-los. Se quiser entender mais sobre os embeddings, você pode ler meu post sobre transformers no qual explico como funcionam os transformers, que é a arquitetura por trás dos LLMs. Você também pode ler meu post sobre ChromaDB onde explico como os embeddings são armazenados em um banco de dados vetorial. E seria interessante você ler meu post sobre a biblioteca HuggingFace Tokenizers na qual se explica como o texto é tokenizado, que é o passo anterior à geração dos embeddings.
Como obter o chunk correto?
Dissemos que a documentação é dividida em chunks e o chunk no qual está a resposta à pergunta do usuário é passado para o LLM. Mas, como se sabe em qual chunk está a resposta? Para isso, convertemos a pergunta do usuário em um embedding e calculamos a similaridade entre o embedding da pergunta e os embeddings dos chunks. Dessa forma, o chunk com maior similaridade é o que é passado para o LLM.

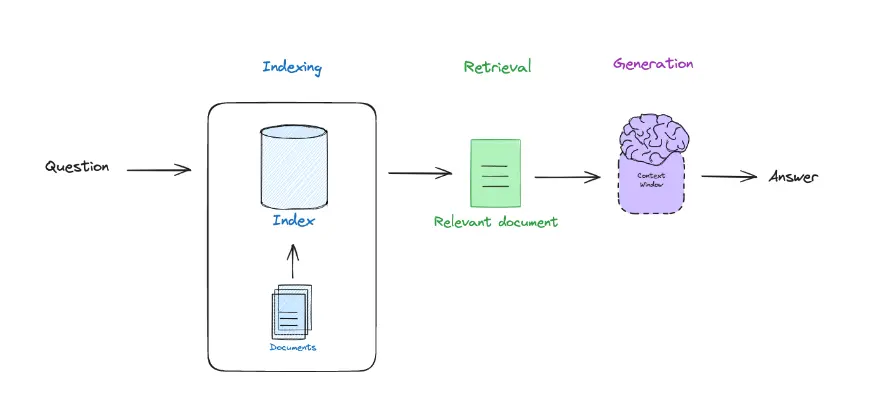
Vamos revisar o que é RAG
De um lado temos o retrieval, que é obter o chunk correto da documentação, do outro lado temos o augmented, que é passar para o LLM a pergunta do usuário e o chunk, e por último temos o generation, que é obter a resposta gerada pelo LLM.
Base de dados vetorial
Vimos que a documentação se divide em chunks e é armazenada em um banco de dados vetorial, portanto precisamos usar um. Para este post, vou usar ChromaDB, que é um banco de dados vetorial bastante usado e, além disso, tenho um post no qual explico como ele funciona.
Então primeiro precisamos instalar a biblioteca do ChromaDB, para isso a instalamos com Conda ou com pip
conda install conda-forge::chromadbo
pip install chromadbFunção de embedding
Como dissemos, tudo vai se basear em embeddings. Portanto, o primeiro passo é criar uma função para obter embeddings de um texto. Vamos usar o modelo sentence-transformers/all-MiniLM-L6-v2.
import chromadb.utils.embedding_functions as embedding_functionsEMBEDDING_MODEL = "sentence-transformers/all-MiniLM-L6-v2"huggingface_ef = embedding_functions.HuggingFaceEmbeddingFunction(api_key=RAG_FUNDAMENTALS_ADVANCE_TECHNIQUES_TOKEN,model_name=EMBEDDING_MODEL)Copied
Testamos a função de embedding
embedding = huggingface_ef(["Hello, how are you?",])embedding[0].shapeCopied
(384,)
Obtemos um embedding de dimensão 384. Embora a missão deste post não seja explicar os embeddings, em resumo, nossa função de embedding categorizou a frase Hello, how are you? em um espaço de 384 dimensões.
Cliente ChromaDB
Agora que temos nossa função de embedding, podemos criar um cliente de ChromaDB.
Primeiro criamos uma pasta onde será salva a base de dados vetorial
from pathlib import Pathchroma_path = Path("chromadb_persisten_storage")chroma_path.mkdir(exist_ok=True)Copied
Agora criamos o cliente
from chromadb import PersistentClientchroma_client = PersistentClient(path = str(chroma_path))Copied
Coleção
Quando temos o cliente do ChromaDB, a próxima coisa que precisamos fazer é criar uma coleção. Uma coleção é um conjunto de vetores, no nosso caso os chunks da documentação.
O criamos indicando a função de embedding que vamos usar
collection_name = "document_qa_collection"collection = chroma_client.get_or_create_collection(name=collection_name, embedding_function=huggingface_ef)Copied
Carregamento de documentos
Agora que criamos a base de dados vetorial, temos que dividir a documentação em chunks e salvá-los na base de dados vetorial.
Função de carregamento de documentos
Primeiro criamos uma função para carregar todos os documentos .txt de um diretório
def load_one_document_from_directory(directory, file):with open(os.path.join(directory, file), "r") as f:return {"id": file, "text": f.read()}def load_documents_from_directory(directory):documents = []for file in os.listdir(directory):if file.endswith(".txt"):documents.append(load_one_document_from_directory(directory, file))return documentsCopied
Função para dividir a documentação em chunks
Uma vez que temos os documentos, os dividimos em chunks
def split_text(text, chunk_size=1000, chunk_overlap=20):chunks = []start = 0while start < len(text):end = start + chunk_sizechunks.append(text[start:end])start = end - chunk_overlapreturn chunksCopied
Função para gerar embeddings de um chunk
Agora que temos os chunks, geramos os embeddings de cada um deles.
Mais tarde veremos por que, mas para gerar os embeddings vamos fazer isso localmente e não através da API do Hugging Face. Para isso, precisamos ter instalado PyTorch e sentence-transformers, para isso fazemos
pip install -U sentence-transformersfrom sentence_transformers import SentenceTransformerimport torchdevice = torch.device("cuda" if torch.cuda.is_available() else "cpu")embedding_model = SentenceTransformer(EMBEDDING_MODEL).to(device)def get_embeddings(text):try:embedding = embedding_model.encode(text, device=device)return embeddingexcept Exception as e:print(f"Error: {e}")exit(1)Copied
Vamos testar agora essa função de embeddings localmente
text = "Hello, how are you?"embedding = get_embeddings(text)embedding.shapeCopied
(384,)
Vemos que obtemos um embedding da mesma dimensão que quando o fazíamos com a API do Hugging Face
O modelo sentence-transformers/all-MiniLM-L6-v2 tem apenas 22M de parâmetros, portanto você será capaz de executá-lo em qualquer GPU. Mesmo se não tiver GPU, você ainda poderá executá-lo em uma CPU.
O LLM que vamos a usar para gerar as respostas, que é o Qwen2.5-72B-Instruct, como seu nome indica, é um modelo de 72B de parâmetros, por isso este modelo não pode ser executado em qualquer GPU e em uma CPU seria impensável devido à lentidão. Por isso, este LLM sim o usaremos através da API, mas na hora de gerar os embeddings podemos fazer localmente sem problema.
Documentos com os quais vamos testar
Para fazer todas essas verificações, baixei o conjunto de dados aws-case-studies-and-blogs e o coloquei na pasta rag-txt_dataset. Com os seguintes comandos, explico como baixá-lo e descompactá-lo.
Criamos a pasta onde vamos baixar os documentos
!mkdir rag_txt_datasetCopied
Baixamos o .zip com os documentos
!curl -L -o ./rag_txt_dataset/archive.zip https://www.kaggle.com/api/v1/datasets/download/harshsinghal/aws-case-studies-and-blogsCopied
% Total % Received % Xferd Average Speed Time Time Time CurrentDload Upload Total Spent Left Speed0 0 0 0 0 0 0 0 --:--:-- --:--:-- --:--:-- 0100 1430k 100 1430k 0 0 1082k 0 0:00:01 0:00:01 --:--:-- 2440k
Descompactamos o .zip
!unzip rag_txt_dataset/archive.zip -d rag_txt_datasetCopied
Archive: rag_txt_dataset/archive.zipinflating: rag_txt_dataset/23andMe Case Study _ Life Sciences _ AWS.txtinflating: rag_txt_dataset/36 new or updated datasets on the Registry of Open Data_ AI analysis-ready datasets and more _ AWS Public Sector Blog.txtinflating: rag_txt_dataset/54gene _ Case Study _ AWS.txtinflating: rag_txt_dataset/6sense Case Study.txtinflating: rag_txt_dataset/ADP Developed an Innovative and Secure Digital Wallet in a Few Months Using AWS Services _ Case Study _ AWS.txtinflating: rag_txt_dataset/AEON Case Study.txtinflating: rag_txt_dataset/ALTBalaji _ Amazon Web Services.txtinflating: rag_txt_dataset/AWS Case Study - Ineos Team UK.txtinflating: rag_txt_dataset/AWS Case Study - StreamAMG.txtinflating: rag_txt_dataset/AWS Case Study_ Creditsafe.txtinflating: rag_txt_dataset/AWS Case Study_ Immowelt.txtinflating: rag_txt_dataset/AWS Customer Case Study _ Kepler Provides Effective Monitoring of Elderly Care Home Residents Using AWS _ AWS.txtinflating: rag_txt_dataset/AWS announces 21 startups selected for the AWS generative AI accelerator _ AWS Startups Blog.txtinflating: rag_txt_dataset/AWS releases smart meter data analytics _ AWS for Industries.txtinflating: rag_txt_dataset/Accelerate Time to Business Value Using Amazon SageMaker at Scale with NatWest Group _ Case Study _ AWS.txtinflating: rag_txt_dataset/Accelerate Your Analytics Journey on AWS with DXC Analytics and AI Platform _ AWS Partner Network (APN) Blog.txt...inflating: rag_txt_dataset/Zomato Saves Big by Using AWS Graviton2 to Power Data-Driven Business Insights.txtinflating: rag_txt_dataset/Zoox Case Study _ Automotive _ AWS.txtinflating: rag_txt_dataset/e-banner Streamlines Its Contact Center Operations and Facilitates a Fully Remote Workforce with Amazon Connect _ e-banner Case Study _ AWS.txtinflating: rag_txt_dataset/iptiQ Case Study.txtinflating: rag_txt_dataset/mod.io Provides Low Latency Gamer Experience Globally on AWS _ Case Study _ AWS.txtinflating: rag_txt_dataset/myposter Case Study.txt
Apagamos o .zip
!rm rag_txt_dataset/archive.zipCopied
Vamos ver o que ficou.
!ls rag_txt_datasetCopied
'23andMe Case Study _ Life Sciences _ AWS.txt''36 new or updated datasets on the Registry of Open Data_ AI analysis-ready datasets and more _ AWS Public Sector Blog.txt''54gene _ Case Study _ AWS.txt''6sense Case Study.txt''Accelerate Time to Business Value Using Amazon SageMaker at Scale with NatWest Group _ Case Study _ AWS.txt''Accelerate Your Analytics Journey on AWS with DXC Analytics and AI Platform _ AWS Partner Network (APN) Blog.txt''Accelerating customer onboarding using Amazon Connect _ NCS Case Study _ AWS.txt''Accelerating Migration at Scale Using AWS Application Migration Service with 3M Company _ Case Study _ AWS.txt''Accelerating Time to Market Using AWS and AWS Partner AccelByte _ Omeda Studios Case Study _ AWS.txt''Achieving Burstable Scalability and Consistent Uptime Using AWS Lambda with TiVo _ Case Study _ AWS.txt''Acrobits Uses Amazon Chime SDK to Easily Create Video Conferencing Application Boosting Collaboration for Global Users _ Acrobits Case Study _ AWS.txt''Actuate AI Case study.txt''ADP Developed an Innovative and Secure Digital Wallet in a Few Months Using AWS Services _ Case Study _ AWS.txt''Adzuna doubles its email open rates using Amazon SES _ Adzuna Case Study _ AWS.txt''AEON Case Study.txt''ALTBalaji _ Amazon Web Services.txt''Amanotes Stays on Beat by Delivering Simple Music Games to Millions Worldwide on AWS.txt''Amazon OpenSearch Services vector database capabilities explained _ AWS Big Data Blog.txt''Anghami Case Study.txt''Announcing enhanced table extractions with Amazon Textract _ AWS Machine Learning Blog.txt'...'What Will Generative AI Mean for Your Business_ _ AWS Cloud Enterprise Strategy Blog.txt''Which Recurring Business Processes Can Small and Medium Businesses Automate_ _ AWS Smart Business Blog.txt'Windsor.txt'Wireless Car Case Study _ AWS IoT Core _ AWS.txt''Yamato Logistics (HK) case study.txt''Zomato Saves Big by Using AWS Graviton2 to Power Data-Driven Business Insights.txt''Zoox Case Study _ Automotive _ AWS.txt'
A criar os chunks!
Listamos os documentos com a função que havíamos criado
dataset_path = "rag_txt_dataset"documents = load_documents_from_directory(dataset_path)Copied
Verificamos que fizemos corretamente.
for document in documents[0:10]:print(document["id"])Copied
Run Jobs at Scale While Optimizing for Cost Using Amazon EC2 Spot Instances with ActionIQ _ ActionIQ Case Study _ AWS.txtRecommend and dynamically filter items based on user context in Amazon Personalize _ AWS Machine Learning Blog.txtWindsor.txtBank of Montreal Case Study _ AWS.txtThe Mill Adventure Case Study.txtOptimize software development with Amazon CodeWhisperer _ AWS DevOps Blog.txtAnnouncing enhanced table extractions with Amazon Textract _ AWS Machine Learning Blog.txtTHREAD _ Life Sciences _ AWS.txtDeep Pool Optimizes Software Quality Control Using Amazon QuickSight _ Deep Pool Case Study _ AWS.txtUpstox Saves 1 Million Annually Using Amazon S3 Storage Lens _ Upstox Case Study _ AWS.txt
Agora criamos os chunks.
chunked_documents = []for document in documents:chunks = split_text(document["text"])for i, chunk in enumerate(chunks):chunked_documents.append({"id": f"{document['id']}_{i}", "text": chunk})Copied
len(chunked_documents)Copied
3611
Como vemos, há 3611 chunks. Como o limite diário da API do Hugging Face são 1000 chamadas na conta gratuita, se quisermos criar embeddings de todos os chunks, acabaríamos com as chamadas disponíveis e além disso não poderíamos criar embeddings de todos os chunks
Reiteramos, este modelo de embeddings é muito pequeno, com apenas 22M de parâmetros, portanto pode ser executado em quase qualquer computador, mais rápido ou mais devagar, mas pode ser executado.
Como só vamos a criar os embeddings dos chunks uma vez, mesmo que não tenhamos um computador muito potente e leve muito tempo, apenas será executado uma vez. Depois, quando quisermos fazer perguntas sobre a documentação, geraremos os embeddings do prompt com a API da Hugging Face e usaremos o LLM com a API. Portanto, só teremos que passar pelo processo de geração dos embeddings dos chunks uma vez.
Geramos os embeddings dos chunks
Última biblioteca que precisaremos instalar. Como o processo de geração dos embeddings dos chunks será lento, vamos instalar tqdm para mostrar uma barra de progresso. Instalamos com Conda ou pip, conforme sua preferência.
conda install conda-forge::tqdmo
pip install tqdmGeramos os embeddings dos chunks
import tqdmprogress_bar = tqdm.tqdm(chunked_documents)for chunk in progress_bar:embedding = get_embeddings(chunk["text"])if embedding is not None:chunk["embedding"] = embeddingelse:print(f"Error with document {chunk['id']}")Copied
100%|██████████| 3611/3611 [00:16<00:00, 220.75it/s]
Vemos um exemplo
from random import randintidx = randint(0, len(chunked_documents))print(f"Chunk id: {chunked_documents[idx]['id']}, text: {chunked_documents[idx]['text']}, embedding shape: {chunked_documents[idx]['embedding'].shape}")Copied
Chunk id: BNS Group Case Study _ Amazon Web Services.txt_0,text: Reducing Virtual Machines from 40 to 12The founders of BNS had been contemplating a migration from the company’s on-premises data center to the public cloud and observed a growing demand for cloud-based operations among current and potential BNS customers.FrançaisConfigures security according to cloud best practicesClive Pereira, R&D director at BNS Group, explains, “The database that records Praisal’s SMS traffic resides in Praisal’s AWS environment. Praisal can now run complete analytics across its data and gain insights into what’s happening with its SMS traffic, which is a real game-changer for the organization.”EspañolAWS ISV Accelerate ProgramReceiving Strategic, Foundational Support from ISV SpecialistsLearn MoreThe value that AWS places on the ISV stream sealed the deal in our choice of cloud provider.”日本語Contact SalesBNS is an Australian software provider focused on secure enterprise SMS and fax messaging. Its software runs on the Windows platform and is l,embedding shape: (384,)
Carregar os chunks na base de dados vetorial
Uma vez que temos todos os chunks gerados, os carregamos na base de dados vetorial. Voltamos a usar tqdm para mostrar uma barra de progresso, pois isso também será lento.
import tqdmprogress_bar = tqdm.tqdm(chunked_documents)for chunk in progress_bar:collection.upsert(ids=[chunk["id"]],documents=chunk["text"],embeddings=chunk["embedding"],)Copied
100%|██████████| 3611/3611 [00:59<00:00, 60.77it/s]
Perguntas
Agora que temos a base de dados vetorial, podemos fazer perguntas à documentação. Para isso, precisamos de uma função que nos retorne o chunk correto.
Obter o chunk correto
Agora precisamos de uma função que nos retorne o chunk correto, vamos criá-la
def get_top_k_documents(query, k=5):results = collection.query(query_texts=query, n_results=k)return resultsCopied
Por último, criamos uma query.
Para gerar a query, selecionei aleatoriamente o documento Using Amazon EC2 Spot Instances and Karpenter to Simplify and Optimize Kubernetes Infrastructure _ Neeva Case Study _ AWS.txt, passei-o para um LLM e pedi que gerasse uma pergunta sobre o documento. A pergunta que foi gerada é
Como a Neeva utilizou o Karpenter e as Instâncias Spot do Amazon EC2 para melhorar sua gestão de infraestrutura e otimização de custos?Então obtemos os chunks mais relevantes diante dessa pergunta.
query = "How did Neeva use Karpenter and Amazon EC2 Spot Instances to improve its infrastructure management and cost optimization?"top_chunks = get_top_k_documents(query=query, k=5)Copied
Vamos a ver quais chunks nos foram devolvidos
for i in range(len(top_chunks["ids"][0])):print(f"Rank {i+1}: {top_chunks['ids'][0][i]}, distance: {top_chunks['distances'][0][i]}")Copied
Rank 1: Using Amazon EC2 Spot Instances and Karpenter to Simplify and Optimize Kubernetes Infrastructure _ Neeva Case Study _ AWS.txt_0, distance: 0.29233667254447937Rank 2: Using Amazon EC2 Spot Instances and Karpenter to Simplify and Optimize Kubernetes Infrastructure _ Neeva Case Study _ AWS.txt_5, distance: 0.4007825255393982Rank 3: Using Amazon EC2 Spot Instances and Karpenter to Simplify and Optimize Kubernetes Infrastructure _ Neeva Case Study _ AWS.txt_1, distance: 0.4317566752433777Rank 4: Using Amazon EC2 Spot Instances and Karpenter to Simplify and Optimize Kubernetes Infrastructure _ Neeva Case Study _ AWS.txt_6, distance: 0.43832334876060486Rank 5: Using Amazon EC2 Spot Instances and Karpenter to Simplify and Optimize Kubernetes Infrastructure _ Neeva Case Study _ AWS.txt_4, distance: 0.44625571370124817
Como eu havia dito, o documento que escolhi aleatoriamente era Using Amazon EC2 Spot Instances and Karpenter to Simplify and Optimize Kubernetes Infrastructure _ Neeva Case Study _ AWS.txt e, como se pode ver, os chunks que nos foram retornados são desse documento. Isso significa que, dos mais de 3000 chunks que havia no banco de dados, ele foi capaz de me retornar os chunks mais relevantes para essa pergunta, parece que isso funciona!
Gerar a resposta
Como já temos os chunks mais relevantes, passamo-los ao LLM, juntamente com a pergunta, para que ele gere uma resposta.
def generate_response(query, relevant_chunks, temperature=0.5, max_tokens=1024, top_p=0.7, stream=False):context = " ".join([chunk for chunk in relevant_chunks])prompt = f"You are an assistant for question-answering. You have to answer the following question: {query} Answer the question with the following information: {context}"message = [{ "role": "user", "content": prompt }]stream = client.chat.completions.create(messages=message,temperature=temperature,max_tokens=max_tokens,top_p=top_p,stream=stream,)response = stream.choices[0].message.contentreturn responseCopied
Testamos a função
response = generate_response(query, top_chunks["documents"][0])print(response)Copied
Neeva, a cloud-native, ad-free search engine founded in 2019, has leveraged Karpenter and Amazon EC2 Spot Instances to significantly improve its infrastructure management and cost optimization. Here’s how:### Early Collaboration with KarpenterIn late 2021, Neeva began working closely with the Karpenter team, experimenting with and contributing fixes to an early version of Karpenter. This collaboration allowed Neeva to integrate Karpenter with its Kubernetes dashboard, enabling the company to gather valuable metrics on usage and performance.### Combining Spot Instances and On-Demand InstancesNeeva runs its jobs on a large scale, which can lead to significant costs. To manage these costs effectively, the company adopted a combination of Amazon EC2 Spot Instances and On-Demand Instances. Spot Instances allow Neeva to bid on unused EC2 capacity, often at a fraction of the On-Demand price, while On-Demand Instances provide the necessary reliability for critical pipelines.### Flexibility and Instance DiversificationAccording to Mohit Agarwal, infrastructure engineering lead at Neeva, Karpenter's adoption of best practices for Spot Instances, including flexibility and instance diversification, has been crucial. This approach ensures that Neeva can dynamically adjust its compute resources to meet varying workloads while minimizing costs.### Improved Scalability and AgilityBy using Karpenter to provision infrastructure resources for its Amazon EKS clusters, Neeva has achieved several key benefits:- **Scalability**: Neeva can scale its compute resources up or down as needed, ensuring that it always has the necessary capacity to handle its workloads.- **Agility**: The company can iterate quickly and democratize infrastructure changes, reducing the time spent on systems administration by up to 100 hours per week.### Enhanced Development CyclesThe integration of Karpenter and Spot Instances has also accelerated Neeva's development cycles. The company can now launch new features and improvements more rapidly, which is essential for maintaining a competitive edge in the search engine market.### Cost Savings and Budget ControlUsing Spot Instances, Neeva has been able to stay within its budget while meeting its performance requirements. This cost optimization is critical for a company that prioritizes user-first experiences and has no competing incentives from advertising.### Future PlansNeeva is committed to continuing its innovation and expansion. The company plans to launch in new regions and further improve its search engine, all while maintaining cost efficiency. As Mohit Agarwal notes, "The bulk of our compute is or will be managed using Karpenter going forward."### ConclusionBy leveraging Karpenter and Amazon EC2 Spot Instances, Neeva has not only optimized its infrastructure costs but also enhanced its scalability, agility, and development speed. This strategic approach has positioned Neeva to deliver high-quality, ad-free search experiences to its users while maintaining a strong focus on cost control and innovation.
Quando pedi ao LLM para gerar uma pergunta sobre o documento, também pedi que gerasse a resposta correta. Esta é a resposta que o LLM me deu.
A Neeva utilizou o Karpenter e as Instâncias Spot do Amazon EC2 para melhorar sua gestão de infraestrutura e otimização de custos de várias maneiras:

Gestão Simplificada de Instâncias:

Karpenter: Ao adotar o Karpenter, a Neeva simplificou o processo de provisionamento e gerenciamento de recursos computacionais para seus clusters do Amazon EKS. O Karpenter provisiona e desprovisiona instâncias automaticamente com base na carga de trabalho, eliminando a necessidade de configurações manuais e reduzindo a complexidade de compreender diferentes instâncias computacionais.
Instâncias Spot: A Neeva utilizou Instâncias Spot do Amazon EC2, que são capacidade não utilizada do EC2 disponível com um desconto significativo (até 90% de economia de custos). Isso permitiu à empresa controlar os custos enquanto atendia aos seus requisitos de desempenho.
Escalabilidade Aumentada:

Karpenter: A capacidade do Karpenter de escalar recursos dinamicamente permitiu que a Neeva iniciasse novas instâncias rapidamente, permitindo que a empresa iterasse com maior velocidade e executasse mais experimentos em menos tempo.
Instâncias Spot: O uso de Instâncias Spot proporcionou flexibilidade e diversificação de instâncias, facilitando o escalonamento dos recursos de computação da Neeva de forma eficiente.
Produtividade Melhorada:

Karpenter: Ao democratizar as alterações de infraestrutura, o Karpenter permitiu que qualquer engenheiro modificasse as configurações do Kubernetes, reduzindo a dependência de expertise especializada. Isso economizou até 100 horas por semana de tempo de espera em administração de sistemas para a equipe da Neeva.
Instâncias Spot: A capacidade de provisionar e desprovisionar rapidamente Instâncias Spot reduziu os atrasos no pipeline de desenvolvimento, garantindo que os trabalhos não ficassem travados devido à falta de recursos disponíveis.
Eficiência Custo:

Karpenter: As melhores práticas do Karpenter para instâncias Spot, incluindo flexibilidade e diversificação de instâncias, ajudaram a Neeva a usar essas instâncias de forma mais eficaz, permanecendo dentro do orçamento.
Instâncias Spot: As economias de custos com o uso de Instâncias Spot permitiram que a Neeva executasse trabalhos em larga escala, como indexação, por quase o mesmo custo, mas em um tempo muito menor. Por exemplo, a Neeva reduziu seus trabalhos de indexação de 18 horas para apenas 3 horas.
Melhor Utilização de Recursos:

Karpenter: O Karpenter proporcionou uma melhor visibilidade sobre o uso de recursos computacionais, permitindo que a Neeva rastreasse e otimizasse seu consumo de recursos mais de perto.
Instâncias Spot: A combinação do Karpenter e das Instâncias Spot permitiu que a Neeva executasse modelos de linguagem grandes de forma mais eficiente, melhorando a experiência de busca para seus usuários.
Em resumo, a adoção do Karpenter e das Instâncias Spot do Amazon EC2 pela Neeva melhorou significativamente sua gestão de infraestrutura, otimização de custos e eficiência geral no desenvolvimento, permitindo que a empresa oferecesse melhores experiências de pesquisa sem anúncios aos seus usuários.
E esta tem sido a resposta gerada pelo nosso RAG
Neeva, um mecanismo de busca nativo em nuvem e sem anúncios fundado em 2019, aproveitou o Karpenter e as Instâncias Spot do Amazon EC2 para melhorar significativamente sua gestão de infraestrutura e otimização de custos. Eis como:

### Colaboração Inicial com o Karpenter
No final de 2021, a Neeva começou a trabalhar em estreita colaboração com a equipe do Karpenter, experimentando e contribuindo com correções para uma versão inicial do Karpenter. Essa colaboração permitiu que a Neeva integrasse o Karpenter ao seu painel do Kubernetes, possibilitando à empresa coletar métricas valiosas sobre uso e desempenho.

### Combinando Instâncias Spot e Instâncias On-Demand
A Neeva executa seus jobs em larga escala, o que pode levar a custos significativos. Para gerenciar esses custos de forma eficaz, a empresa adotou uma combinação de Amazon EC2 Spot Instances e On-Demand Instances. As Spot Instances permitem que a Neeva lance lances sobre capacidade EC2 não utilizada, frequentemente por uma fração do preço On-Demand, enquanto as On-Demand Instances fornecem a necessária confiabilidade para pipelines críticos.

### Flexibilidade e Diversificação de Instâncias
De acordo com Mohit Agarwal, líder de engenharia de infraestrutura da Neeva, a adoção de melhores práticas para Instâncias Spot pelo Karpenter, incluindo flexibilidade e diversificação de instâncias, foi crucial. Essa abordagem garante que a Neeva possa ajustar dinamicamente seus recursos de computação para atender às cargas de trabalho variáveis, minimizando custos.

### Melhor Escalabilidade e Agilidade
Ao usar o Karpenter para provisionar recursos de infraestrutura para seus clusters do Amazon EKS, a Neeva alcançou vários benefícios importantes:
- **Escalabilidade**: O Neeva pode escalar seus recursos de computação para cima ou para baixo conforme necessário, garantindo que sempre tenha a capacidade necessária para lidar com suas cargas de trabalho.
- **Agilidade**: A empresa pode iterar rapidamente e democratizar as mudanças de infraestrutura, reduzindo o tempo gasto com a administração do sistema em até 100 horas por semana.

### Ciclos de Desenvolvimento AperfeiçoadosA integração do Karpenter e das Instâncias Spot também acelerou os ciclos de desenvolvimento da Neeva. A empresa agora pode lançar novos recursos e melhorias mais rapidamente, o que é essencial para manter uma vantagem competitiva no mercado de motores de busca.

### Economia de Custos e Controle Orçamentário
Usando Instâncias Spot, a Neeva tem conseguido permanecer dentro do seu orçamento enquanto atende aos seus requisitos de desempenho. Essa otimização de custos é crucial para uma empresa que prioriza experiências centradas no usuário e não possui incentivos conflitantes provenientes da publicidade.

### Planos Futuros
A Neeva está comprometida em continuar sua inovação e expansão. A empresa planeja lançar em novas regiões e melhorar ainda mais seu mecanismo de busca, mantendo a eficiência de custos. Como Mohit Agarwal observa, "A maior parte do nosso compute será gerenciada usando Karpenter a partir de agora."

### Conclusão
Ao aproveitar o Karpenter e as Instâncias Spot do Amazon EC2, a Neeva não apenas otimizou seus custos de infraestrutura, mas também melhorou sua escalabilidade, agilidade e velocidade de desenvolvimento. Esta abordagem estratégica posicionou a Neeva para fornecer experiências de pesquisa de alta qualidade e sem anúncios aos seus usuários, mantendo um forte foco no controle de custos e inovação.
Portanto, podemos concluir que o RAG funcionou corretamente!!!
Limites de naive RAG
Como dissemos, hoje explicamos naive RAG, que é a arquitetura mais simples do RAG, mas tem suas limitações.
As limitações desta arquitetura são:
Limites na busca de informações (retriever)
- Conhecimento limitado do contexto e da documentação: Quando o sistema de RAG ingênuo busca os chunks, ele procura aqueles que têm um significado semântico similar ao prompt, mas não é capaz de saber quais são os mais relevantes para a pergunta do usuário, ou quais são os que possuem informações mais atualizadas, ou se sua informação é mais correta do que a de outros chunks. Por exemplo, se um usuário perguntar sobre os problemas dos adoçantes no sistema digestivo, o RAG ingênuo pode retornar documentos sobre adoçantes ou sobre o sistema digestivo, mas não é capaz de saber que os documentos sobre o sistema digestivo são os mais relevantes para a pergunta do usuário. Outro exemplo é se o usuário perguntar sobre os últimos avanços na IA, mas o RAG ingênuo não é capaz de saber quais são os últimos papers da base de dados.
- Não há uma sincronização entre o retrieval e o gerador. Como vimos, são dois sistemas independentes; de um lado, o retrieval busca os documentos mais semelhantes à pergunta do usuário, e esses documentos são passados ao gerador, que gera uma resposta.
- Escalabilidade ineficiente para grandes bancos de dados. Como a recuperação busca os documentos com maior similaridade semântica em toda a base de dados, quando esta fica muito grande, podemos ter tempos de pesquisa muito longos.
- Pouca adaptação à pergunta do usuário. Se o usuário fizer uma pergunta que envolva vários documentos, ou seja, não há nenhum documento que contenha toda a informação da pergunta do usuário, o sistema recuperará todos esses documentos e os passará para o gerador, que pode usá-los ou não. Ou, em um caso pior, pode deixar de lado algum documento relevante para gerar a resposta.
Limites na geração de respostas (generator)
- O modelo poderia alucinar respostas mesmo ao fornecer informações relevantes.
- O modelo pode estar limitado por questões relacionadas a ódio, discriminação, etc.
Para ultrapassar esses limites, geralmente são utilizadas técnicas como o
- Pré-recuperação: Que inclui técnicas para melhorar a indexação, tornando a busca de informações mais eficiente. Ou técnicas como a melhoria da pergunta do usuário para que o retrieval possa encontrar os documentos mais relevantes.
- Pós-recuperação: Aqui são utilizadas técnicas como o re-ranqueamento dos documentos, que é uma técnica usada para melhorar a busca por informações relevantes


